Sreeram Viswanath
Expert
Published on: Apr 21, 2026
e Verification of ITR - How to e-Verify Income Tax Return (ITR)
Filing your Income Tax Return (ITR) is an essential step in fulfilling your tax obligations, but the process doesn’t end with submitting your return. To ensure its validity, e-Verification is required. e-Verification is a secure, convenient, and efficient way to confirm the authenticity of your ITR without the need for physical paperwork. This article will guide you through the different methods of e-Verification, prerequisites, and detailed steps to make the process seamless and hassle-free.
What is e Verification of ITR?
e-Verification of Income Tax Return (ITR) is the process of verifying the authenticity of your ITR after you have submitted it online. It is a crucial step that ensures the Income Tax Department acknowledges and processes your filed return. Without completing the e-Verification, your ITR will be treated as invalid, and the department will not proceed with any further actions like processing refunds.
e-Verification is an electronic process that allows taxpayers to confirm their ITR using various methods. By completing the e-Verification process, you ensure that your ITR is valid and the necessary actions are carried out, such as processing refunds and addressing any discrepancies in the return.
Importance of e-verification of ITR
Income Tax Return (ITR) verification is a crucial step in the tax filing process, as it ensures the authenticity and correctness of the information provided in the return. Here's why it's important:
- Completing the Filing Process: The verification of ITR ensures that the return you’ve filed is valid. Without verification, your ITR will be considered incomplete or invalid.
- Legal Requirement: According to tax laws, verification is mandatory. Failing to verify your ITR within the prescribed time frame can lead to penalties or the rejection of your return.
- e-Verification for Convenience: e-Verification is the easiest and fastest method to complete this process. You can verify your return using various methods such as an Aadhaar OTP, net banking, bank account number, or through a digital signature.
- Verification of Other Services: In addition to verifying the ITR, you may also need to verify other services such as:
- Income Tax Forms: If you're submitting forms through the online portal or offline utility.
- e-Proceedings: Verifying responses during tax proceedings.
- Refund Reissue Requests: To ensure the correct processing of refund requests.
- Rectification Requests: If you need to correct any mistakes or discrepancies in the original ITR.
- Condonation of Delay: If you miss the due date for filing the ITR, you can seek approval for late filing, which also requires verification.
- Service Requests: Submitting and verifying various requests like those made by External Representing Individuals (ERIs).
- Uploading ITR in Bulk: ERIs can also verify multiple ITR submissions at once.
Overall, verification is an essential step that ensures that all submitted tax information is authentic and that the process is completed correctly.
ITR e-Verification Time Limit
The Central Board of Direct Taxes (CBDT) has revised the time limit for e-verification of Income Tax Returns (ITR). The new time frame mandates that ITR must be verified within 30 days from the date of submission. This change applies to returns filed online on or after 1st August 2022, reducing the previous time limit of 120 days.
Different Ways to e-Verify Your Income Tax Return (ITR)
You can e-Verify your returns through any of the following methods:
- OTP on Mobile Number Registered with Aadhaar: A one-time password (OTP) is sent to your Aadhaar-linked mobile number.
- EVC through Pre-validated Bank Account: Generate an Electronic Verification Code (EVC) using your bank account that has been pre-validated on the Income Tax portal.
- EVC through Pre-validated Demat Account: Use your demat account (once pre-validated) to generate an EVC.
- EVC through ATM (Offline Method): Some banks allow you to generate an EVC at an ATM using your debit card.
- Net Banking: Log in through your bank’s net banking portal and access the Income Tax e-filing portal to verify your return.
- Digital Signature Certificate (DSC): Use a registered DSC to digitally sign and verify your ITR, typically used by professionals or companies.
Prerequisites for e-Verification of Income Tax Return (ITR)
Before you proceed with e-Verifying your ITR, ensure that the following general and method-specific requirements are met:
General Prerequisites:
- Registered User: You must be a registered user on the Income Tax e-Filing portal with a valid user ID and password.
- Acknowledgement Number: If you're e-Verifying without logging in, you'll need the acknowledgement number of your filed return.
- Filed Return: You or your ERI (e-Return Intermediary) must have filed the return to initiate e-Verification.
e-Verification Methods & Their Prerequisites:
e-Verification Method | Prerequisites |
Digital Signature Certificate (DSC) | Valid and active DSC The Emsigner utility is installed and running on your PC The DSC USB token is plugged into your PC The DSC obtained from a Certifying Authority Class 2 or Class 3 DSC |
OTP on Mobile Number Linked with Aadhaar | PAN must be linked with Aadhaar Aadhaar-linked mobile number must be active |
Bank Account EVC / Demat Account EVC | Bank/demat account must be pre-validated and EVC-enabled on the e-Filing portal |
Net Banking | PAN must be linked to your bank account Net banking must be enabled for that account |
Make sure all the necessary linkages (PAN-Aadhaar, PAN-bank, etc.) and validations are completed beforehand for a smooth e-Verification process.
Procedure for e-Verifying Income Tax Return (ITR)
The e-Verification process ensures that your Income Tax Return (ITR) is validated electronically. Here’s a step-by-step guide on how to e-Verify your ITR using both the pre-login and post-login methods:
e-Verify Income Tax Return Pre-Login Method
This method allows you to verify your Income Tax Return without logging into the e-Filing portal—just enter a few basic details and verify using an OTP.
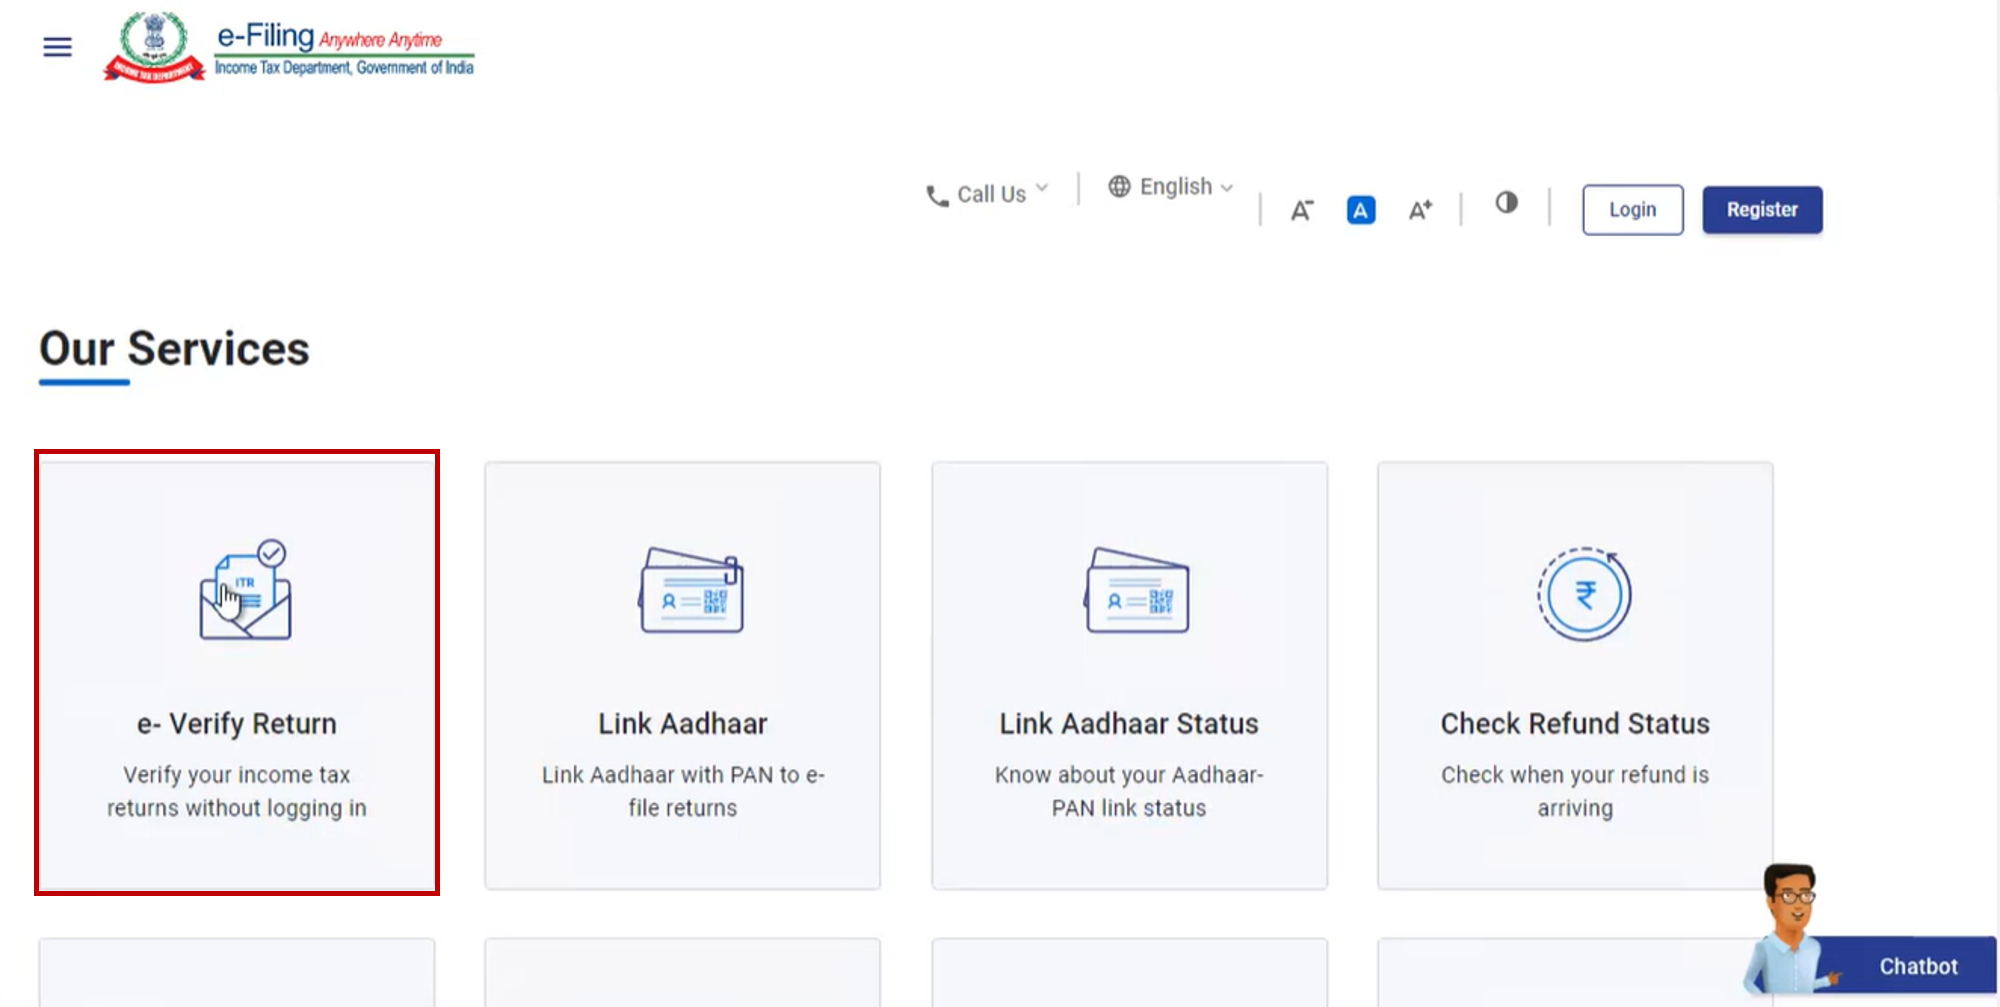
Step 1: Visit the e-Filing portal homepage and click on e-Verify Return.
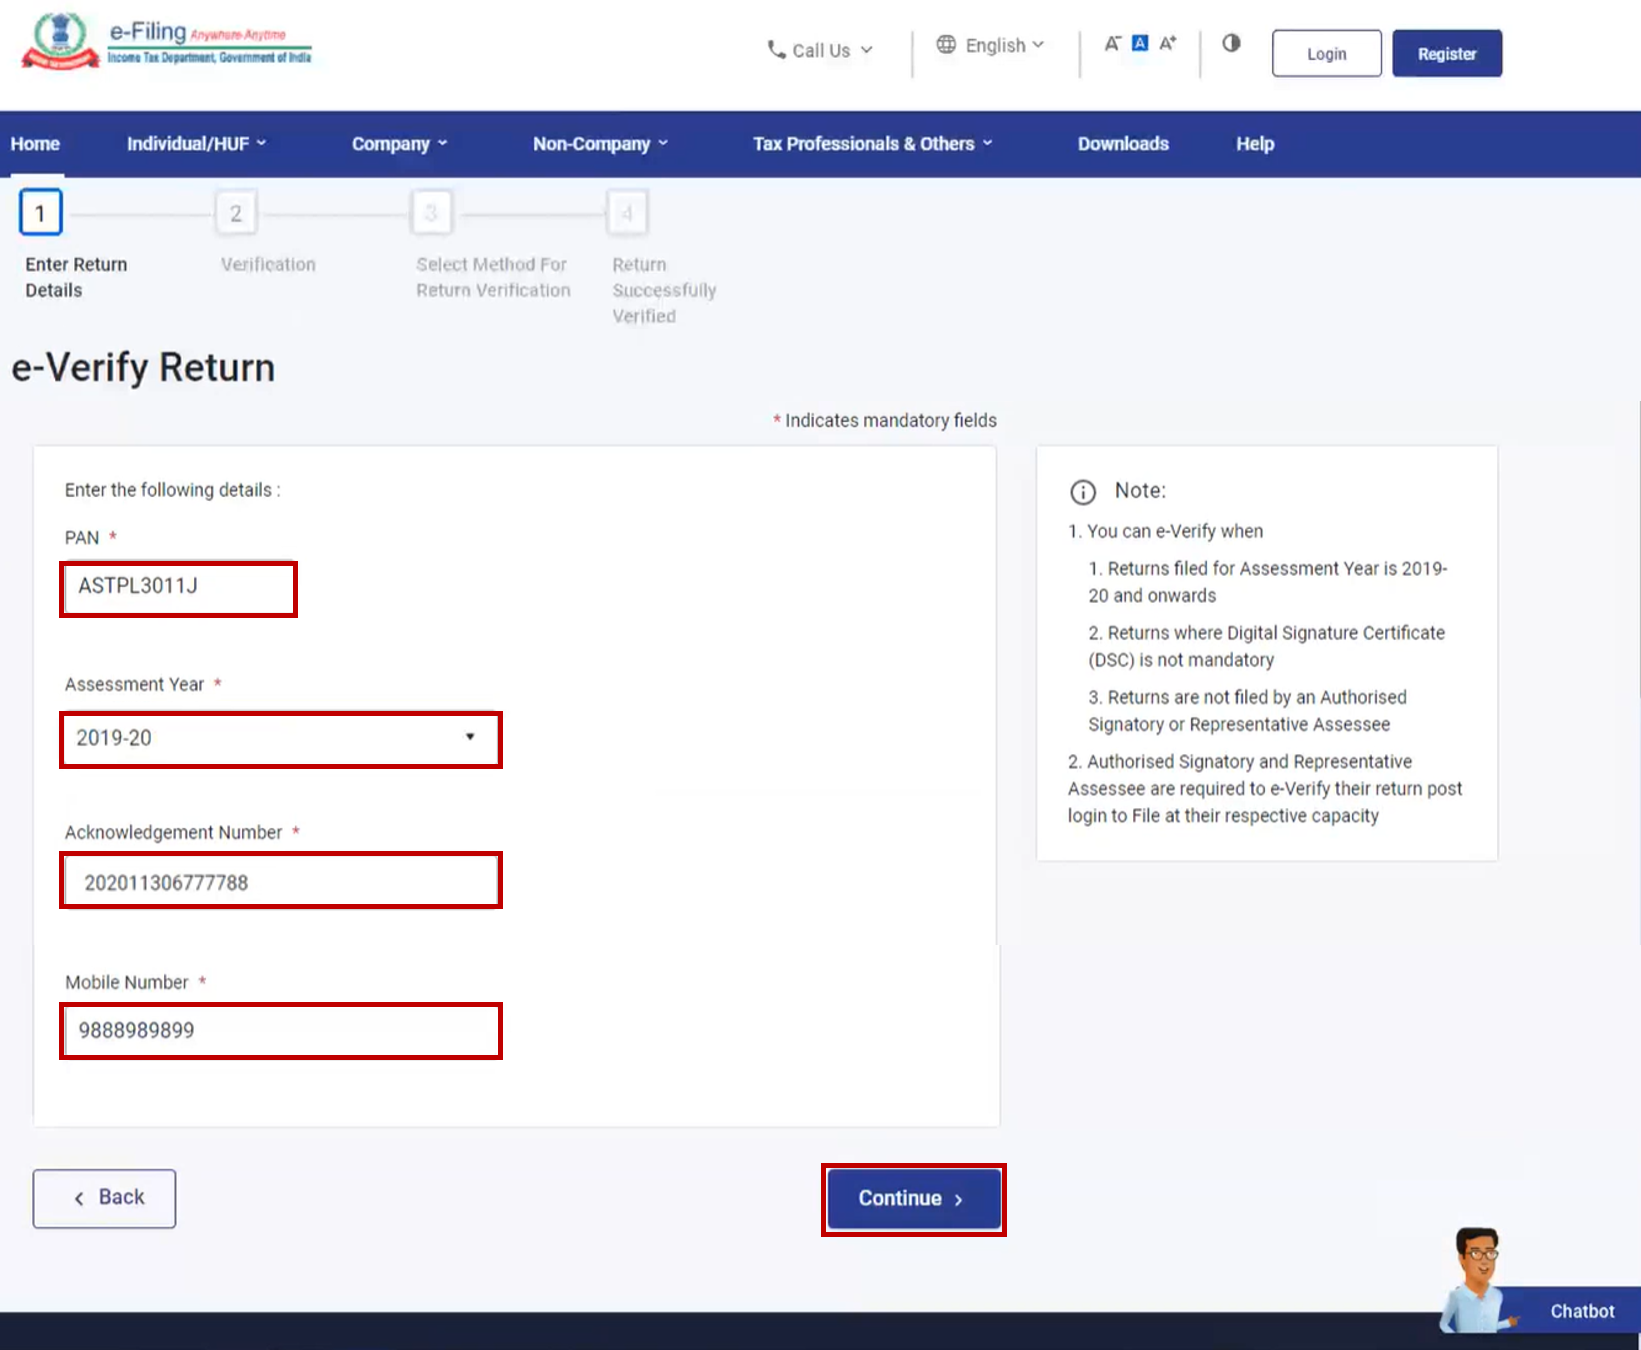
Step 2: On the e-Verify Return page, provide the following details:
- PAN
- Assessment Year
- Acknowledgement Number of the filed ITR
- Mobile Number accessible to youThen, click Continue.
Step 3: Enter the 6-digit OTP received on the mobile number entered in Step 2.
Important Notes:
- The OTP is valid for 15 minutes only.
- You have three attempts to enter the correct OTP.
- A countdown timer will indicate the OTP’s expiration time.
- To receive a new OTP, click Resend OTP.

Step 4: Click Submit to proceed.
Next Steps Based on Timeframe of Verification:
If you’re verifying | Proceed to |
After 120 / 30 days of filing the return | Step 5 (Condonation) |
Within 120 / 30 days of filing the return | Skip to Step 7 |
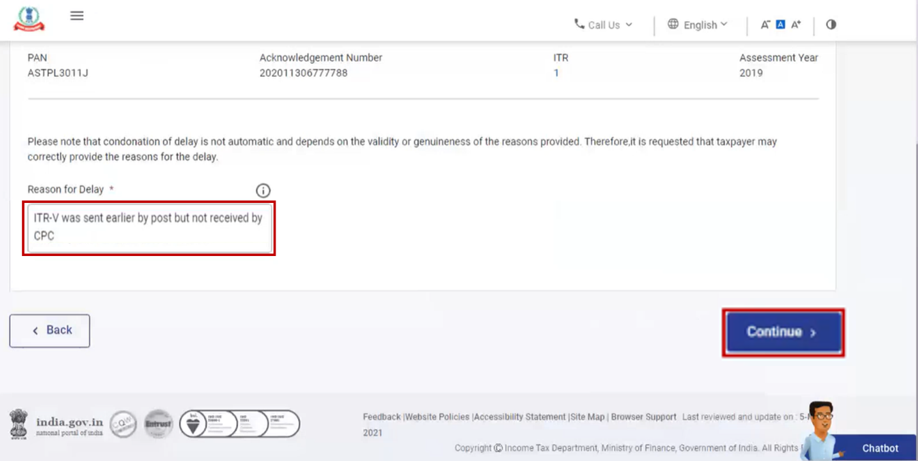
Step 5: If verifying after the allowed period, click OK when prompted.

Step 6: To submit a Condonation of Delay request:
- Choose the appropriate Reason for Delay from the dropdown.
- If selecting Others, enter the reason in the Remarks field. Then, click Continue.
Step 7: Choose any one of the methods to complete e-Verification. Below, we’ve provided a detailed procedure for each available method.
e-Verify Income Tax Return Post-Login Method
This method allows you to verify your ITR after logging in to the Income Tax e-Filing portal using your credentials. Follow the steps below to complete the process.
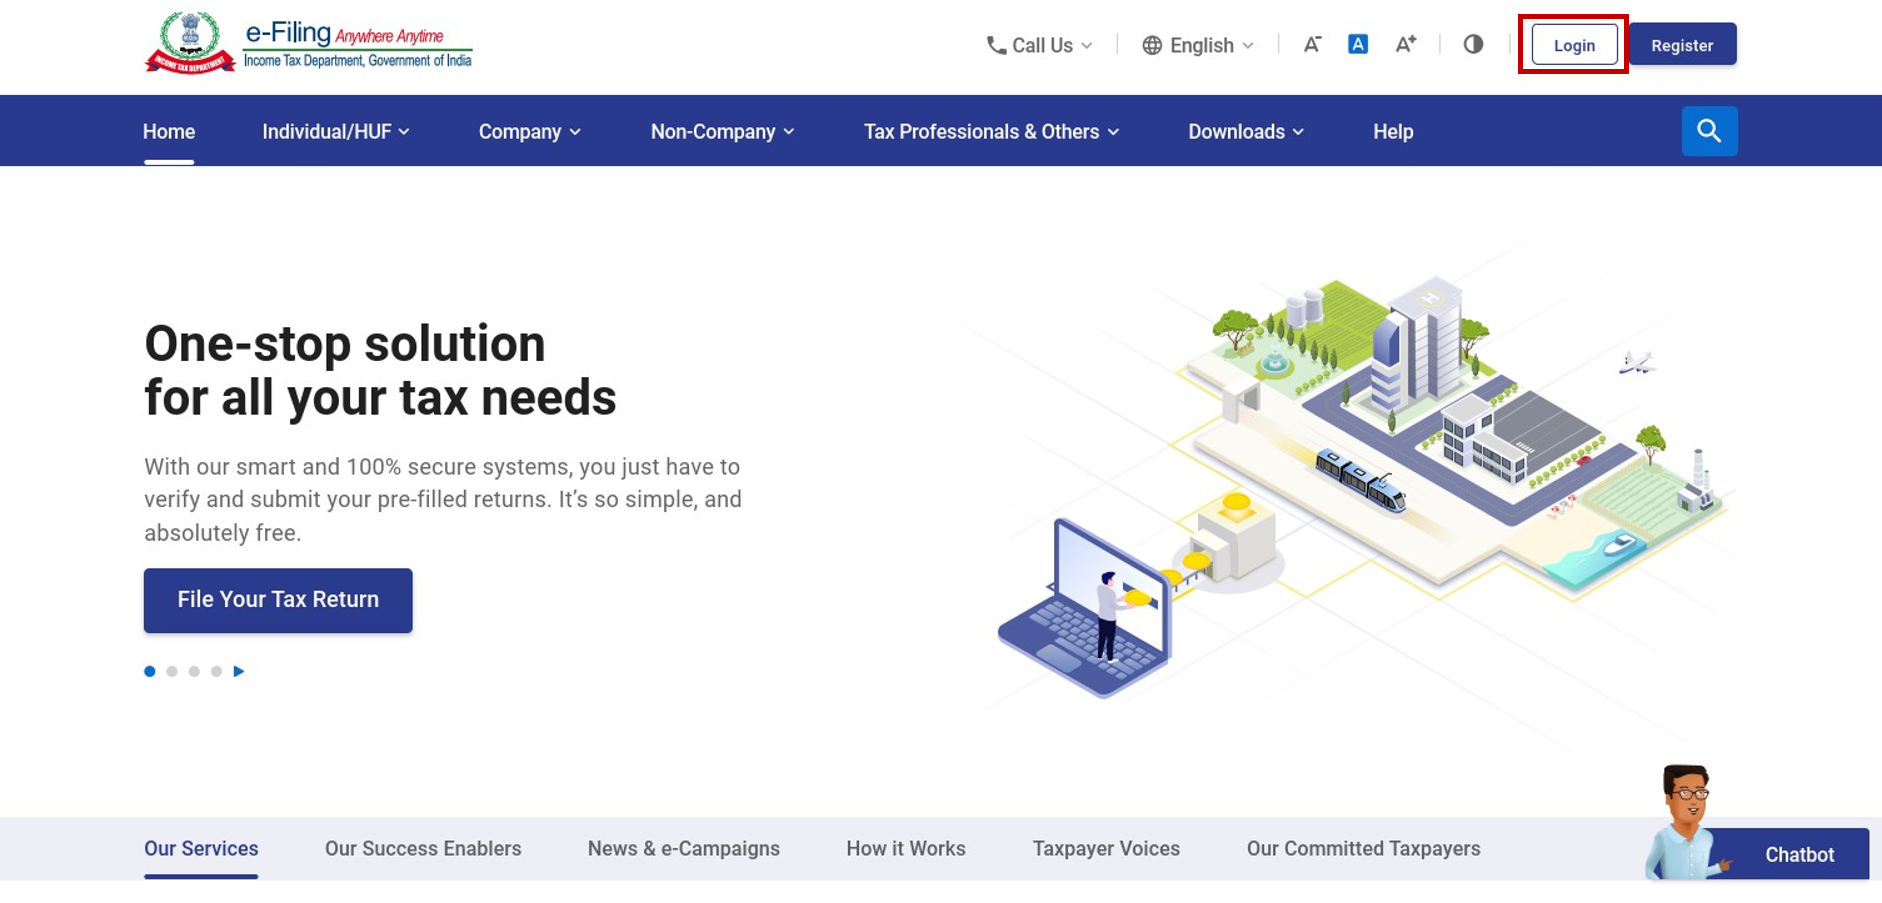
Step 1: Log in to the e-Filing portal using your user ID and password.
Step 2: Navigate to e-File > Income Tax Return > e-Verify Return.
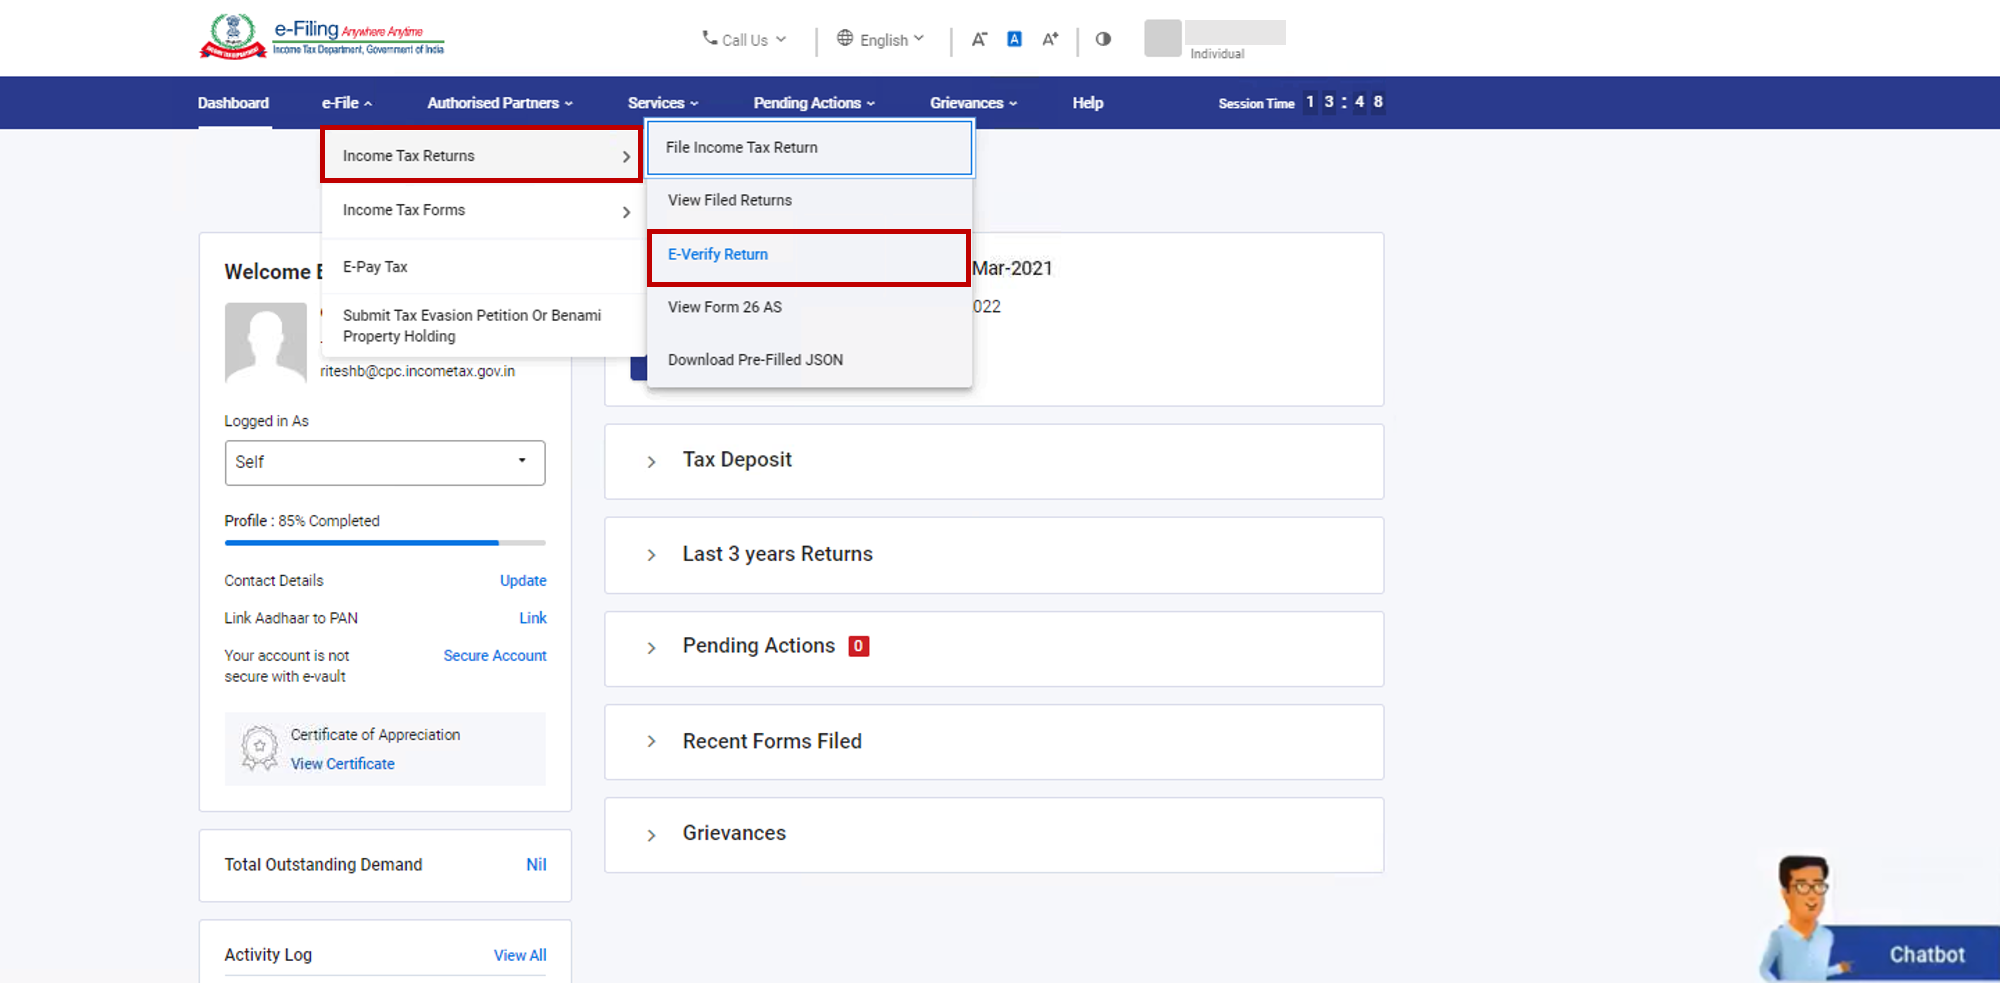
Step 3: On the e-Verify Return page, click on e-Verify next to the unverified return.
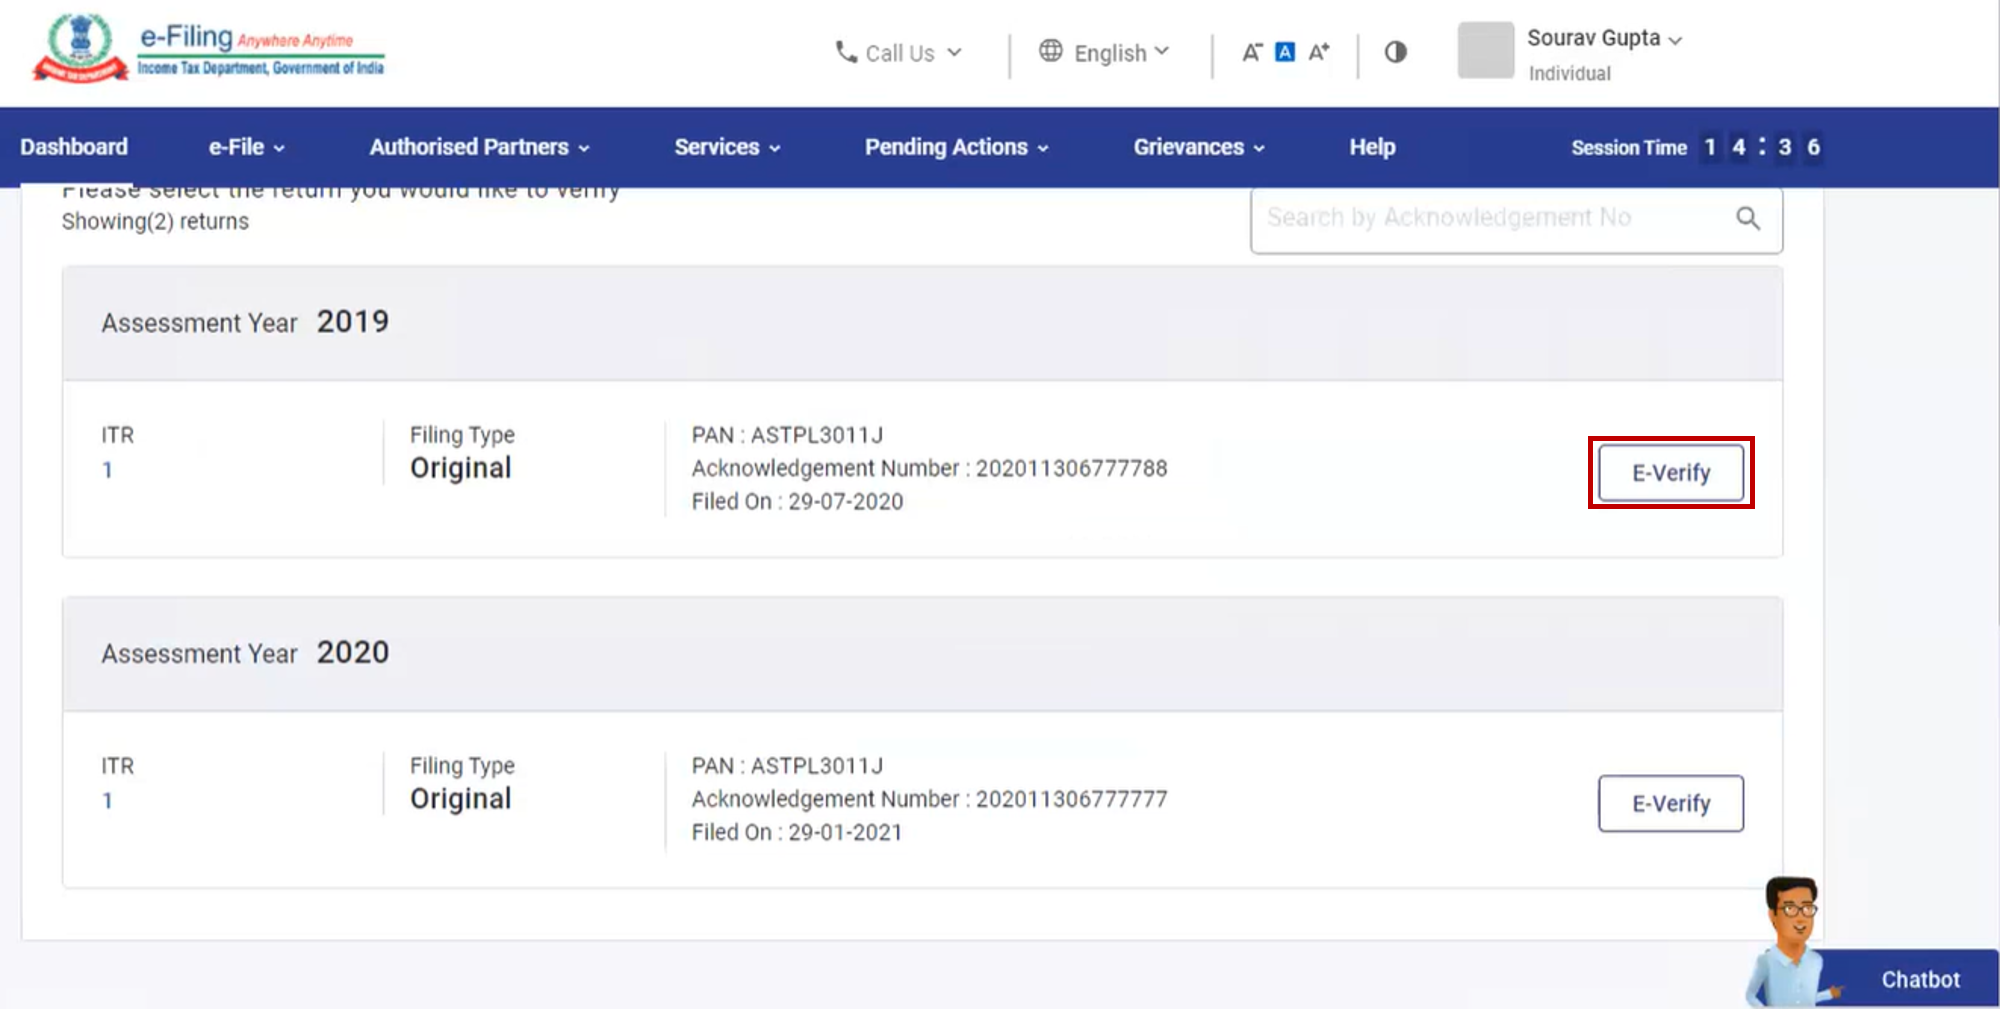
Next Steps Based on Timeframe of Verification:
If you’re verifying | Proceed to |
After 120 / 30 days of filing the return | Step 4 (Condonation) |
Within 120 / 30 days of filing the return | Go directly to Step 6 |
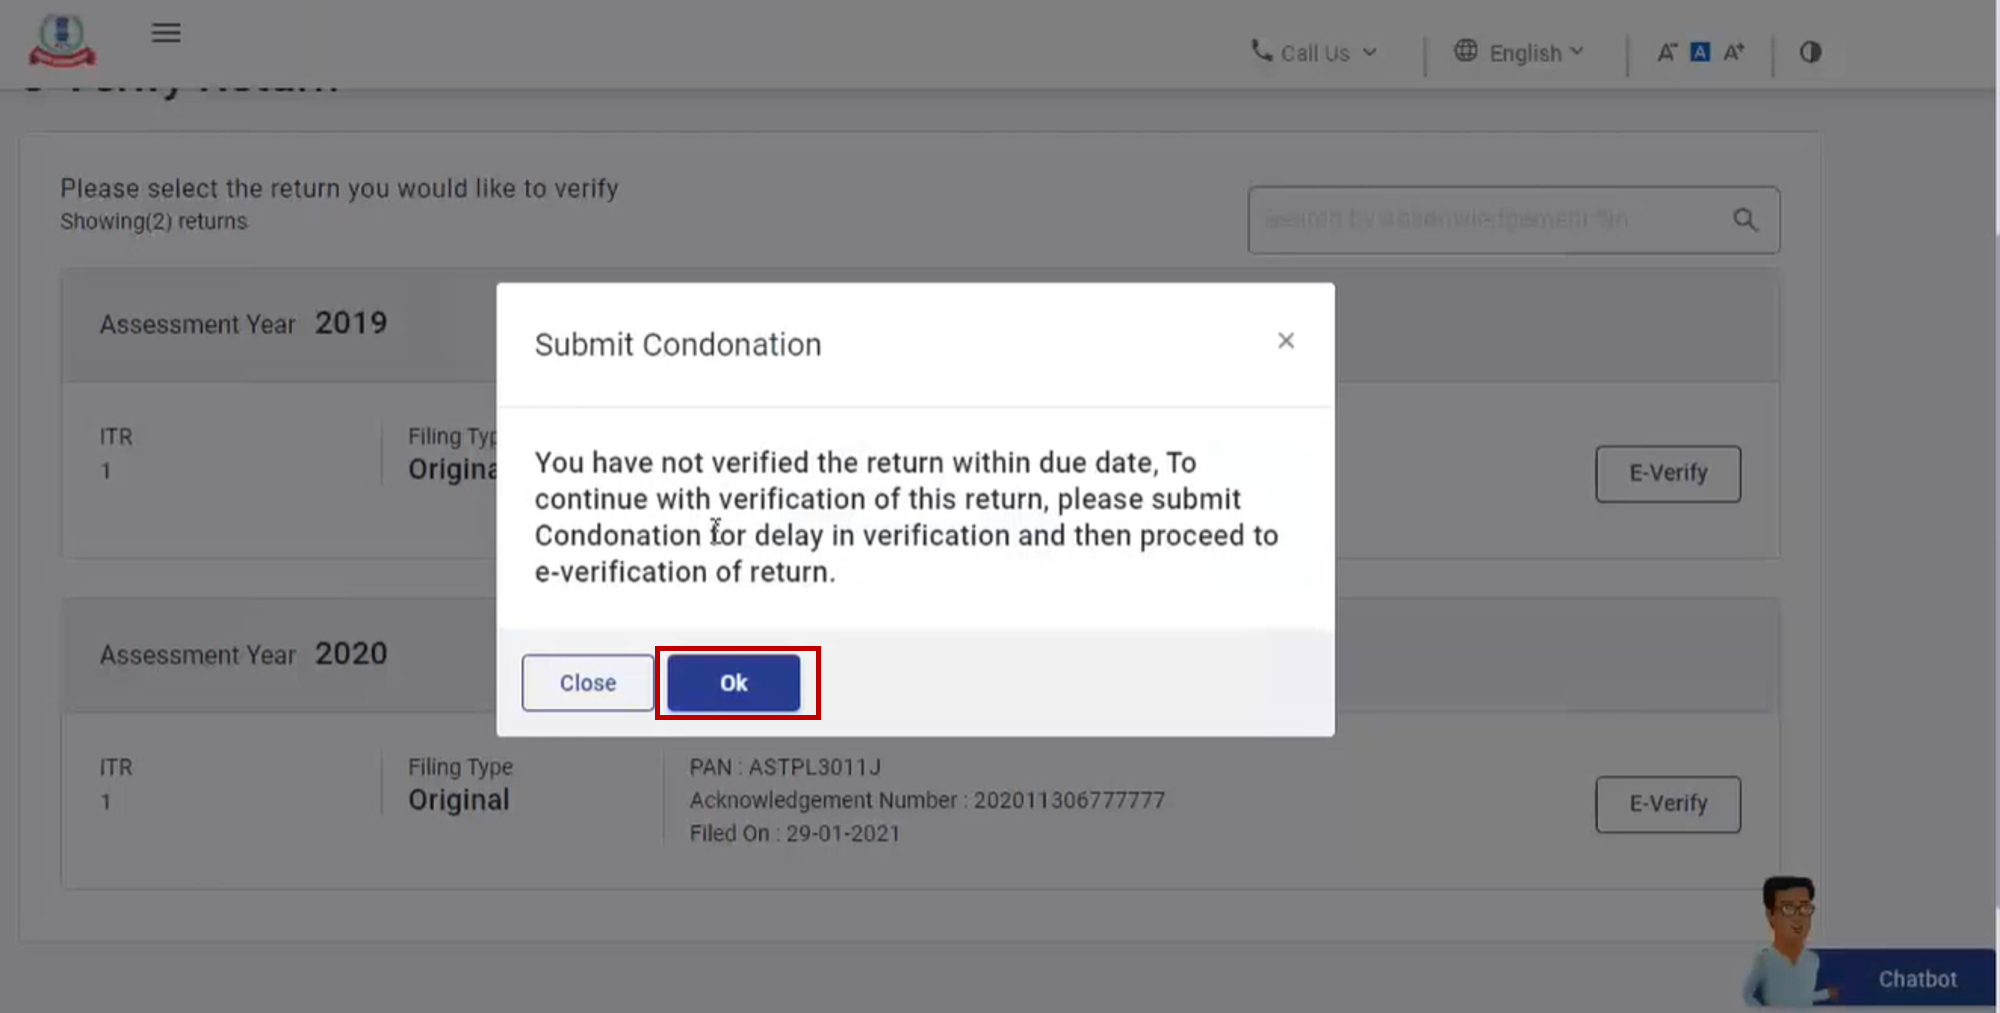
Step 4: If verifying after 120 / 30 days of filing, click OK when prompted.
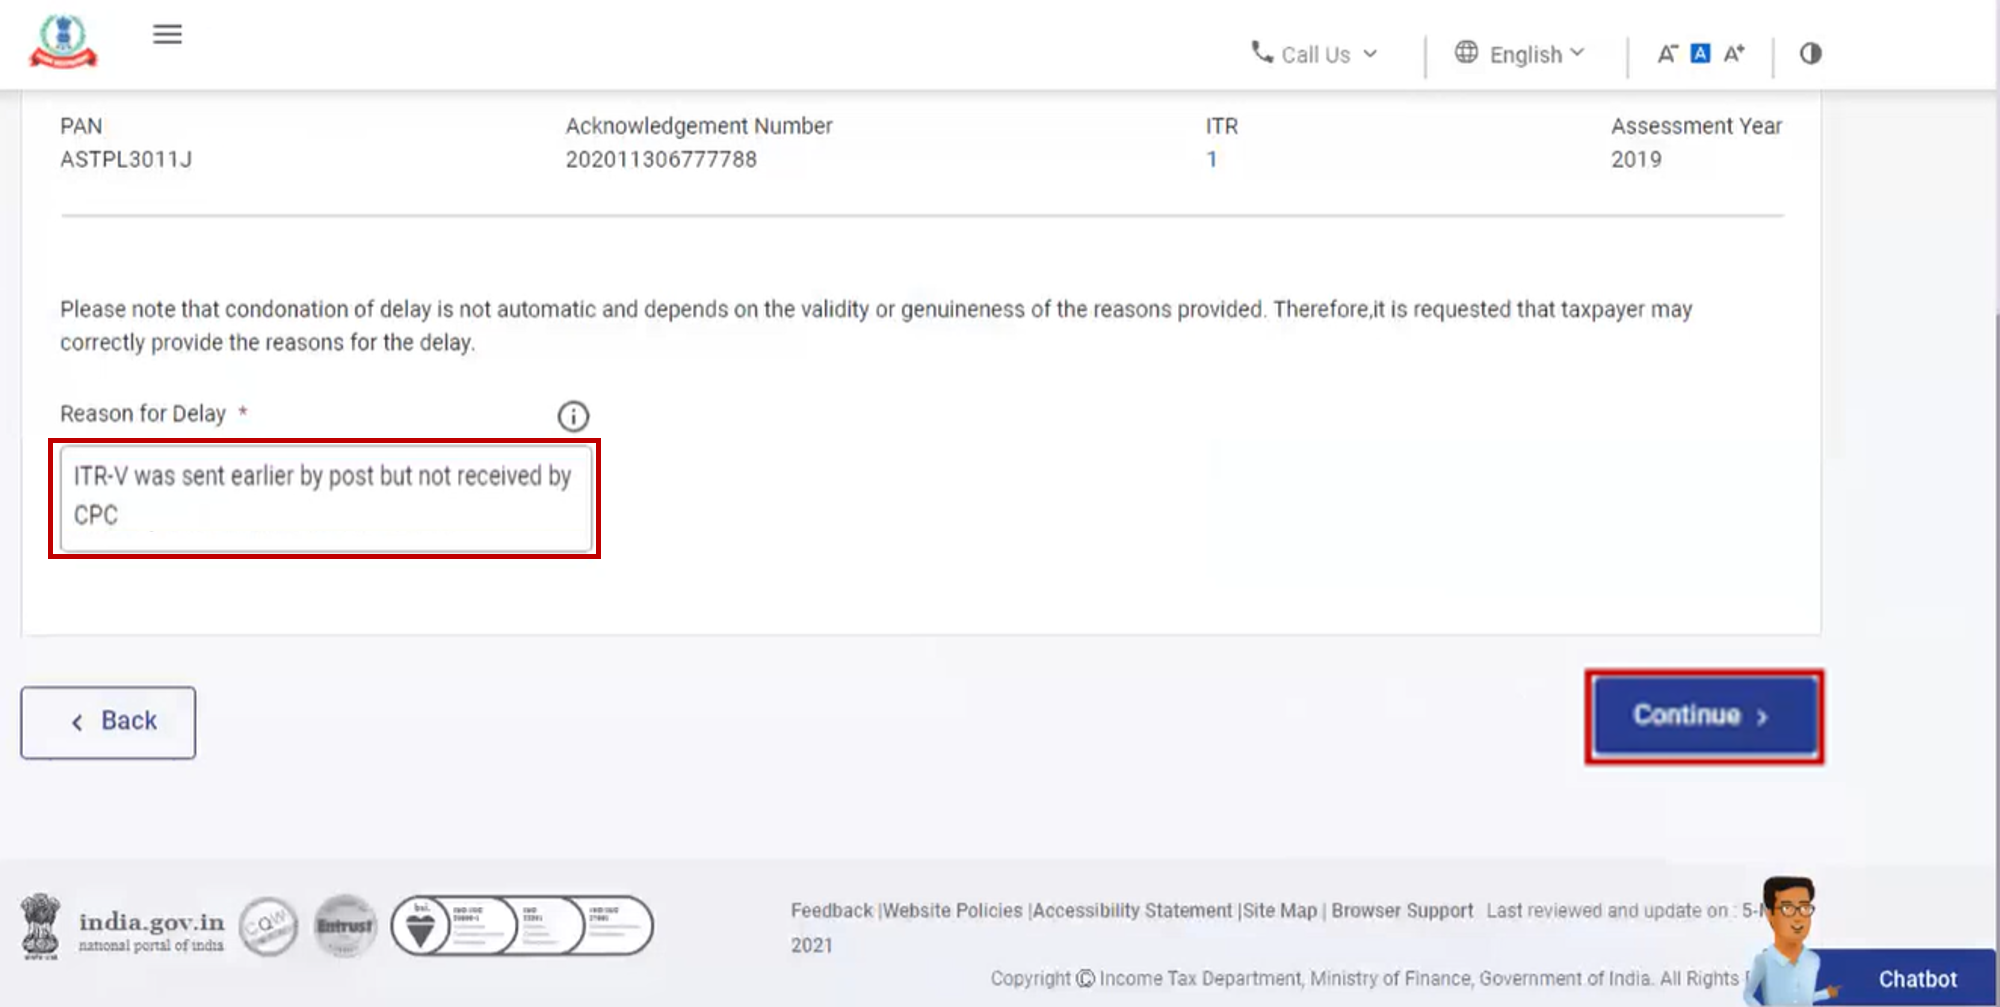
Step 5: To submit a Condonation of Delay request:
- Select the appropriate Reason for Delay from the dropdown.
- If Others is selected, enter the reason in the Remarks field. Then, click Continue.
Step 6:Choose any one of the methods to complete e-Verification. Below, we’ve provided a detailed procedure for each available method.
Method 1: e-Verification of ITR Using DSC
You can e-Verify your Income Tax Return using a Digital Signature Certificate (DSC) if you choose to verify your ITR immediately after filing.
Note: If you select e-Verify Later while submitting your ITR, you will not be able to use DSC for verification later on.
Step-by-Step Process:
- Step 1: On the e-Verify page, select: “I would like to e-Verify using Digital Signature Certificate (DSC)”
- Step 2: On the Verify Your Identity page, click: “Click here to download emsigner utility”
- Step 3: Once you've downloaded and installed the emsigner utility, go back to the Verify Your Identity page. Check the box: “I have downloaded and installed emsigner utility” and click Continue.
- Step 4: On the Data Sign page:
- Select your DSC Provider
- Choose your Certificate
- Enter the Provider Password
- Click Sign
A success message will appear, along with a Transaction ID. Keep this Transaction ID safe for future reference. You’ll also receive a confirmation email and SMS on your registered contact details.
Method 2: e-Verify ITR Using Aadhaar OTP
Follow the steps below to e-Verify your Income Tax Return using an OTP sent to your Aadhaar-linked mobile number.
Step-by-Step Process:
- Step 1: On the e-Verify page, choose: “I would like to verify using OTP on mobile number registered with Aadhaar” and click Continue.
- Step 2: On the Aadhaar OTP page, tick the checkbox that says: “I agree to validate my Aadhaar details”, then click Generate Aadhaar OTP.
- Step 3: Enter the 6-digit OTP received on your Aadhaar-linked mobile number and click Validate.
Important Notes:
- The OTP is valid for 15 minutes.
- You have a maximum of 3 attempts to enter the correct OTP.
- A countdown timer on the screen shows how long the OTP remains valid.
- If needed, click Resend OTP to receive a fresh one.
- Upon successful validation, a confirmation message will appear along with a Transaction ID.
Make sure to note down the Transaction ID for future reference. You’ll also receive a confirmation via email and SMS on your registered contact details.
Method 3: e-Verify Using an Existing Aadhaar OTP
If you already have a valid OTP sent to your Aadhaar-linked mobile number, you can use it to e-Verify your Income Tax Return by following these steps:
Step-by-Step Process:
- Step 1: On the e-Verify page, select: “I already have an OTP on mobile number registered with Aadhaar”.
- Step 2: Enter the 6-digit OTP you already received and click Continue.
Important Notes:
- The OTP is valid for 15 minutes only.
- You have up to 3 attempts to enter the correct OTP.
- A countdown timer on the screen will show the remaining time before the OTP expires.
- If you click Resend OTP, a new OTP will be generated and sent to your Aadhaar-linked mobile number.
- Once validated, a success message will be displayed along with a Transaction ID.
Method 4: e-Verification of ITR Using EVC
If you already have a valid EVC, you can quickly e-Verify your Income Tax Return using the following steps:
Step-by-Step Process:
- Step 1: On the e-Verify page, select: “I already have an Electronic Verification Code (EVC)”
- Step 2: Enter the EVC in the designated textbox and click Continue.
A success message will appear, along with a Transaction ID and the EVC used.
Method 5: e-Verification of ITR After Generating EVC Through Bank Account
You can e-Verify your Income Tax Return using an EVC sent to your mobile number and email ID linked to your pre-validated, EVC-enabled bank account.
Step-by-Step Process:
Step 1: On the e-Verify page, select “Through Bank Account” and click Continue.
Note:
- An EVC will be generated and sent to your registered mobile number and email ID associated with your validated bank account.
- If your bank account isn't pre-validated or EVC-enabled, refer to the My Bank Account user manual to complete the process before proceeding.
Step 2: Enter the EVC received on your mobile and email in the Enter EVC textbox, then click e-Verify.
Upon successful verification, a success message will appear along with a Transaction ID and the EVC used.
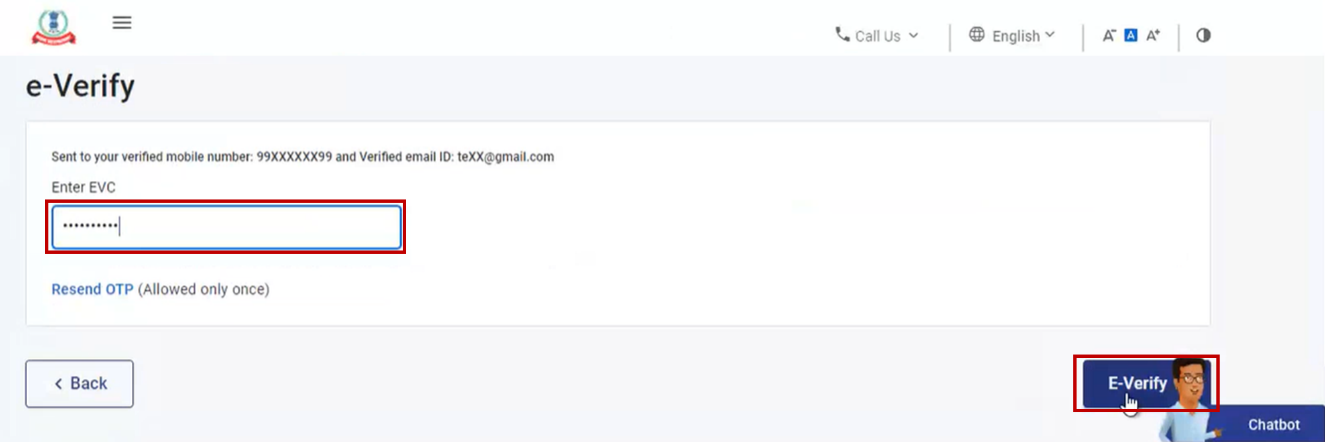
Method 6: e-Verify After Generating EVC Through Demat Account
You can e-Verify your ITR using an EVC sent to your mobile number and email ID linked with your pre-validated and EVC-enabled demat account.
Step-by-Step Process:
Step 1: On the e-Verify page, select: “Through Demat Account” and click Continue.
Note:
- An EVC will be sent to your mobile number and email ID registered with your demat account.
- Ensure your demat account is pre-validated and EVC-enabled. Refer to the My Demat Account user manual if needed.
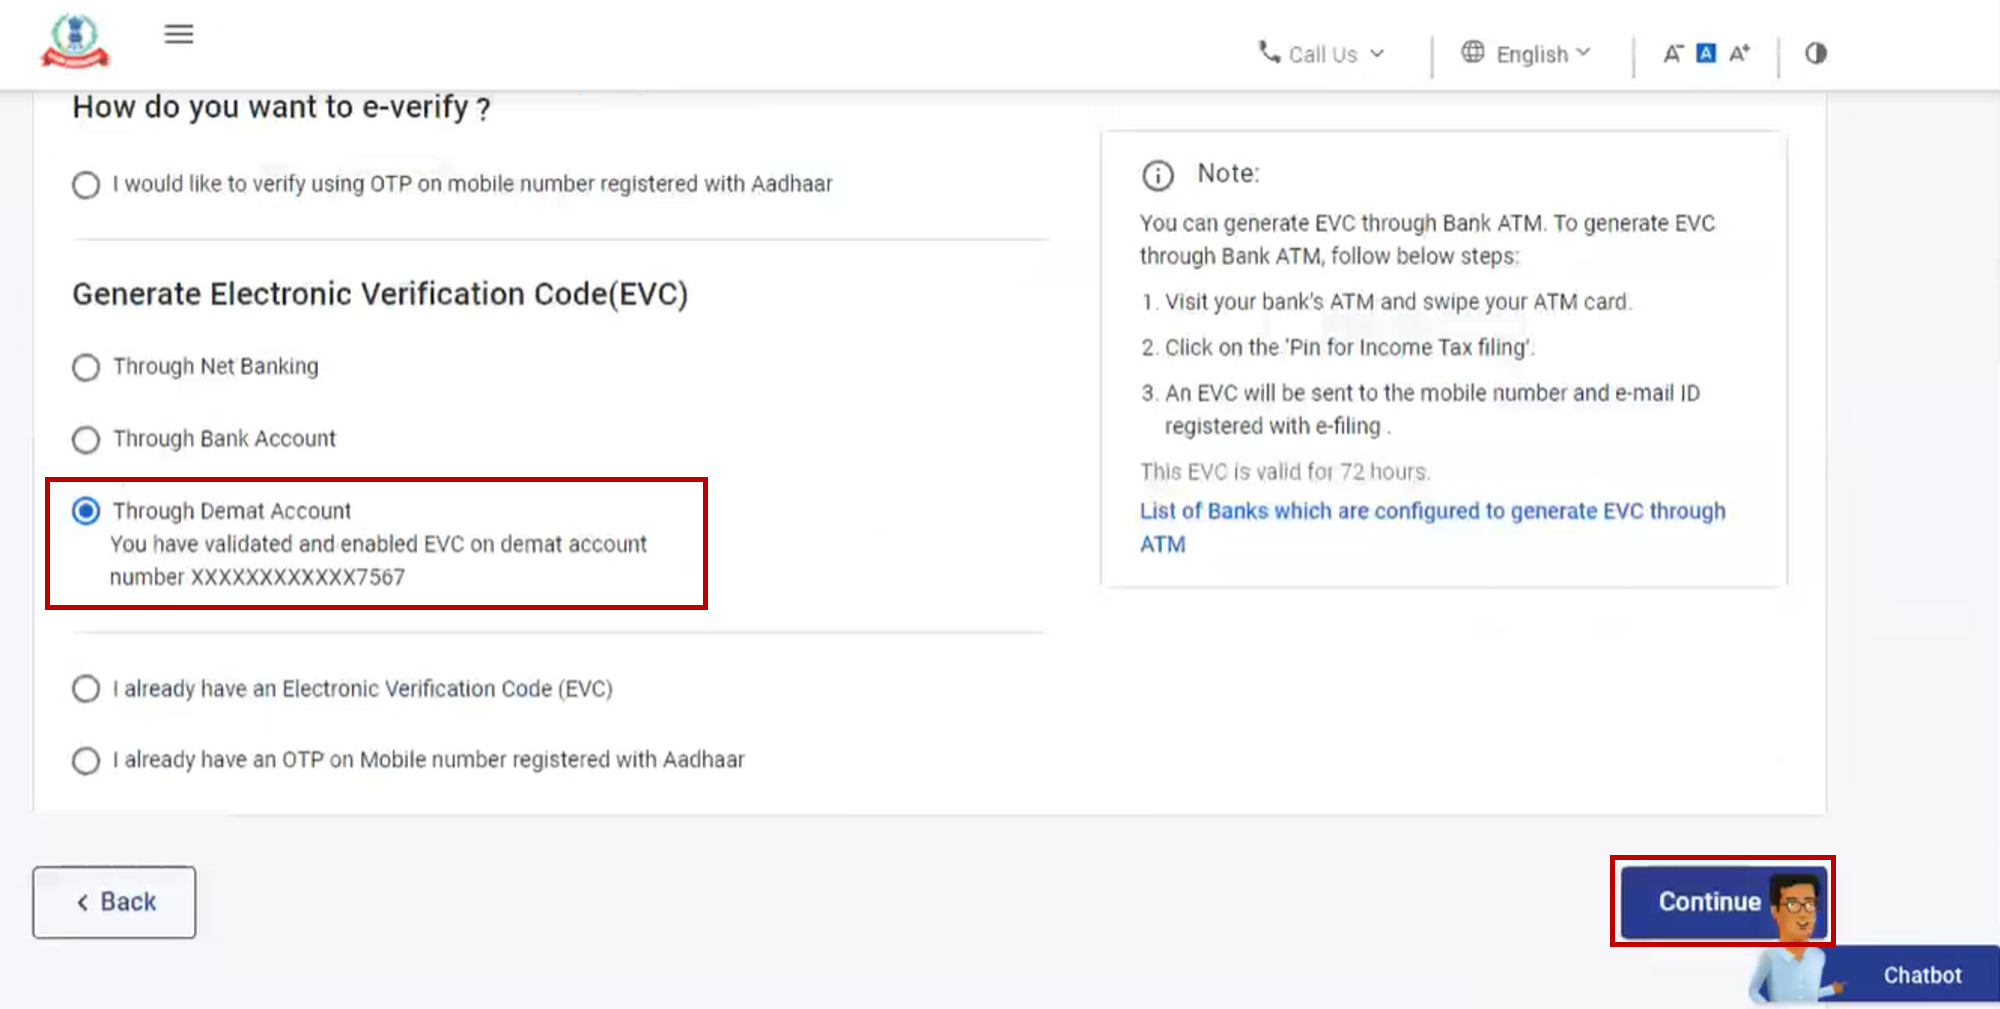
Step 2: Enter the EVC received and click e-Verify.
A success message with a Transaction ID and EVC will appear. Save these for future reference. Confirmation is also sent to your registered email and mobile number.
Method 7: e-Verify Using Net Banking
This method allows you to verify your return by logging in through your bank’s net banking portal.
Step-by-Step Process:
Step 1: On the e-Verify page, select “Through Net Banking” and click Continue.
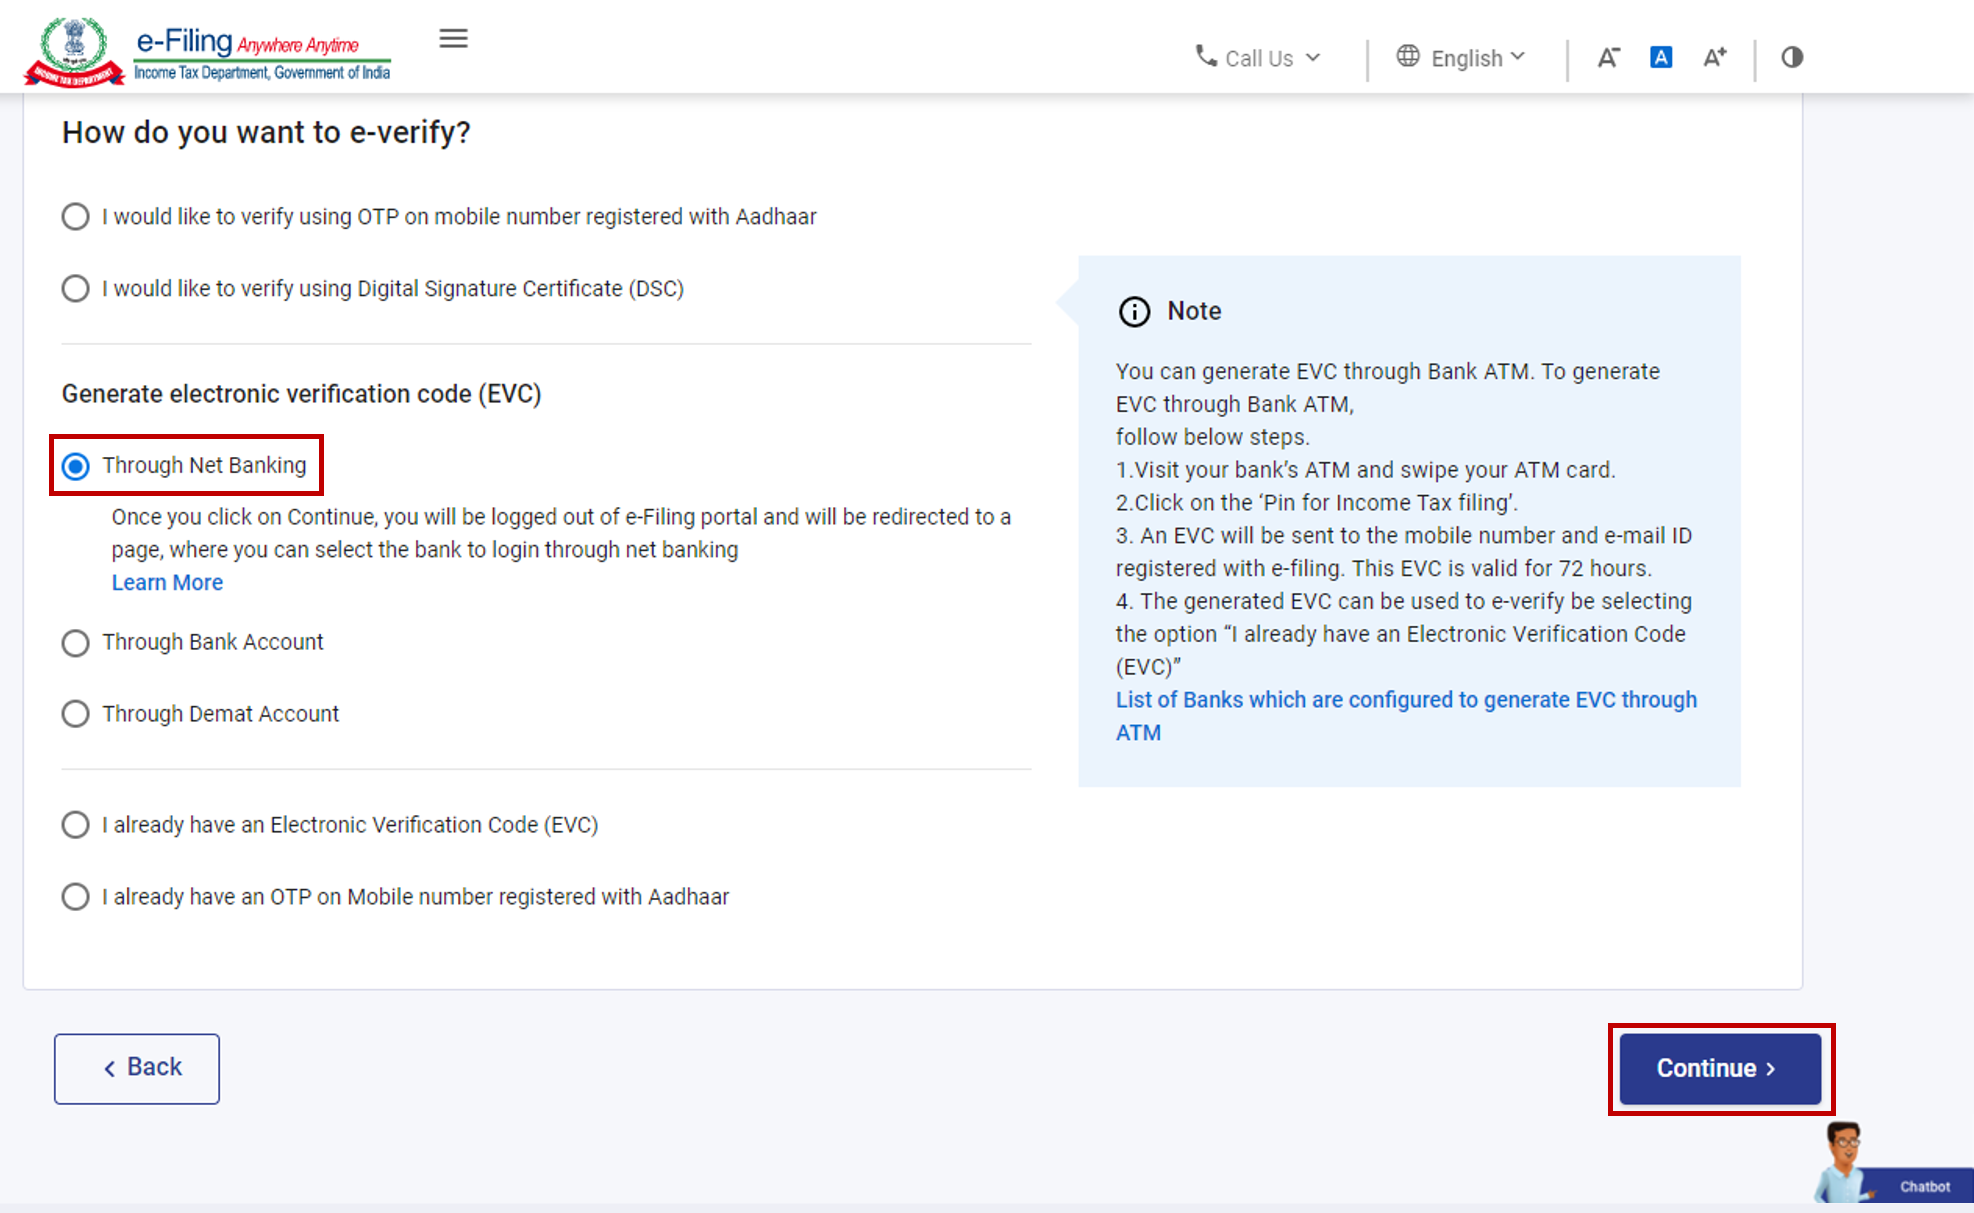
Step 2: Choose your preferred bank and click Continue.
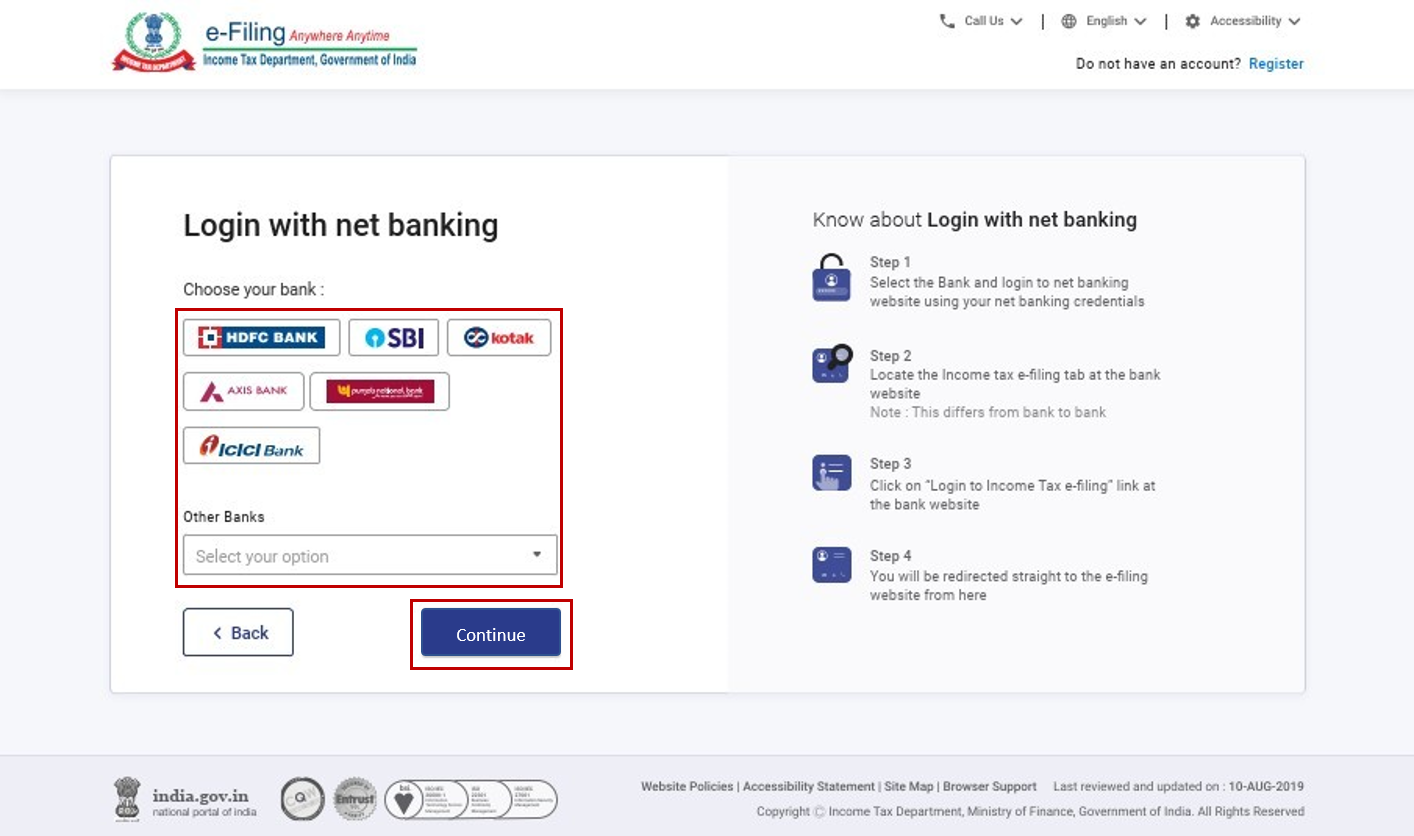
Step 3: Read the disclaimer and click Continue.
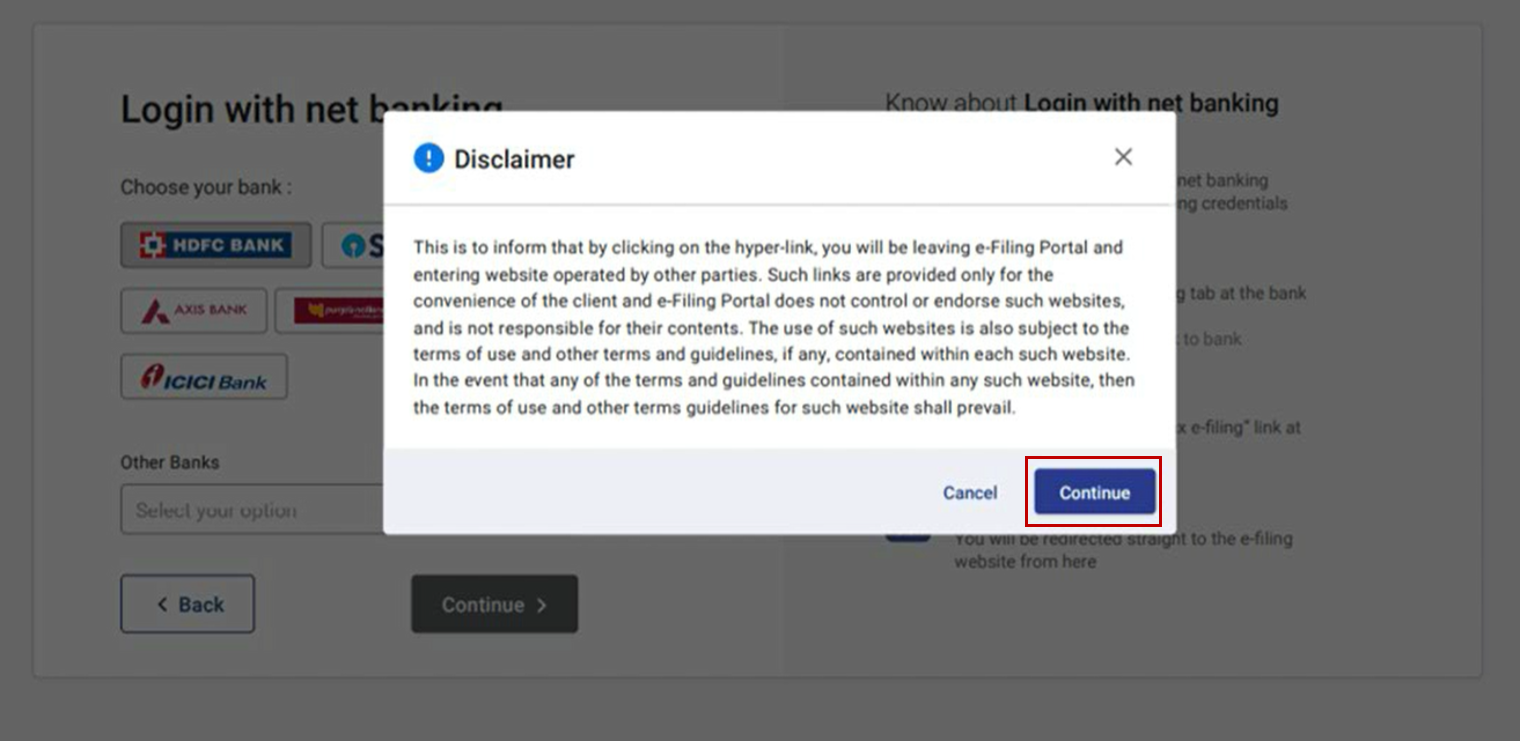
Note: You will now be redirected to your bank’s Net Banking login page.
Step 4: Log in using your Net Banking credentials.
Step 5: From your bank’s dashboard, click the link to log in to the e-Filing portal.
You will be logged out of internet banking and automatically logged in to the e-Filing portal.
Step 6: Go to the respective ITR/Form/Service and click e-Verify.
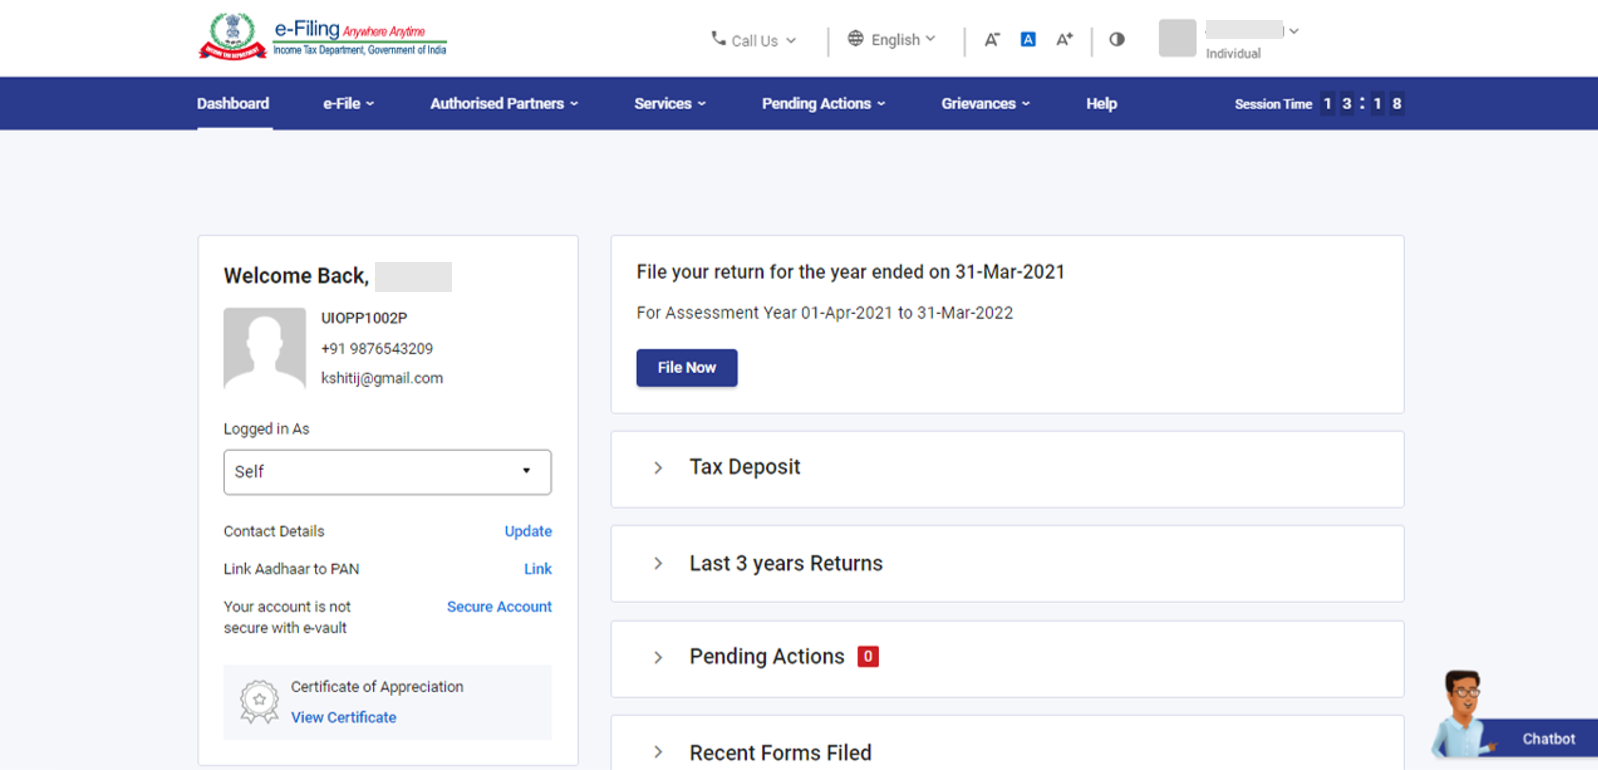
A success message with a Transaction ID will be displayed. You’ll also receive confirmation via email and SMS.
Method 8: Generate EVC Through Bank ATM (Offline Method)
This method allows you to generate an EVC from an ATM, provided your bank supports it.
Step 1: Visit your bank’s ATM and swipe your ATM card.
Note: This service is available only at select banks (e.g., Axis Bank, Canara Bank, Central Bank of India, ICICI Bank, IDBI Bank, Kotak Mahindra Bank, and SBI).
Step 2: Enter your ATM PIN.
Step 3:Select the option: “Generate EVC for Income Tax Filing”.
An EVC will be sent to your registered mobile number and email ID.
Important:
- Your PAN must be linked to your bank account.
- PAN should also be registered with the e-Filing portal.
Step 4: Use the received EVC to verify your return by selecting
“I already have an Electronic Verification Code (EVC)”
Conclusion
e-Verifying your Income Tax Return (ITR) is a crucial final step to complete the filing process. Whether you choose to verify using Aadhaar OTP, Net Banking, a Digital Signature Certificate (DSC), or an Electronic Verification Code (EVC), the process is now simpler and faster with multiple options available. It’s important to complete the e-Verification within the stipulated time (30 days from filing) to ensure your return is processed without delays. Choose the method that’s most convenient for you and follow the step-by-step procedures outlined above for a hassle-free experience.
Need help with filing or e-Verifying your ITR?
IndiaFilings makes it simple, fast, and stress-free. Get expert assistance with ITR filing, e-Verification, and compliance—all in one place.
File Your ITR with IndiaFilings
Frequently Asked Questions
1. What is e-Verification of ITR?
e-Verification is the process of confirming the authenticity of your Income Tax Return (ITR) electronically after submission. Without this step, your ITR is considered invalid by the Income Tax Department.
2. Is e-Verification mandatory after filing ITR?
Yes. As per income tax laws, verification of the return is mandatory. If not verified within the stipulated time (30 days from filing), the return is treated as invalid.
3. What are the different methods to e-Verify my ITR?
You can e-Verify your ITR using:
- Aadhaar OTP
- Net Banking
- Digital Signature Certificate (DSC)
- Pre-validated Bank Account (EVC)
- Pre-validated Demat Account (EVC)
- Bank ATM (EVC)
- Existing EVC or Aadhaar OTP
4. What is the time limit to e-Verify the ITR after filing?
You must e-Verify your ITR within 30 days from the date of submission. For returns filed before August 1, 2022, the time limit was 120 days.
5. What happens if I don’t e-Verify within 30 days?
Your ITR will be considered invalid, and it will be treated as if it were never filed. You will have to file a fresh return and may face penalties.
6. Can I e-Verify my ITR without logging into the Income Tax portal?
Yes, you can use the pre-login method by entering your PAN, assessment year, acknowledgement number, and a mobile number to receive an OTP for verification.
7. What should I do if I miss the 30-day e-Verification deadline?
You can file a Condonation Request on the portal by selecting the reason for the delay. The Income Tax Department may accept or reject the request.
8. Is Aadhaar OTP a safe method for e-Verification?
Yes. Aadhaar OTP is secure and one of the fastest ways to e-Verify your return. Just ensure your PAN is linked with Aadhaar, and the mobile number linked to Aadhaar is active.
9. Can I use the same EVC or OTP for multiple returns?
No. Each EVC or OTP is unique and valid only for one return and for a limited time (usually 15 minutes).
10. Where can I get help if I’m unable to e-Verify my return?
You can contact IndiaFilings for end-to-end support with ITR filing and verification.