Renu Suresh
Expert
Published on: Jun 15, 2026
Gstr 6 Return Filing
GSTR 6 is a monthly return that needs to be filed by an Input Service Distributor. To help taxpayers prepare their GSTR 6 return offline, Goods and Service Tax Network (GSTN) provides an Excel-based GSTR 6 offline utility. Taxpayers can prepare their GSTR 6 return process by uploading JSON file generated from the offline utility to GST portal. After uploading the GSTR 6 return, the taxpayer can preview the form, utilize cash to pay off liabilities and file GSTR 6. In this article, we look at the procedure to file GSTR 6 return using offline utility in detail.What is GSTR-6?
GSTR-6 is a monthly return that must be filed by every Input Service Distributor (ISD) under the Goods and Services Tax (GST) regime. An ISD is an office of a business that receives invoices for services used by its branches and then distributes the eligible Input Tax Credit (ITC) to those branches or units. Form GSTR-6 contains details of all input tax credits received, credit distributed, and any amendments made to previous returns. Filing GSTR-6 ensures that the credit is accurately passed on to the respective units, helping businesses manage tax compliance and utilise ITC effectively.
Who should file GSTR-6?
Only those persons who are registered as Input Service Distributors (ISD) are required to file Form GSTR-6. It is a mandatory monthly return that must be filed by every ISD, regardless of whether there is any Input Tax Credit (ITC) to distribute. Even if no ITC is available or no distribution has taken place during a particular month, a ‘Nil’ return must still be filed.
GSTR-6 Due Date
The due date for filing GSTR-6 is the 13th of every month following the relevant tax period. This monthly filing ensures that the distribution of Input Tax Credit (ITC) by the Input Service Distributor (ISD) is accurately reported and updated in the GST records. Timely submission of GSTR-6 is essential for proper credit allocation to the respective branches or units and helps avoid penalties or interest for late filing.
Details to be Provided in GSTR-6 Returns
Form GSTR-6 is a monthly return to be filed by Input Service Distributors (ISD). Here's a breakdown of the sections:
1. GSTIN
The Goods and Services Tax Identification Number (GSTIN) of the ISD needs to be provided.
2. Legal and Trade Name
This section auto-populates the legal name and trade name (if any) of the registered ISD.

3. Input Tax Credit Received for Distribution
Details of all ITC received by the ISD during the tax period are reported here, categorized as integrated tax, central tax, state/UT tax, and cess.

4. Total ITC/Eligible ITC/Ineligible ITC
A summary of ITC available for distribution, split into eligible and ineligible ITC, is provided in this section.

5. Distribution of Input Tax Credit
This section captures details of ITC distributed to recipients:
- 5A: Distribution of eligible ITC.
- 5B: Distribution of ineligible ITC.

6. Amendments to Earlier Returns
Any corrections or amendments to information furnished in previous returns (Table 3) are reported here.

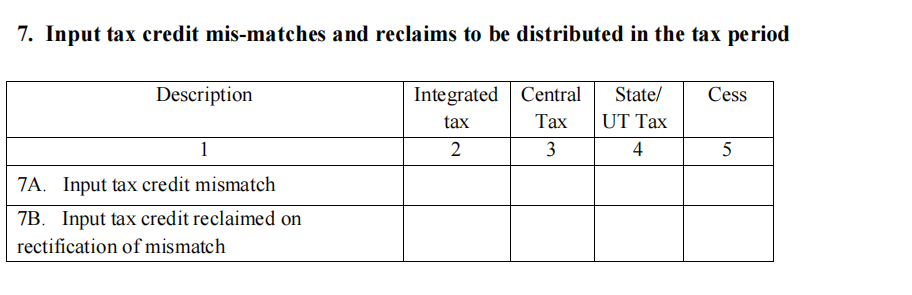
7. ITC Mismatches and Reclaims
This section deals with mismatched ITC:
- 7A: Mismatched ITC identified.
- 7B: ITC reclaimed after rectifying mismatches.
8. Distribution of Adjusted ITC
ITC adjustments from Tables 6 and 7 are distributed here:
- 8A: Adjusted eligible ITC.
- 8B: Adjusted ineligible ITC.

9. Redistribution of ITC to Correct Recipients
If ITC was distributed to the wrong recipient earlier, this section captures its redistribution:
- 9A: Redistribution of eligible ITC.
- 9B: Redistribution of ineligible ITC.
10. Late Fee
Details of any late fees paid for delayed filing are recorded here.

11. Refund Claimed from Electronic Cash Ledger
Refunds claimed from the ISD’s electronic cash ledger are reported, along with associated debit entry numbers and bank details.

GSTR 6 Offline Utility from the GST Portal - How to Download?
Downloading the GSTR 6 Offline Utility tool is a one-time activity; however, it may require an update in future if the offline tool is updated at the GST Portal. Note: You need to check the version of the GSTR 6 Offline Utility with the one available for download on the GST web portal at regular intervals. Follow the steps by step guidelines given here to download and install GSTR 6 Offline Utility tool in your computer: Note: The taxpayer can download the GSTR 6 Offline Utility from the GST Portal without login to the Portal. Step 1: Access the home page of Goods and Service Tax (GST) web portal. Step 2: You need to select the Downloads option from the GST home page. From the list of offline tools, select the GSTR 6 Offline Utility.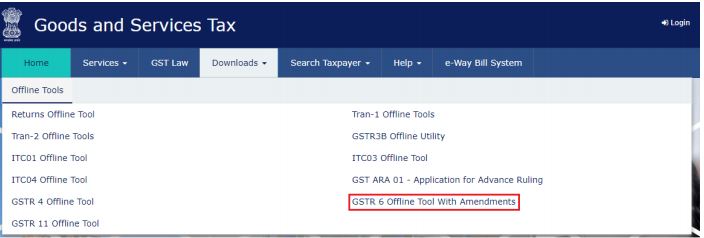 Image 1 GSTR 6 Return Offline Utility
Step 3: The GSTR4 Offline Tool will be downloaded in the Downloads folder.
Image 1 GSTR 6 Return Offline Utility
Step 3: The GSTR4 Offline Tool will be downloaded in the Downloads folder.
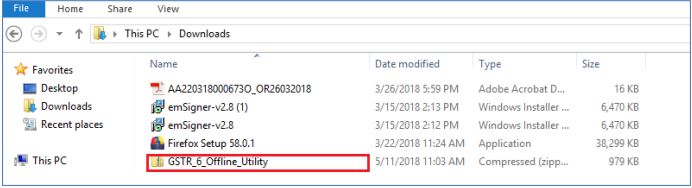 Image 2 GSTR 6 Return Offline Utility
Check Corrupted File
Before Unzip and open the GSTR 6 offline tool, ensure that the file is not corrupted. To identify the corrupted file, check the values provided in the downloaded GSTR 6 file with the ones mentioned under Downloads of GSTR 6. If there is an exact match, the GSTR 6 file is not corrupted. Else, you need to download the file again. To find the values provided in the downloaded file follow the steps described below: Open Windows PowerShell: To open the Windows PowerShell, use the Search box on the Start menu, and type PowerShell. Click on the Windows PowerShell option. Image 3 GSTR 6 Return Offline Utility
The PowerShell will be displayed as depicted in the image below:
Image 3 GSTR 6 Return Offline Utility
The PowerShell will be displayed as depicted in the image below:
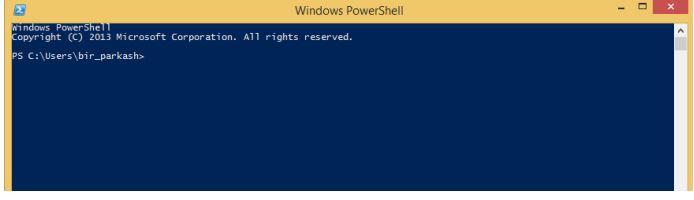 Image 4 GSTR 6 Return Offline Utility
Provide the command in this format and click on enter. Command: Get-FileHash <> Algorithm <>
Image 4 GSTR 6 Return Offline Utility
Provide the command in this format and click on enter. Command: Get-FileHash <> Algorithm <>
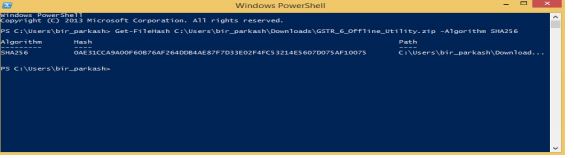 Image 5 GSTR 6 Return Offline Utility
Compare the Hash value received with the hash value provided in GSTR_6_Offline_Utility downloads page.
If the hash value matches, you can unzip the downloaded GSTR 6 folder for installation.
Image 5 GSTR 6 Return Offline Utility
Compare the Hash value received with the hash value provided in GSTR_6_Offline_Utility downloads page.
If the hash value matches, you can unzip the downloaded GSTR 6 folder for installation.
 Image 6 GSTR 6 Return Offline Utility
GSTR 6 Offline Utility - Installation Procedure
Once the GSTR 6 Offline Utility is downloaded, you need to unzip these downloaded files on your computer. The procedure to install the GSTR 6 Offline Utility is explained in detail below: Step 1: Unzip the downloaded files and extract the files from the downloaded zip folder GSTR GSTR_6_Offline_Utility folder. Zip folder consists of the GSTR6_WithoutAmendments_20180509_v1file as depicted in the image below.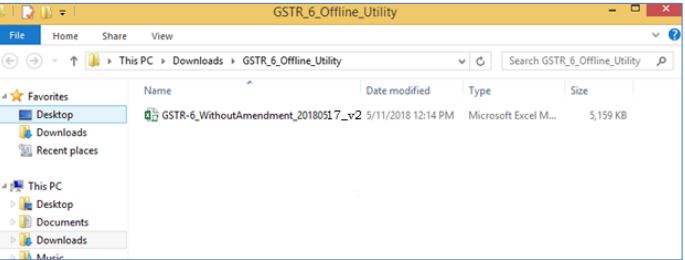 Image 7 GSTR 6 Return Offline Utility
Step 2: Once the folder is unzipped, double-click the GSTR6_WithoutAmendments_20180517_v2. The excel file will be opened.
Step 3: You need to click on the Enable Editing and enable content button in the excel sheet.
Image 7 GSTR 6 Return Offline Utility
Step 2: Once the folder is unzipped, double-click the GSTR6_WithoutAmendments_20180517_v2. The excel file will be opened.
Step 3: You need to click on the Enable Editing and enable content button in the excel sheet.
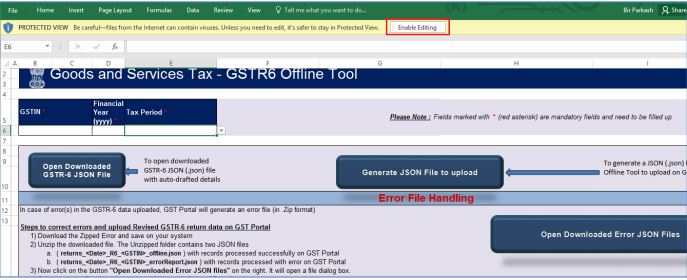 Image 8 GSTR 6 Return Offline Utility
Procedure to Prepare GSTR 6 Return Utility
The procedure to prepare GSTR 6 return utility is explained in detail below. You need to perform the following four steps to prepare GSTR 6 return utility.- Enter details in the GSTR 6 worksheets
- Validate the details entered using ‘Validate Sheet’ button
- Generate JSON (JSON) file
- Upload Generated JSON on GST Portal and Preview the details uploaded
- File GSTR 6 return on GST Portal
Enter details in the GSTR 6 worksheet of GSTR 6 Offline Tool
Step 1: Launch GSTR 6 Excel based Offline, A pop-up window will appear, it will ask you to open saved version Yes/No.- By clicking on No, GSTR 6 excel based offline will open with no saved data.
- By clicking on yes, GSTR 6 excel based offline will open with data saved in the last session.
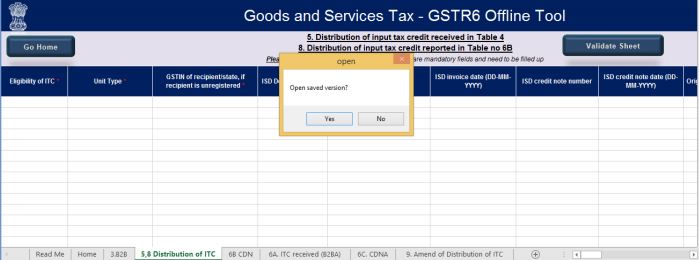 Image 9 GSTR 6 Return Offline utility once the GSTR 6 Excel based Offline Utility is launched and navigate to worksheet GSTR 6.
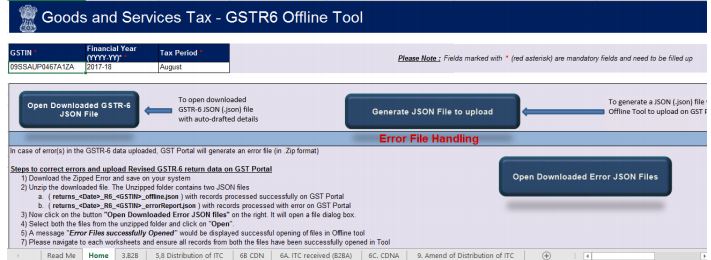 Image 10 GSTR 6 Return Offline Utility
Step 2: Click on Read Me tab. Read Me tab furnishes the Introduction to Excel Based GSTR 6 Offline Tool in brief. Once you have read details in Reading Me tab, move to next tab Home.
Image 10 GSTR 6 Return Offline Utility
Step 2: Click on Read Me tab. Read Me tab furnishes the Introduction to Excel Based GSTR 6 Offline Tool in brief. Once you have read details in Reading Me tab, move to next tab Home.
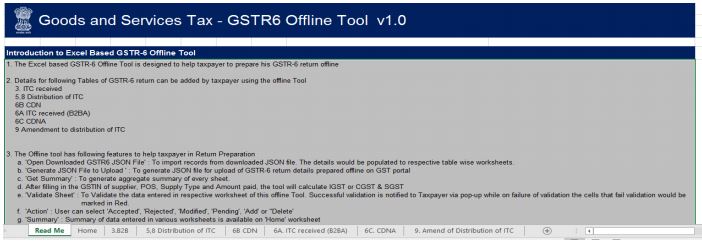 Image 11 GSTR 6 Return Offline Utility
Step 3: In the GSTIN field, provide the GSTIN.
Step 4: Select the applicable Financial Year from the Year drop-down list for which the GSTR 6 need to prepare. Select the tax period from the drop-down menu.
Image 11 GSTR 6 Return Offline Utility
Step 3: In the GSTIN field, provide the GSTIN.
Step 4: Select the applicable Financial Year from the Year drop-down list for which the GSTR 6 need to prepare. Select the tax period from the drop-down menu.
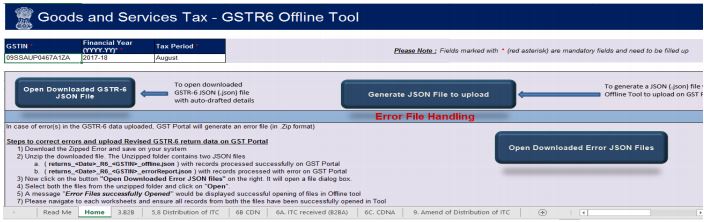 Image 12 GSTR 6 Return Offline Utility
Step 5: After selecting the financial year and tax period, add the details in the sheet which is applicable. Details which are to be added in each tab are given below.
Image 12 GSTR 6 Return Offline Utility
Step 5: After selecting the financial year and tax period, add the details in the sheet which is applicable. Details which are to be added in each tab are given below.
- 3(B2B) – Inward Supplies Received from the Registered supplier
- 5, 8 Distribution of ITC
- 6B (CDN) – Debit notes / Credit notes
- 6A ITC received (B2BA)
- 6A CDNA
- Amend of Distribution of ITC
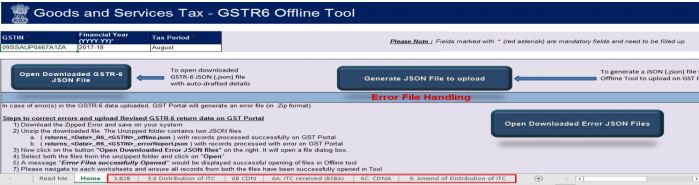 Image 13 GSTR 6 Return Offline Utility
Validate Entered Details using Validate Sheet Button
Once all details are provided in the worksheet, click on the Validate Sheet button to validate the GSTR 6 worksheet. Note: Each sheet requires to be validated separately.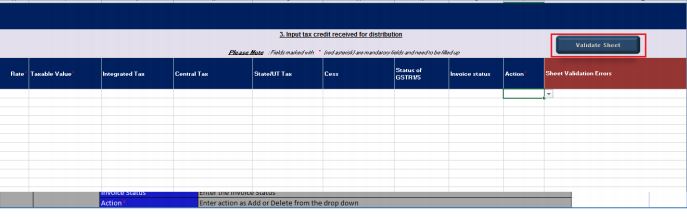 Image 14 GSTR 6 Return Offline Utility
For Successful Validation
Step 1: In case of successful validation, a pop-up message ‘No error(s) found’ will be displayed and you can proceed to generate the JSON (.json) file. To generate JSON click ton OK button.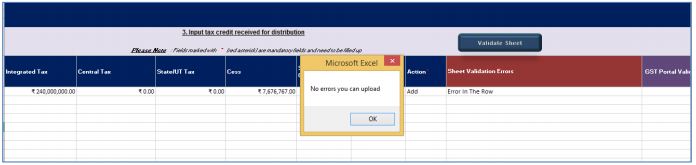 Image 15 GSTR 6 Return Offline Utility
For Unsuccessful Validation
Step 2: A pop-up message will be displayed with an error message. Click on the OK button.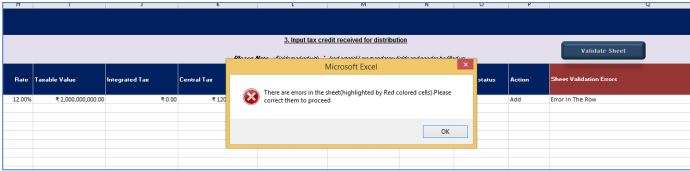 Image 16 GSTR 6 Return Offline Utility
Step 3: The “Sheet Validation Errors” Column will be updated with the error message.
Image 16 GSTR 6 Return Offline Utility
Step 3: The “Sheet Validation Errors” Column will be updated with the error message.
 Image 17 GSTR 6 Return Offline Utility
Step 4: If the validation failure; check for cells that have failed validation and correct errors according to help text file.
Note: To view the comments for fields with errors, you can click on the Review tab and select Show All Comments link.
Image 17 GSTR 6 Return Offline Utility
Image 17 GSTR 6 Return Offline Utility
Step 4: If the validation failure; check for cells that have failed validation and correct errors according to help text file.
Note: To view the comments for fields with errors, you can click on the Review tab and select Show All Comments link.
Image 17 GSTR 6 Return Offline Utility
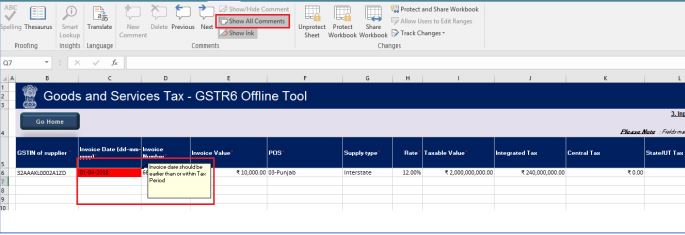 Image 18 GSTR 6 Return Offline Utility
Step 5: Once all the errors are rectified, click the Validate Sheet button on each sheet.
Image 18 GSTR 6 Return Offline Utility
Step 5: Once all the errors are rectified, click the Validate Sheet button on each sheet.
 Image 19 GSTR 6 Return Offline Utility
Step 6: As mentioned above, after successful validation, a pop-up message with ‘No error found’ will be displayed. Click on the OK button.
Step 7: Once you clicked on the OK button, you will be redirected to the home screen displaying a popup message as “Summary is successfully generated”.
Image 19 GSTR 6 Return Offline Utility
Step 6: As mentioned above, after successful validation, a pop-up message with ‘No error found’ will be displayed. Click on the OK button.
Step 7: Once you clicked on the OK button, you will be redirected to the home screen displaying a popup message as “Summary is successfully generated”.
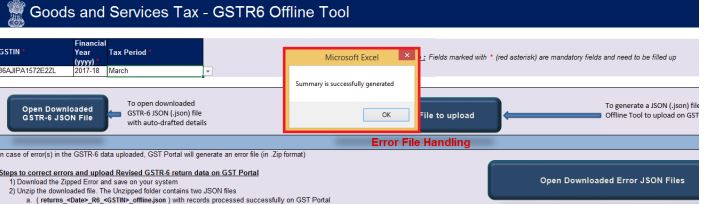 Image 20 GSTR 6 Return Offline Utility
Step 8: Click on the OK and scroll down on the home page; Summary will be generated.
Image 20 GSTR 6 Return Offline Utility
Step 8: Click on the OK and scroll down on the home page; Summary will be generated.
Generate JSON using Generate File button
Upon successful validation, you need to click on the Go Home button to navigate to the home page. Image 21 GSTR 6 Return Offline Utility
Step 1: To generate JSON file, select Generate JSON File to upload option from the home page. This JSON can be uploaded to the GST Portal.
Image 21 GSTR 6 Return Offline Utility
Step 1: To generate JSON file, select Generate JSON File to upload option from the home page. This JSON can be uploaded to the GST Portal.
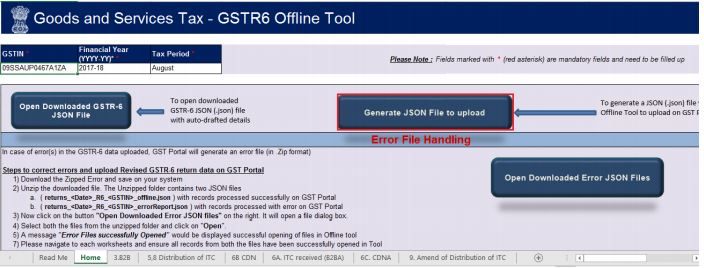 Image 22 GSTR 6 Return Offline Utility
Step 2: Browse the location to save the JSON (.json) file on the system and click on the Save button.
Image 22 GSTR 6 Return Offline Utility
Step 2: Browse the location to save the JSON (.json) file on the system and click on the Save button.
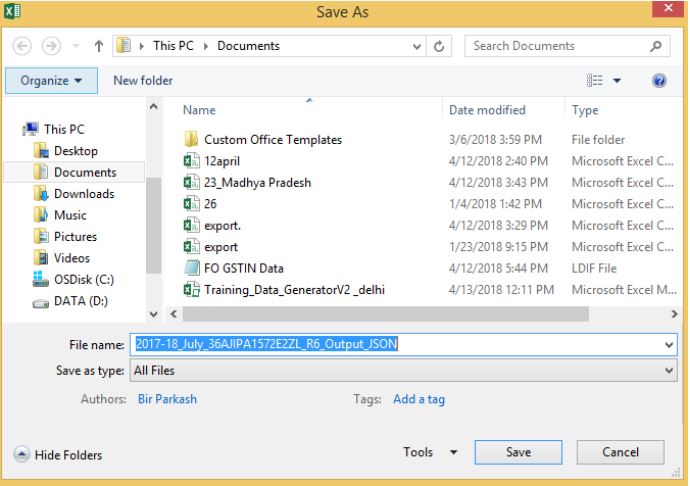 Image 23 GSTR 6 Return Offline Utility
Upload Generated JSON on GST Portal
Step 1: To upload Generated JSON file on GST web portal, you need to access the Goods and Service Tax (GST) home page. Step 2: From the main page, click on Service option and then click on Returns option. Now, you need to select the Returns dashboard command. Step 3: The File Returns page will be displayed. From the Financial Year drop-down menu, select the financial year for which the GSTR 6 return has to be uploaded. Step 4: From the return filing period drop-down menu, select the return filing period for which the GSTR 6 return has to be uploaded. Step 5: After providing details, click on the Search button.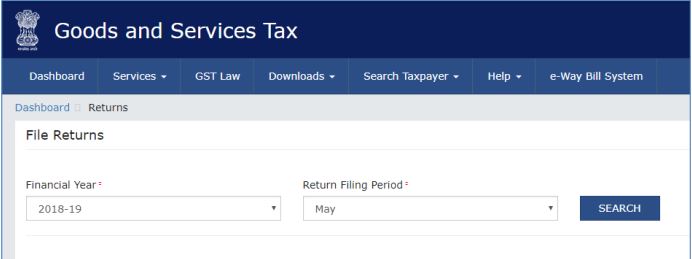 Image 24 GSTR 6 Return Offline Utility
Step 6: Applicable returns of the selected tax period will be displayed. From the GSTR 6 tile, you need to click on the PREPARE OFFLINE option.
Image 24 GSTR 6 Return Offline Utility
Step 6: Applicable returns of the selected tax period will be displayed. From the GSTR 6 tile, you need to click on the PREPARE OFFLINE option.
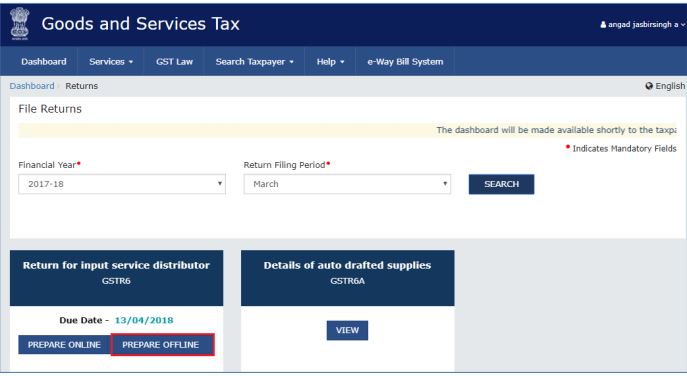 Image 25 GSTR 6 Return Offline Utility
Step 7: Click on the Choose File button to choose the JSON file prepared using the GSTR 6 Offline utility tool.
Image 25 GSTR 6 Return Offline Utility
Step 7: Click on the Choose File button to choose the JSON file prepared using the GSTR 6 Offline utility tool.
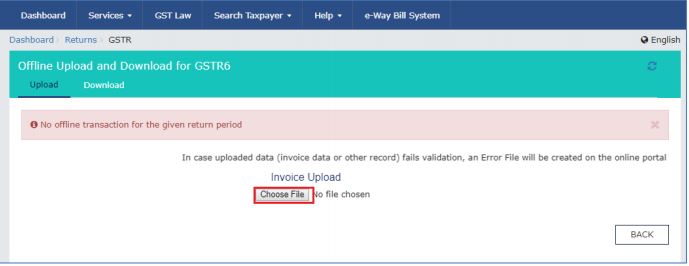 Image 26 GSTR 6 Return Offline Utility
Step 8: Browse and navigate to JSON file to be uploaded from the system. Click on the Open button.
Image 26 GSTR 6 Return Offline Utility
Step 8: Browse and navigate to JSON file to be uploaded from the system. Click on the Open button.
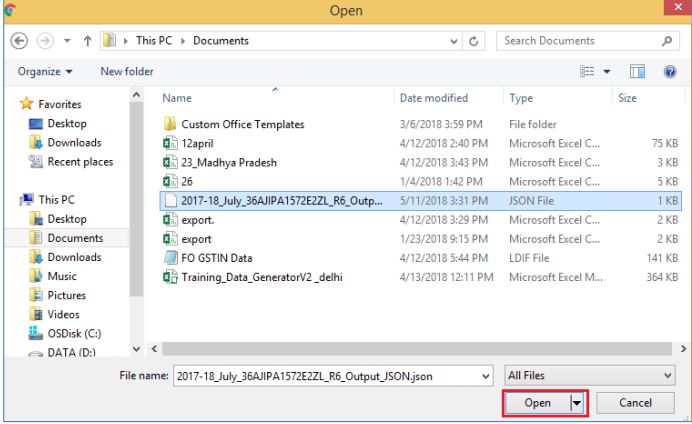 Image 27 GSTR 6 Return Offline Utility
Step 9: The uploaded JSON file will be validated and processed. It could take 15 minutes for processing. The Status will change to Processed.
Image 27 GSTR 6 Return Offline Utility
Step 9: The uploaded JSON file will be validated and processed. It could take 15 minutes for processing. The Status will change to Processed.
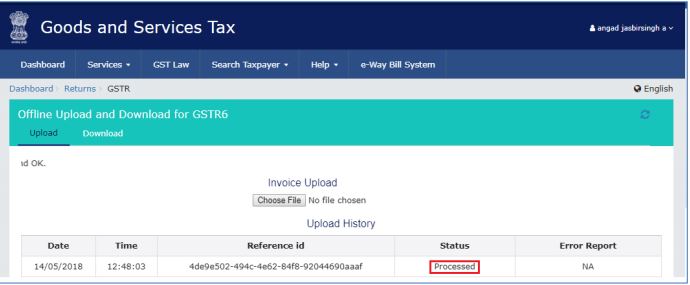 Image 28 GSTR 6 Return Offline Utility
The uploaded JSON file will be validated and processed. Upon successful validation and processing, the details provided will be populated in respective Tables. In the case of validation failure upon processing, errors if any will be shown on the GST Portal.
Note: You can upload JSON multiple times on GST web portal till submission. However, earlier uploaded data will be overwritten. Tables and Preview will reflect only the last uploaded data. You can download the records successfully processed on GST portal anytime by navigating to 'Returns Dashboard>Financial Year>Return Period>GSTR 6 Prepare Offline> Download'.
Image 28 GSTR 6 Return Offline Utility
The uploaded JSON file will be validated and processed. Upon successful validation and processing, the details provided will be populated in respective Tables. In the case of validation failure upon processing, errors if any will be shown on the GST Portal.
Note: You can upload JSON multiple times on GST web portal till submission. However, earlier uploaded data will be overwritten. Tables and Preview will reflect only the last uploaded data. You can download the records successfully processed on GST portal anytime by navigating to 'Returns Dashboard>Financial Year>Return Period>GSTR 6 Prepare Offline> Download'.
Filing GSTR 6 on GST Portal
Step 1: To file GSTR 6 on GST portal, you need to access the home page of Goods and Service Tax (GST). Step 2: From the main page, click on Service option and then click on Returns option. Now, you need to select the Returns dashboard command. Image 29 GSTR 6 Return Offline Utility
Step 3: The File Returns page will be displayed. Select the Financial Year and Return Filing Period (Month) for which you want to file the return from the drop-down list.
Step 5: After providing details, click on the Search button.
Image 29 GSTR 6 Return Offline Utility
Step 3: The File Returns page will be displayed. Select the Financial Year and Return Filing Period (Month) for which you want to file the return from the drop-down list.
Step 5: After providing details, click on the Search button.
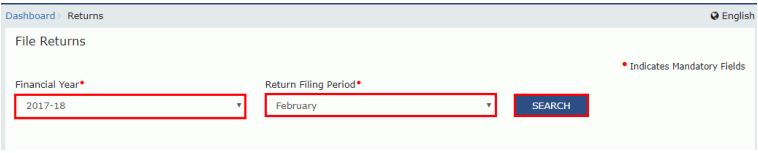 Image 30 GSTR 6 Return Offline Utility
Step 6: The file returns page will display. This page will display the due date of filing the returns, which the taxpayer is required to file using separate tiles.
Step 7: If you want to prepare the return by making entries on the GST Portal, click on the Prepare Online button from the GSTR6 tile.
Image 30 GSTR 6 Return Offline Utility
Step 6: The file returns page will display. This page will display the due date of filing the returns, which the taxpayer is required to file using separate tiles.
Step 7: If you want to prepare the return by making entries on the GST Portal, click on the Prepare Online button from the GSTR6 tile.
 Image 31 GSTR 6 Return Offline Utility
Generate GSTR 6 Summary
Step 1: GSTR 6 Return for and Click on the Generate GSTR 6 SUMMARY button from the Input Service Distributor page. Step 2: The Details of auto drafted supplies of goods or services page will be displayed. Note:- The Status should reflect as ‘Not Filed’. In case the Status is ‘Filed’, GSTR 6 for the same Month/tax period cannot be filed.
- The user needs to explicitly hit on the GENERATE GSTR6 SUMMARY button at the bottom of the page; then the only auto drafted items will be visible.
Preview GSTR 6 Returns
Once all the details are provided, click on the Preview button. By clicking on this option, the draft Summary page of GSTR 6 will download. It is recommended to download this Summary page and review the summary of entries made in different sections before submitting the GSTR 6. Note: The submit button will freeze the invoice details uploaded in the GSTR 6 for that particular month.Acknowledge and Submit GSTR 6 to freeze data
Step 1: Select the acknowledgement check box. Once you click on the acknowledgement, the SUBMIT button will be enabled. Step 2: Click the SUBMIT button in the landing page to submit GSTR 6 and Click on the Proceed button.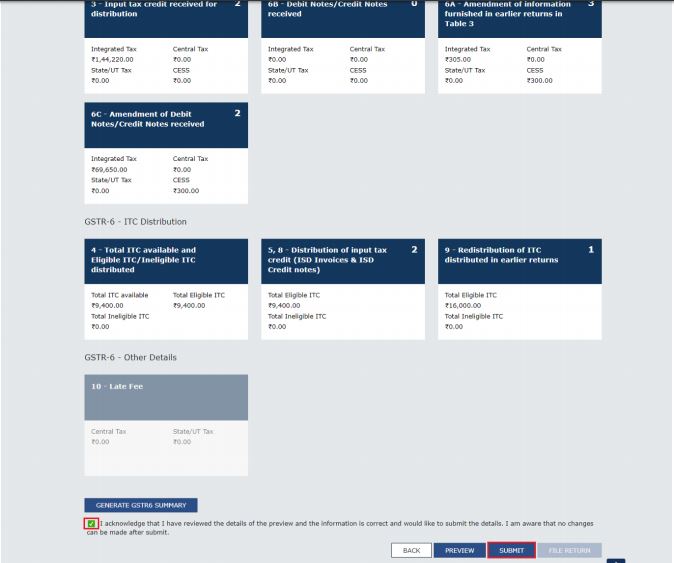 Image 32 GSTR 6 Return Offline Utility
Step 3: A success message will be displayed. Once you have submitted the data, data will be frozen, and you cannot change any fields.
Step 4: Refresh the page and the status of GSTR6 changes to submit after the submission of GSTR 6.
Image 32 GSTR 6 Return Offline Utility
Step 3: A success message will be displayed. Once you have submitted the data, data will be frozen, and you cannot change any fields.
Step 4: Refresh the page and the status of GSTR6 changes to submit after the submission of GSTR 6.
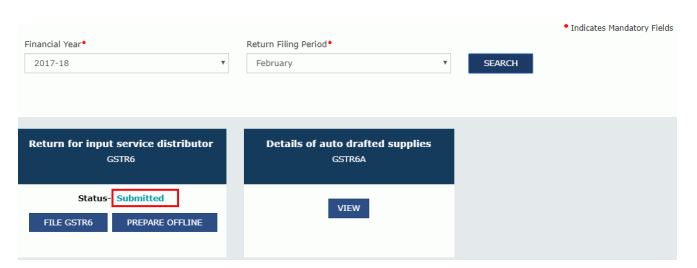 Image 33 GSTR 6 Return Offline Utility
Click on the Preview button again, to download the submitted GSTR 6 in PDF format.
Image 33 GSTR 6 Return Offline Utility
Click on the Preview button again, to download the submitted GSTR 6 in PDF format.
Offset Late Fee
Once you have submitted the GSTR 6, Late Fee tile gets enabled. To view details of late fee, click on the 10 - Late Fee tile.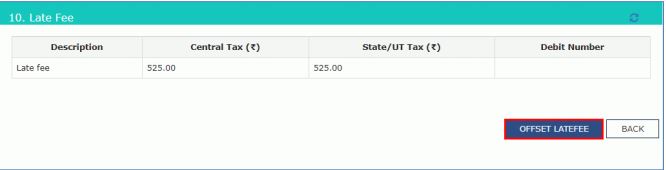 Image 34 GSTR 6 Return Offline Utility
Click on the Offset Late fee button. A late fee will offset, and debt number will be displayed.
Image 34 GSTR 6 Return Offline Utility
Click on the Offset Late fee button. A late fee will offset, and debt number will be displayed.
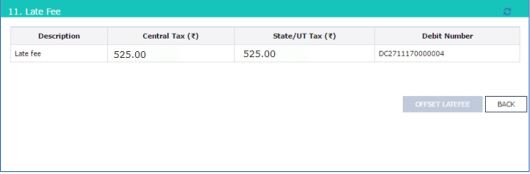 Image 35 GSTR 6 Return Offline Utility
File GSTR 6 with DSC/ EVC
Select the file return option, the Returns Filing for GSTR 6 page will be displayed. Select the Declaration checkbox. From the Authorized Signatory drop-down menu, select the authorised signatory. This will enable the two buttons FILE WITH DSC or FILE WITH EVC.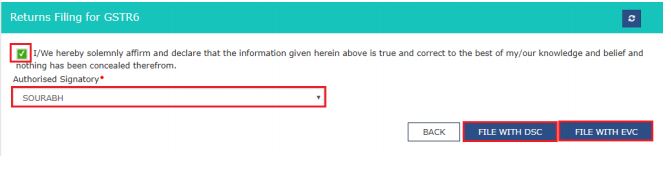 Image 36 GSTR 6 Return Offline Utility
Click on the FILE WITH DSC or FILE WITH EVC button to file Table 6A of FORM GSTR1.
Note: On the filing of the GSTR 6, notification through e-mail and SMS will be sent to the Authorized Signatory.
Image 36 GSTR 6 Return Offline Utility
Click on the FILE WITH DSC or FILE WITH EVC button to file Table 6A of FORM GSTR1.
Note: On the filing of the GSTR 6, notification through e-mail and SMS will be sent to the Authorized Signatory.
File With DSC
By selecting the file with DSC, a warning message will be displayed, click on the PROCEED button. Select the appropriate certificate and click on the Sign button.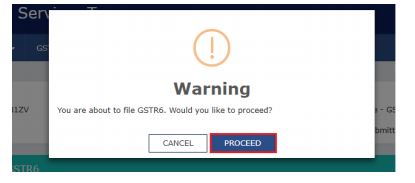 Image 37 GSTR 6 Return Offline Utility
File With EVC
Enter the OTP received on email and mobile number of the Authorized Signatory registered at the GST Portal and click on the VERIFY button. Image 38 GSTR 6 Return Offline Utility
The success message will be displayed. Refresh the page, the status of GSTR 6 changes to Filed.
Note: On the filing of the GSTR 6, notification through e-mail and SMS will be sent to the Authorized Signatory.
Image 38 GSTR 6 Return Offline Utility
The success message will be displayed. Refresh the page, the status of GSTR 6 changes to Filed.
Note: On the filing of the GSTR 6, notification through e-mail and SMS will be sent to the Authorized Signatory.