Bennisha
Expert
Published on: Apr 21, 2026
GSTR-6A
GSTR-6A is a system generated statement of inward supplies for a receiver taxpayer. GSTR-6A form is available in a read-only format where the taxpayer cannot take any action in GSTR-6A. The form is for a particular tax period and changes based on the details that are uploaded by the counterparty supplier till ISD taxpayer submits the GSTR-6 for the same tax period.
Generation of GSTR-6A
GSTR-6A will be generated in the following circumstances.
- When supplier uploads the B2B transaction details in GSTR-1 and 5.
- If the supplier submits the return before the receiver submits the GSTR-6, then the supplier's B2B details are auto-populated in GSTR-6A of the Current tax period.
- If the supplier submits the return after the receiver submits the GSTR-6, then the supplier's B2B details are auto-populated in the GSTR-6A of the next tax period.
- If ISD taxpayer has not submitted the GSTR-6 and the supplier has already submitted the GSTR-1, the GSTR-1/5 data is auto-populated to the corresponding tax period's GSTR-6A or open tax period GSTR-6A.
- If the B2B details in GSTR-6 have been rolled over to the next tax period, then that will be part of GSTR-6 of the following tax period. However, it will not be a part of GSTR-6A of next tax period.
Viewing GSTR-6A
Here are the steps that have to be performed to view GSTR-6A.
Step 1: Login to the Portal The taxpayer has to login to the official GST Portal. Step 2: Enter the Details The taxpayer has to enter the username and password. Step 3: Click Returns Dashboard From the 'Services' tab, select 'Returns' and then click 'Return Dashboard' command. An alternate step to do this, the taxpayer can click the 'Returns Dashboard' link.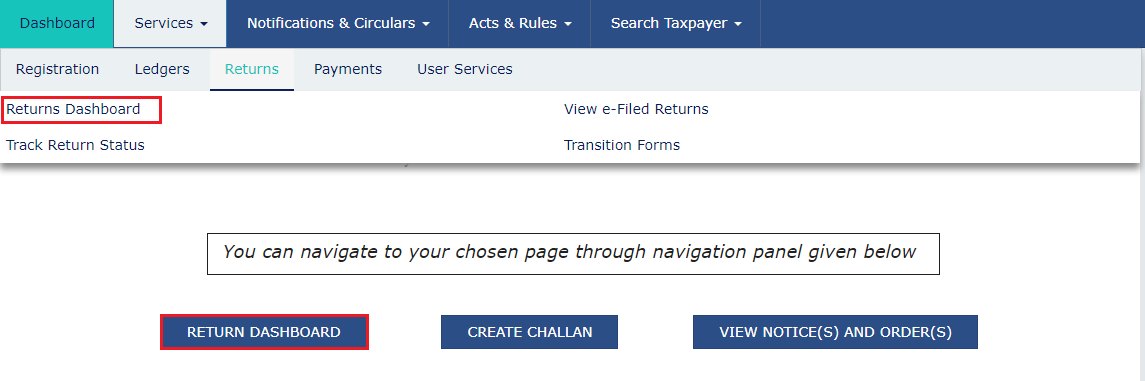 Step 3-GSTR-6A
Step 4: Select Financial Year and Return Filing Period
The 'File Returns' page appears on the screen. the taxpayer has to select the concerned 'Financial Year and Return FIling Period' from the drop-down list for which the return has to be filed.
Step 5: Click Search
The taxpayer has to click the 'Search' button.
Step 3-GSTR-6A
Step 4: Select Financial Year and Return Filing Period
The 'File Returns' page appears on the screen. the taxpayer has to select the concerned 'Financial Year and Return FIling Period' from the drop-down list for which the return has to be filed.
Step 5: Click Search
The taxpayer has to click the 'Search' button.
 Step 5-GSTR-6A
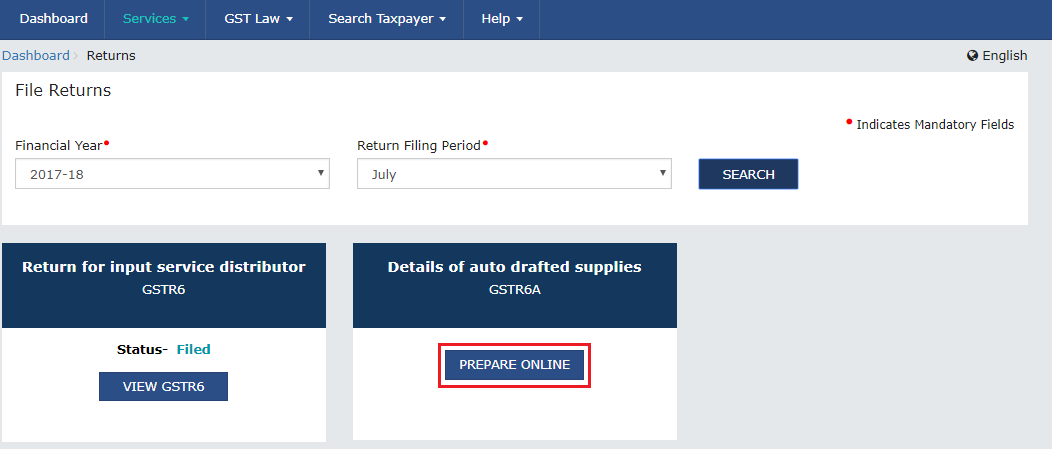
Step 6: Click Prepare Online
The 'File Returns' page is displayed on the screen. This page displays the due date for filing the returns for which the taxpayer has to file using separate tiles. From the GSTR-6A tile, click the 'Prepare Online' button if the taxpayer desires to prepare returns by making entries on the GST Portal.
Step 5-GSTR-6A
Step 6: Click Prepare Online
The 'File Returns' page is displayed on the screen. This page displays the due date for filing the returns for which the taxpayer has to file using separate tiles. From the GSTR-6A tile, click the 'Prepare Online' button if the taxpayer desires to prepare returns by making entries on the GST Portal.
 Step 6-GSTR-6A
Viewing Details in Various Tiles
There are tiles that represent tables to view relevant details. The taxpayer has to click on the tile name to know and view the related details.
Input Tax Credit Received for Distribution
Step 1: Input Tax Credit Received for Distribution The taxpayer has to click 'Input Tax Credit Received for Distribution' tile to view the details of the input tax credit received for distribution.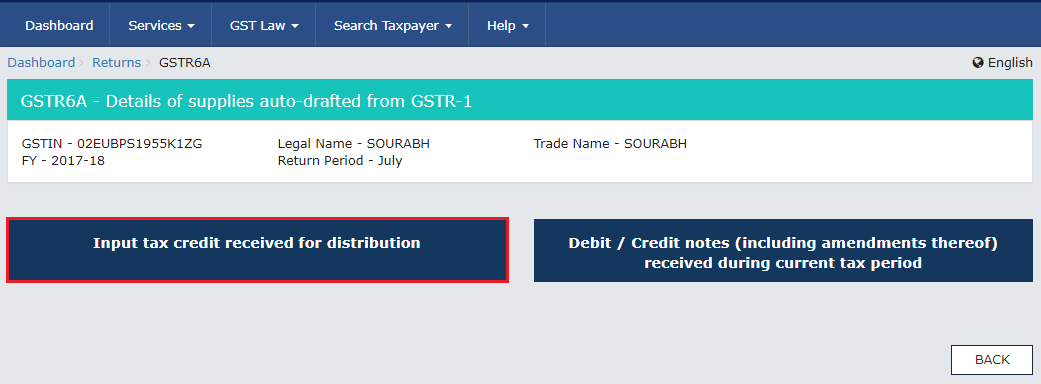 Step 1-GSTR-6A
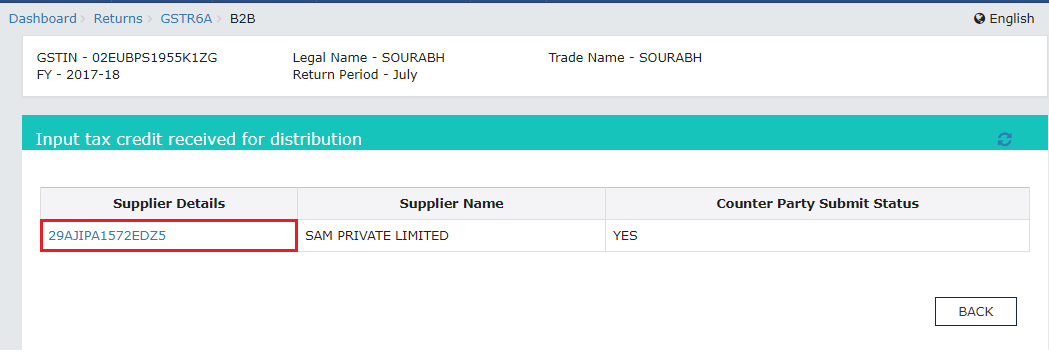
Step 2: Click Supplier's GSTIN
The taxpayer hs to click the 'Supplier's GSTIN' link under the Supplier Details column. Once that is done, a list of invoice line items under the 'Uploaded by Supplier' tab appears.
Step 1-GSTR-6A
Step 2: Click Supplier's GSTIN
The taxpayer hs to click the 'Supplier's GSTIN' link under the Supplier Details column. Once that is done, a list of invoice line items under the 'Uploaded by Supplier' tab appears.
 Step 2-GSTR-6A
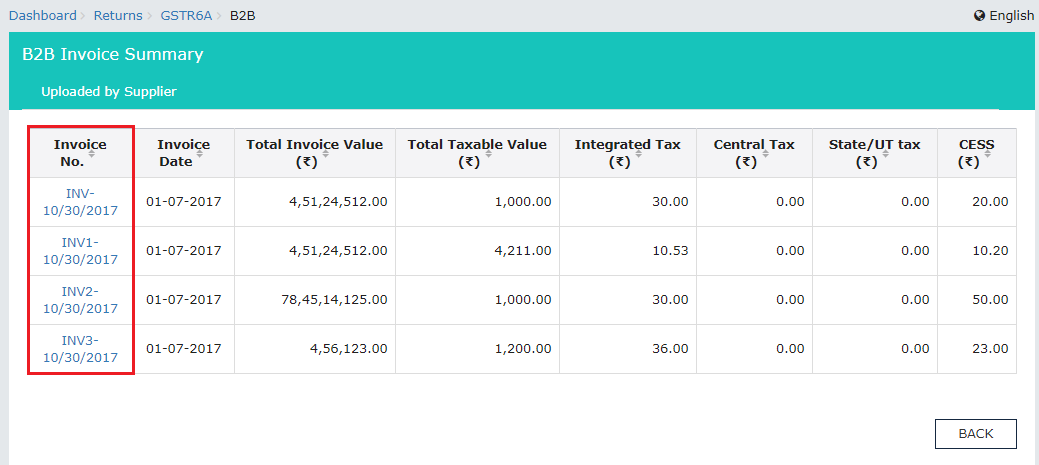
Step 3: Click Invoice Number
The taxpayer has to click the 'Invoice Number' link under the Invoice Number column.
Step 2-GSTR-6A
Step 3: Click Invoice Number
The taxpayer has to click the 'Invoice Number' link under the Invoice Number column.
 Step 3-GSTR-6A
The Item level details are displayed on the screen.
Step 3-GSTR-6A
The Item level details are displayed on the screen.
 Step 6-GSTR-6A
Viewing Debit/ Credit Notes
Here are the steps to view Debit/ Credit notes that are received during the current tax period.
Step 1: Debit/ Credit notes (including amendments thereof) received during the current tax period The taxpayer has to click the 'Debit / Credit notes (including amendments thereof) received during the current tax period' to view the details of the debit/ credit notes that are received during the current tax period. Step 1-GSTR-6A
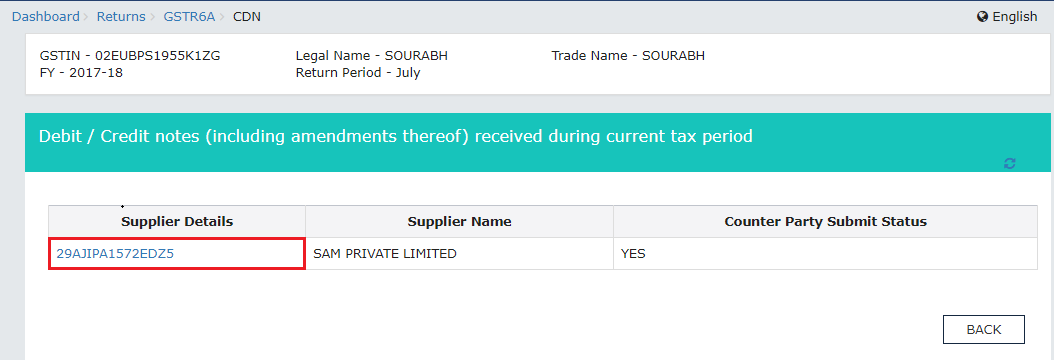
Step 2: Click Supplier's GSTIN
The taxpayer has to click the 'Supplier's GSTIN' link under the Supplier's Details column. Once that is done, a list of invoice line items under the 'Uploaded by Supplier' tab.
Step 1-GSTR-6A
Step 2: Click Supplier's GSTIN
The taxpayer has to click the 'Supplier's GSTIN' link under the Supplier's Details column. Once that is done, a list of invoice line items under the 'Uploaded by Supplier' tab.
 Step 2-GSTR-6A
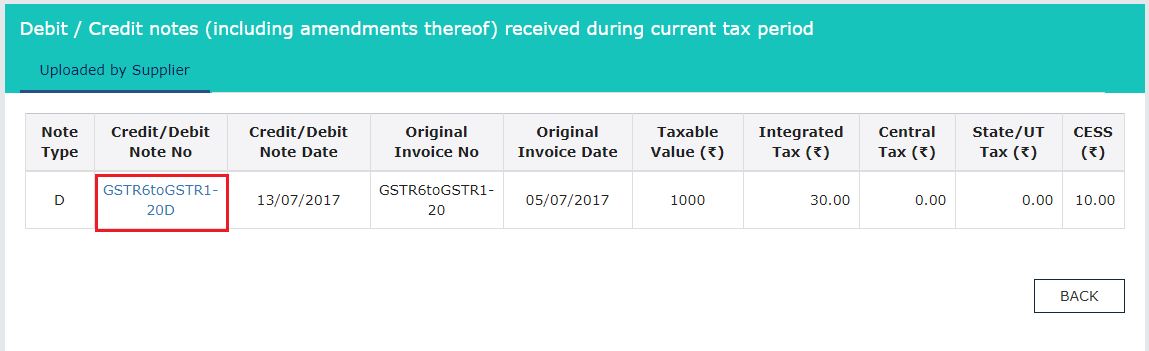
Step 3: Click Credit or Debit Note No
The taxpayer has to click the 'Credit or Debit Note No' link under the 'Credit/ Debit Note No column.
Step 2-GSTR-6A
Step 3: Click Credit or Debit Note No
The taxpayer has to click the 'Credit or Debit Note No' link under the 'Credit/ Debit Note No column.
 Step 3-GSTR-6A
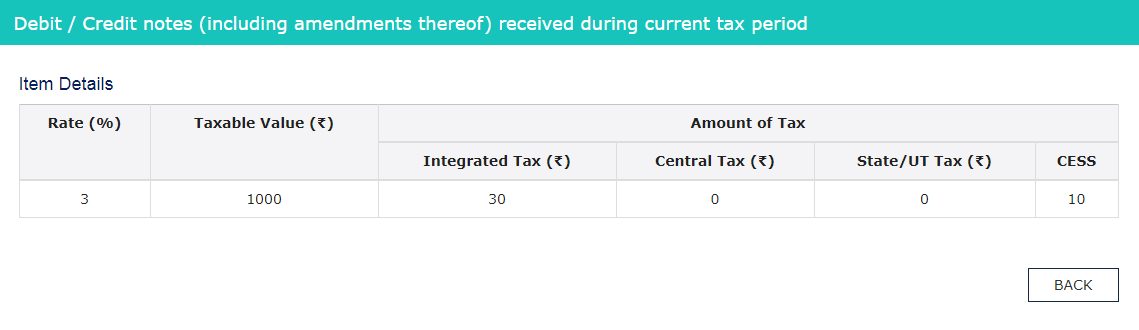
The item level details are displayed on the screen.
Step 3-GSTR-6A
The item level details are displayed on the screen.
 Step 3-GSTR-6A
Time Period to View GSTR-6A
A taxpayer can view GSTR-6A of a tax period twice.
- If the counterparty has no submitted or filed GSTR-1: Any or all invoices that are uploaded by the Supplier Taxpayers in their GSTR-1 is made available in the GSTR-6A and the same is also available in the GSTR-6 of the recipient.
- If the counterparty has submitted or filed their return: All invoices that are available in the GSTR-6A will still be available for viewing. In addition to this, the Receiver taxpayers can take action on the invoices of GSTR-6. The 'Accept/ Reject' buttons against the invoices are enabled to perform the action. The information available in GSTR-6A is also made available in GSTR-6.