Sinduja Shankar
Expert
Published on: Jun 15, 2026
GSTR-11: Meaning, Eligibility, Due Date & Procedure
GSTR-11 is a return form to be filed by every registered person who has been issued a Unique Identity Number (UIN) to get tax credit/refunds under GST for all the goods/services they purchase in India. Based on the GSTR-11 return filing, GST refunds will be processed by the Government. Form GSTR-11 is a statement of inward supply of goods or services or both received by
Unique Identity Number (UIN) holders. In this article, we look at the procedure for Gstr 11 Filing in detail.Need help to file your GSTR-11? Our IndiaFilings GST experts easily file your GSTR-11 returns with expert guidance!
What is GSTR-11?
GSTR-11 is a quarterly return that must be filed by every registered person who has been issued a Unique Identity Number (UIN) under the GST regime. It serves as a statement of inward supplies of goods or services or both received by UIN holders. The primary purpose of filing GSTR-11 is to enable these entities to claim tax credits or refunds on the GST paid on their inward supplies.
GSTR-11 Due Date
All UIN holders are required to file a quarterly GSTR-11 return. The GSTR-11 for a particular month can be filed upon the completion of that month. The due date for filing the GSTR-11 is before the 28th of the following month, that statement is filed on their inward providers if they need to say the refund.
Note: It is mandatory to have a valid UIN in order to be eligible to file GSTR-11 and claim the tax refund.Details to be Provided in GSTR-11 Returns
Form GSTR-11 consists of four main sections that need to be carefully filled out by UIN holders.
- UIN: In this section, the Unique Identity Number (UIN) assigned to the notified body by the GST administration must be entered.
- Name of the Person Having UIN: The name of the UIN holder will be auto-populated based on the GST database when filing the return.
- Details of Inward Supplies Received: This section requires the GSTIN of the suppliers. Once the GSTIN is entered, the details of inward supplies will be auto-filled from the suppliers’ GSTR-1. UIN holders are not allowed to modify these details manually.
- Refund Amount: The refund amount is auto-calculated based on the details of inward supplies. UIN holders need to provide their bank details for the credit of the refund directly into their account.
Below, we have attached the GSTR-11 form for your reference,
Pre-requisites to File GSTR-11
Before filing GSTR-11, the UIN holder must ensure they have the relevant tax invoice, debit note, or credit note for each inward supply to be declared. Additionally, it is essential that the UIN was communicated to the supplier at the time of purchase, allowing the supplier to report the transaction correctly in their GST returns. This ensures that all inward supplies are accurately reflected and matched in the Gstr 11 Filing.
Procedure for Filing Form GSTR-11
The taxpayers must follow the below procedure to file GSTR-11 for claiming refunds under GST for all the goods and services purchased in India.
Visit GST Portal
Step 1: Firstly, the taxpayers have to visit the Goods and Services Tax portal to apply for Form GSTR-11 to claim for refunds under GST.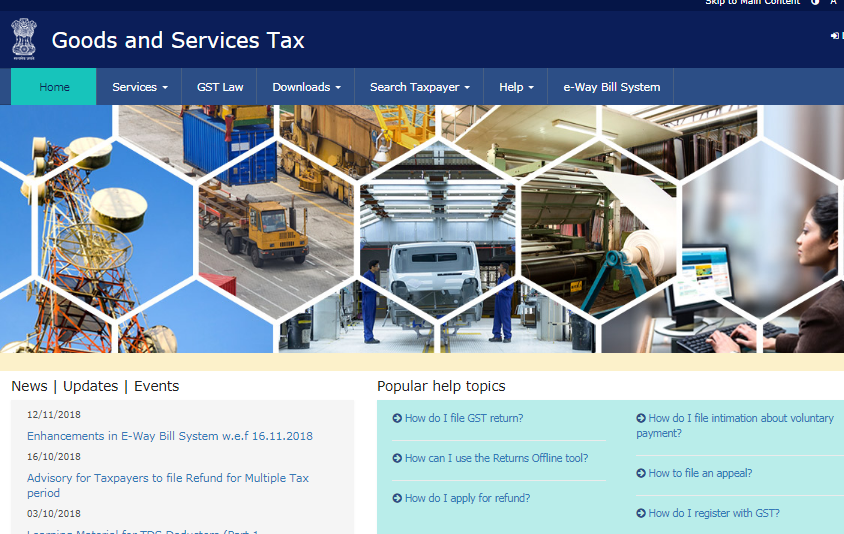 Step 1 - Filing of Form GSTR-11
Login into Portal
Step 2: Click on the ‘Login’ button to access the username and password page. Step 3: Enter the correct ‘Username’ and ‘Password’ credentials along with the captcha in the required field and click ‘login’.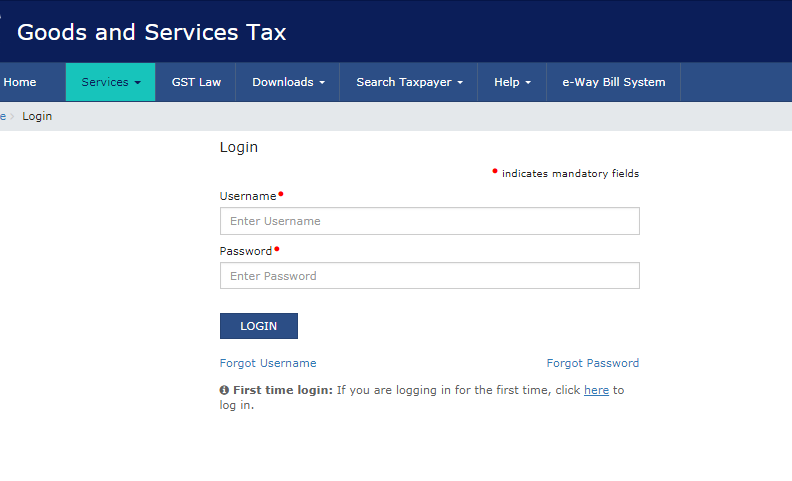 Step 3 - Filing of Form GSTR-11
File Returns
Step 4: After logging in, select ‘Returns Dashboard’ command from the Returns Menu under the service tab that is visible on the home page.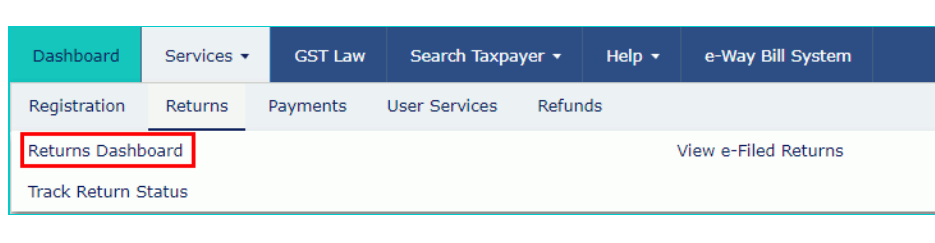 Step 4 - Filing of Form GSTR-11
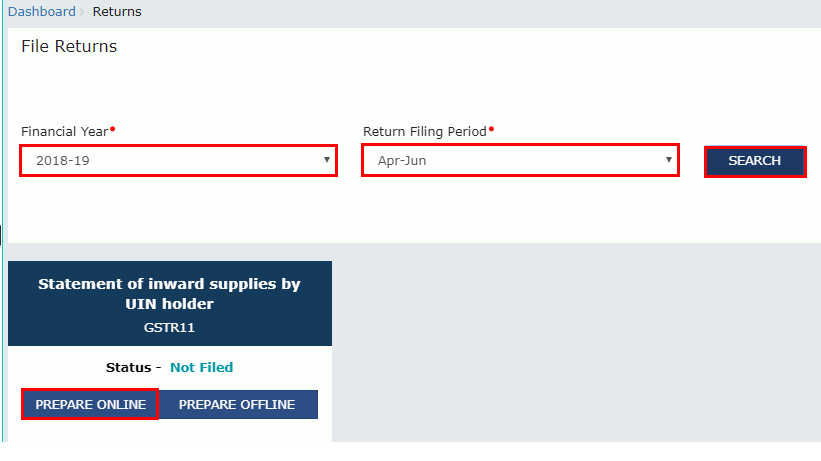
Step 5: Upon clicking on the "Returns Dashboard" link, the page of File Returns will be displayed.
Step 6: Select the Financial Year & Return Filing Period (Month) for which it is required to file the return from the drop-down list.
Step 7: Click on the search button.
Step 8: In the GSTR-11 box, click on the “Prepare Online” button if want to prepare returns by making entries on the GST Portal.
Step 4 - Filing of Form GSTR-11
Step 5: Upon clicking on the "Returns Dashboard" link, the page of File Returns will be displayed.
Step 6: Select the Financial Year & Return Filing Period (Month) for which it is required to file the return from the drop-down list.
Step 7: Click on the search button.
Step 8: In the GSTR-11 box, click on the “Prepare Online” button if want to prepare returns by making entries on the GST Portal.
 Step 8 - Filing of Form GSTR-11
Step 9: The GSTR-11 -Quarterly Return page will be displayed.
Step 8 - Filing of Form GSTR-11
Step 9: The GSTR-11 -Quarterly Return page will be displayed.
Fill in the Right Credentials
Step 10: Click on the following tiles, to know and enter related details:- Details of Invoices received
- Details of Credit/Debit Notes received
 Step 10 - Filing of Form GSTR-11
Details of Invoices received
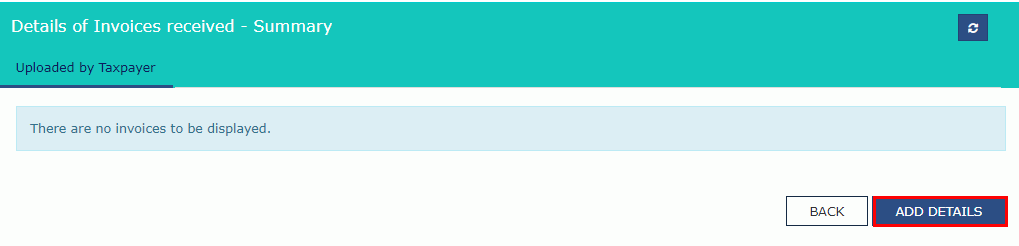
Step 11: Click on the Details of Invoices received tile to enter details of taxable inward supplies received from the registered taxpayers. Step 12: The Details of Invoices received - a Summary page will be displayed. Now click on the “Add Details” button.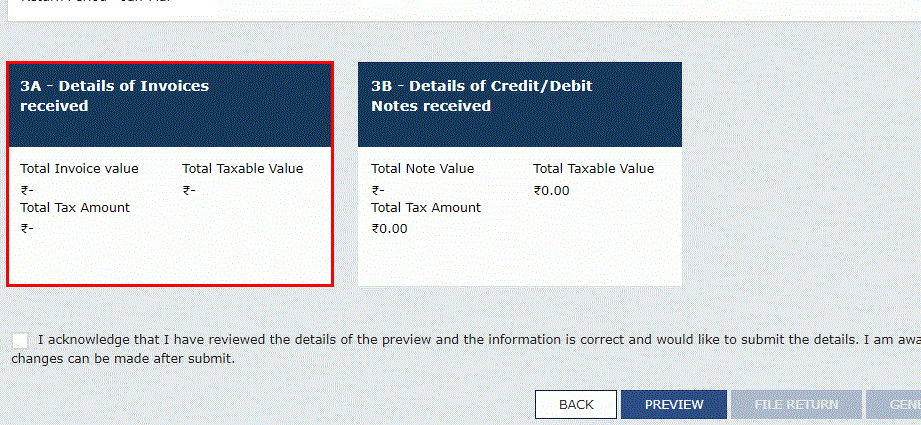 Step 12 - Filing of Form GSTR-11
Step 13: After clicking on the "add details" button, the Details of Invoices received- Add Invoice page will be displayed.
Note: The field will accept only GSTIN of the Normal taxpayer or Non-Resident taxpayer.
Step 12 - Filing of Form GSTR-11
Step 13: After clicking on the "add details" button, the Details of Invoices received- Add Invoice page will be displayed.
Note: The field will accept only GSTIN of the Normal taxpayer or Non-Resident taxpayer.
 Step 13 - Filing of Form GSTR-11
Step 14: Enter the GSTIN of the supplier, in the Supplier GSTIN field.
Step 15: Enter the Invoice number, date of the invoice and value of the total invoice in the Invoice fields.
Step 13 - Filing of Form GSTR-11
Step 14: Enter the GSTIN of the supplier, in the Supplier GSTIN field.
Step 15: Enter the Invoice number, date of the invoice and value of the total invoice in the Invoice fields.
In case of an Intra-State transaction
Step 16: In case the POS (place of supply) of the goods and services is the same State as that of the supplier. Step 17: Enter the taxable value of the goods or services and the cess amount.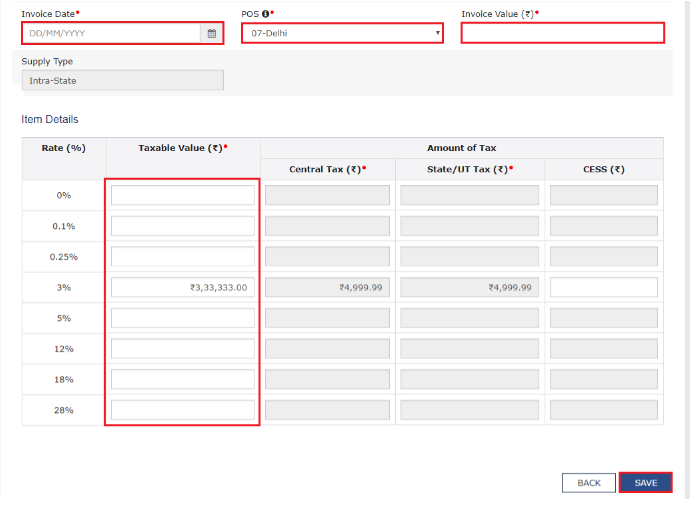 Step 17 - Filing of Form GSTR-11
Step 18: To save the invoice details, click on the “Save” button
Note: Based on the values entered in the tax rates and taxable values, the value of tax fields are auto-populated. The CESS field is not auto-populated and has to be entered by the taxpayer.
Step 17 - Filing of Form GSTR-11
Step 18: To save the invoice details, click on the “Save” button
Note: Based on the values entered in the tax rates and taxable values, the value of tax fields are auto-populated. The CESS field is not auto-populated and has to be entered by the taxpayer.
In case of an Inter-State transaction
Step 19: In case the Place of Supply (POS) is different from the State of the supplier, the transaction becomes an Inter-State transaction. Step 20: Now enter the taxable value of the goods or services and the cess amount in the respective fields.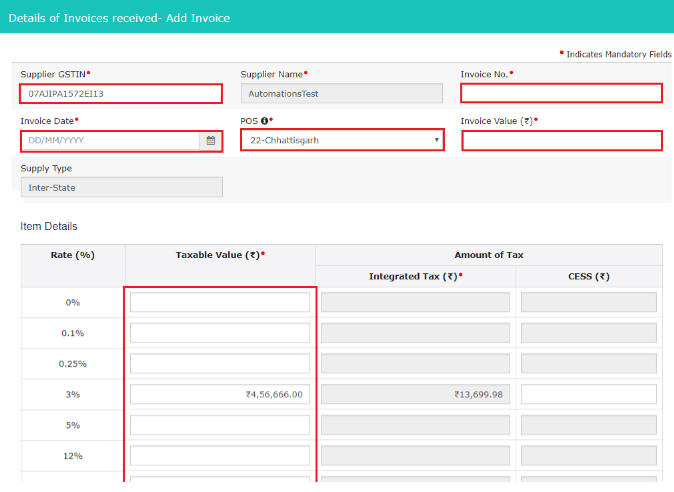 Step 20 - Filing of Form GSTR-11
Step 21: To save the invoice details, click on the “Save” button
Note: Based on the values entered in the tax rates and taxable values, the value of tax fields are auto-populated. The CESS field is not auto-populated and has to be entered by the taxpayer.
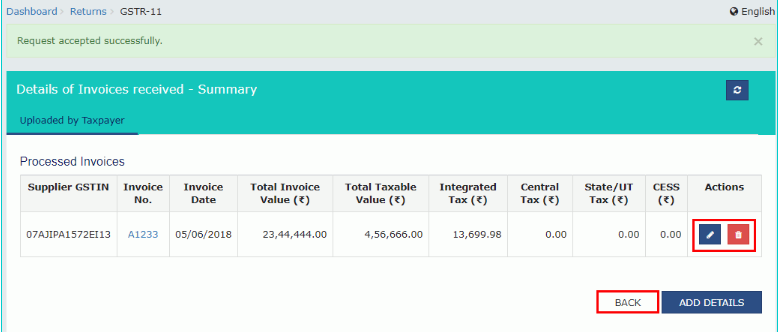
Step 22: It directs to the previous page where a message will be displayed that the request accepted successfully.
Step 20 - Filing of Form GSTR-11
Step 21: To save the invoice details, click on the “Save” button
Note: Based on the values entered in the tax rates and taxable values, the value of tax fields are auto-populated. The CESS field is not auto-populated and has to be entered by the taxpayer.
Step 22: It directs to the previous page where a message will be displayed that the request accepted successfully.
 Step 22 - Filing of Form GSTR-11
Step 23: If needed, edit/delete the added invoices (under Actions).
Step 24: Click on the Back button to go back to the GSTR-11 page.
Step 25: The page be directed to the GSTR-11 landing page and the details of credit or debit notes received tile will reflect in the number of notes added along with total note value, tax amount and taxable value. The total taxable value and tax amount are the net value of debit and credit notes.
Step 22 - Filing of Form GSTR-11
Step 23: If needed, edit/delete the added invoices (under Actions).
Step 24: Click on the Back button to go back to the GSTR-11 page.
Step 25: The page be directed to the GSTR-11 landing page and the details of credit or debit notes received tile will reflect in the number of notes added along with total note value, tax amount and taxable value. The total taxable value and tax amount are the net value of debit and credit notes.
 Step 25 - Filing of Form GSTR-11
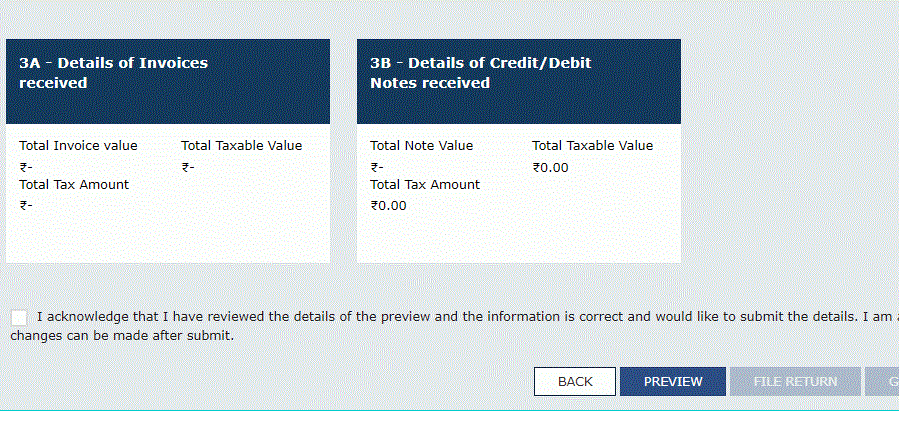
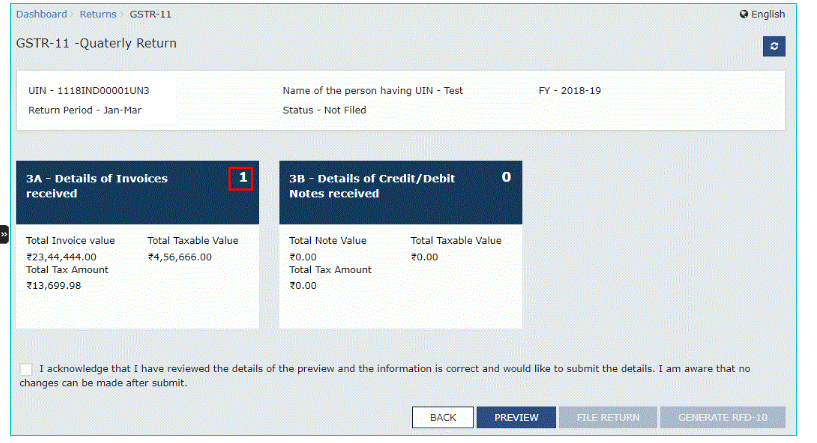
Preview GSTR-11
Step 26: Now click on the “preview” button, once the details are entered. The draft summary page will be downloaded on clicking on the preview button.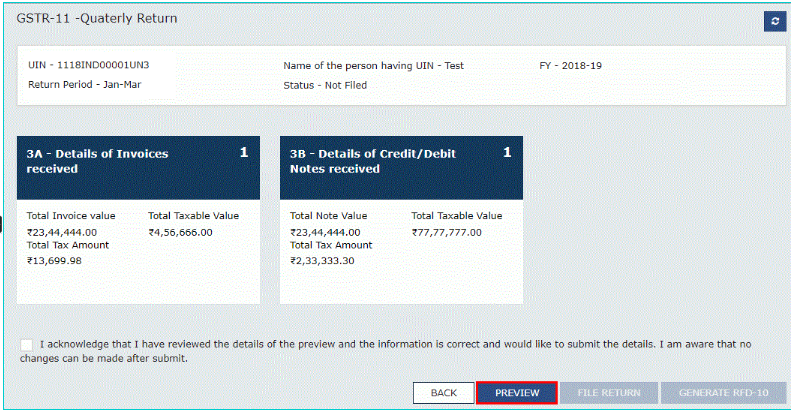 Step 26 - Filing of Form GSTR-11
Step 27: The PDF file is generated with watermark of the draft as the details are yet to be submitted.
Step 26 - Filing of Form GSTR-11
Step 27: The PDF file is generated with watermark of the draft as the details are yet to be submitted.
File GSTR-11 with DSC/ EVC
Step 28: Select the Declaration checkbox and click on the File Return button.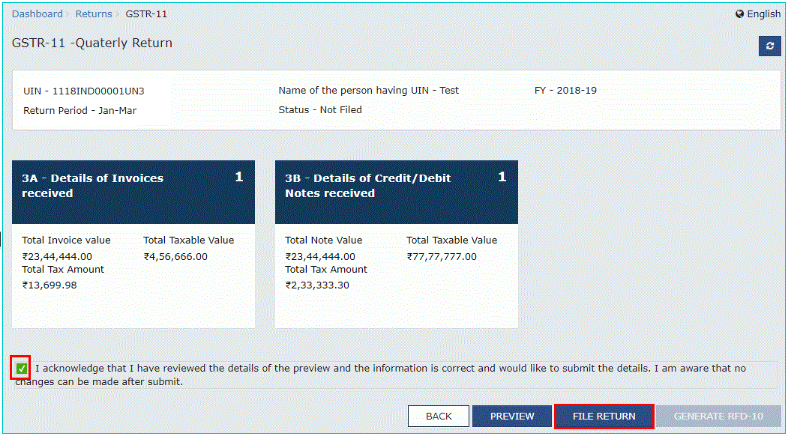 Step 28 - Filing of Form GSTR-11
Step 29: A message is displayed that "Tax amount as declared there would be posted as refund amount in RFD-10 State-wise and the same is non-editable on the higher side. Now select Yes to proceed to File. After filing GSTR-11, no changes can be made" and then click on the YES button.
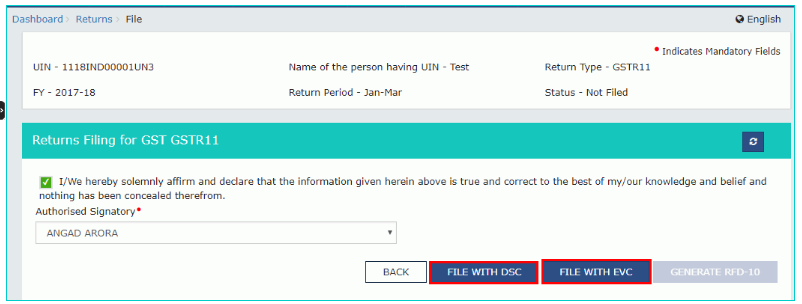
Step 30: The Returns Filing for GST GSTR11 page will be displayed. Now select the Declaration checkbox.
Step 31: Select the authorised signatory, in the Authorised Signatory drop-down list. This will enable the two buttons namely File with DSC or File with EVC.
Step 32: Click on the File with DSC or File with DSC button to file GSTR-11.
Step 28 - Filing of Form GSTR-11
Step 29: A message is displayed that "Tax amount as declared there would be posted as refund amount in RFD-10 State-wise and the same is non-editable on the higher side. Now select Yes to proceed to File. After filing GSTR-11, no changes can be made" and then click on the YES button.
Step 30: The Returns Filing for GST GSTR11 page will be displayed. Now select the Declaration checkbox.
Step 31: Select the authorised signatory, in the Authorised Signatory drop-down list. This will enable the two buttons namely File with DSC or File with EVC.
Step 32: Click on the File with DSC or File with DSC button to file GSTR-11.
 Step 32 - Filing of Form GSTR-11
Using DSC Option
Step 33: If using a DSC, it is required to select the registered DSC from the emSigner pop-up screen and then proceed from there accordingly.Using EVC Option
Step 34: Enter the OTP that has received and then click on the Validate OTP button.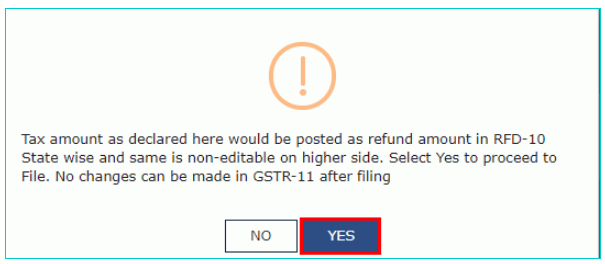 Step 34 - Filing of Form GSTR-11
Step 35: It displays a prompt to confirm the action, click on Proceed to move forward.
Step 34 - Filing of Form GSTR-11
Step 35: It displays a prompt to confirm the action, click on Proceed to move forward.
Acknowledgement Message
Step 36: On successfully filing the application for cancellation of registration, the system will generate the ARN and display a confirmation message. Step 37: The status of the GSTR-11 return changes to "Filed".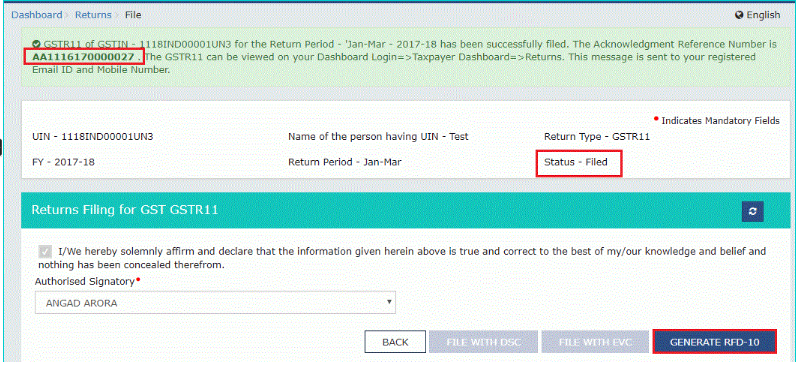 Step 37 - Filing of Form GSTR-11
Step 38: To generate GST RFD-10 application form of the same quarter for which Form GSTR-11 is filed, then click on the "Generate RFD-10" button.
Step 37 - Filing of Form GSTR-11
Step 38: To generate GST RFD-10 application form of the same quarter for which Form GSTR-11 is filed, then click on the "Generate RFD-10" button.