Renu Suresh
Expert
Published on: Jul 30, 2026
GSTR-4 Return Filing
GSTR-4 returns must be filed persons enrolled under the GST Composition Scheme. To help taxpayers prepare their GSTR-4 return offline, Goods and Service Tax Network (GSTN) provides the Excel-based GSTR-4 Offline Utility. Taxpayers can prepare their GSTR-4 return process by uploading JSON file generated from the Offline utility to GST portal. After uploading the GSTR-4 return, the taxpayer can preview the form, utilize cash to pay off liabilities and file GSTR-4. In this article, we will examine the procedure to file GSTR-4 returns using Offline Utility.Features of GSTR-4 Offline Utility
Details for the following sections of GSTR-4 return can be added by the taxpayer using GSTR 4 Offline Utility:- Inward supplies received from a registered supplier (including attracting reverse charge)
- Amendment of Inward Supplies received from a registered supplier (including attracting reverse charge)
- Inward supplies received from the unregistered supplier
- Amendment of Inward supplies received from the unregistered supplier
- Import of services
- Amendment of Import of services.
- Debit Notes/Credit Notes (for registered)
- Amendment of Debit Notes/Credit Notes (for registered)
- Debit Notes/Credit Notes (for unregistered)
- Amendment of Debit Notes/Credit Notes (for Unregistered)
- Tax on outward supplies made (Net of advance and goods returned)
- Amendments of Tax on outward supplies made (Net of advance and goods returned)
- The advance amount paid for reverse charge supplies in the tax period.
- Amendment of the Advance amount paid for reverse charge supplies in the tax period
- The advance amount on which tax was paid earlier, but the invoice has been received in the current period.
- Amendment of the Advance amount on which tax was paid earlier, but the invoice has been received in the current period.
Basic System Configurations
To use GSTR 4 Offline Utility tool efficiently, ensure that your system has the following basic configuration:- System Requirement: The GSTR-4 Offline Utility tool functions work best on Windows 7 and above; the GSTR-4 Offline Utility tool does not work on Linux and Mac.
- MS Excel: Microsoft Excel 2007 and above is needed to run GSTR-4 Offline Utility tool. Alternatively, the tool will open in the default browser for any below version.
Download GSTR 4 Offline Utility From the GST Portal
Downloading the GSTR-4 Offline Utility tool is a one-time activity; however, it may require an update in the future if the Tool is updated in the GST Portal. Note: You need to check the version of the GSTR 4 Offline Utility tool used by you with the one available for download on the GST Portal at regular intervals. Follow the step-by-step guidelines given below to download and install GSTR-4 Offline Utility tool on your computer: Note: The taxpayer can download the GSTR 4 Offline Utility from the GST Portal without login to the Portal. Step 1: Access the home page of Goods and Service Tax (GST) web portal. Step 2: You need to select the Downloads option from the GST home page. From the list of offline tools, you need to select GSTR-4 Offline Utility.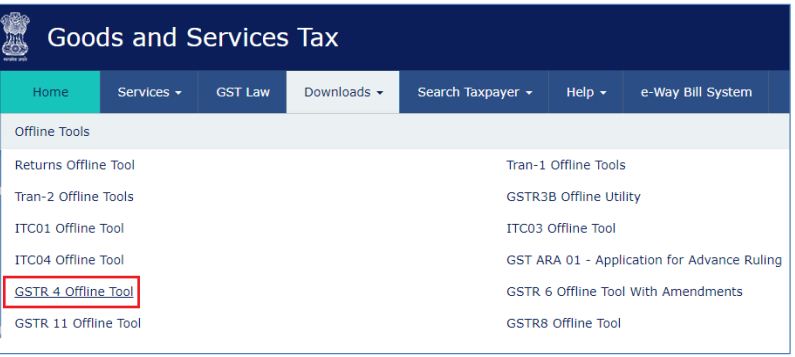 Image 1 GSTR 4 Return Filing
Step 3: The GSTR-4 Offline Utility tool page will be displayed. Click on the Download option to download the file.
Image 1 GSTR 4 Return Filing
Step 3: The GSTR-4 Offline Utility tool page will be displayed. Click on the Download option to download the file.
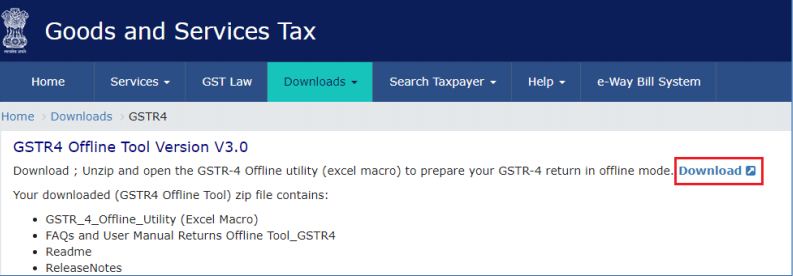 Image 2 GSTR 4 Return Filing
Step 4: A confirmation message will be displayed on the screen. Click on the PROCEED button to download the GSTR-4 Offline Utility from the GST Portal.
The progress of the download will be displayed in a new browser tab. You can track the progress of the offline tool download.
Step 5: The GSTR-4 Offline Tool will be downloaded in the Downloads folder.
Image 2 GSTR 4 Return Filing
Step 4: A confirmation message will be displayed on the screen. Click on the PROCEED button to download the GSTR-4 Offline Utility from the GST Portal.
The progress of the download will be displayed in a new browser tab. You can track the progress of the offline tool download.
Step 5: The GSTR-4 Offline Tool will be downloaded in the Downloads folder.
 Image 3 GSTR 4 Return Filing
Check Corrupted File
Before unzipping and opening the GSTR-4 offline tool, ensure that the file is not corrupted. To identify the corrupted file, check the values provided in the downloaded file with the ones mentioned under 'Downloads' section of GSTR-4. If there is an exact match, the GSTR-4 file is not corrupted. Else, you need to download the file again. To find the values provided in the downloaded file, follow the steps below: Open Windows PowerShell: To Start Windows PowerShell, use the Search box on the Start menu, and type PowerShell. Click Windows PowerShell. PowerShell will be displayed.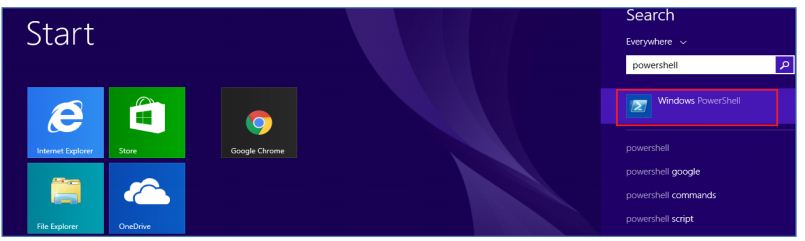 Image 4 GSTR 4 Return Filing
Provide the command in below format and click on enter. Command: Get-FileHash <> Algorithm <>
Image 4 GSTR 4 Return Filing
Provide the command in below format and click on enter. Command: Get-FileHash <> Algorithm <>
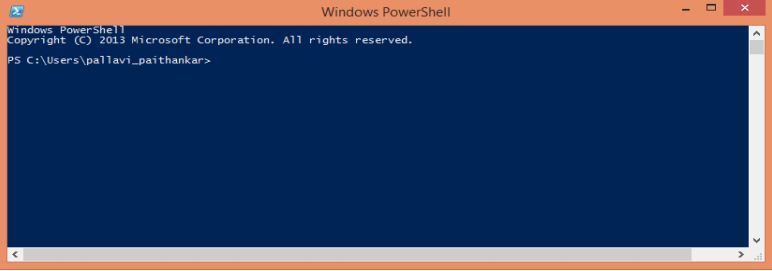 Image 5 GSTR 4 Return Filing
Check the Hash value that you have received with the hash value provided in GSTR_4_Offline_Utility downloads page.
Image 5 GSTR 4 Return Filing
Check the Hash value that you have received with the hash value provided in GSTR_4_Offline_Utility downloads page.
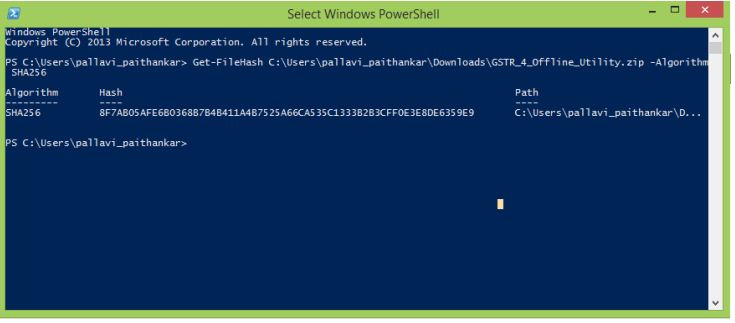 Image 6 GSTR 4 Return Filing
If the hash value matches, unzip the downloaded GSTR 4 folder.
Image 6 GSTR 4 Return Filing
If the hash value matches, unzip the downloaded GSTR 4 folder.
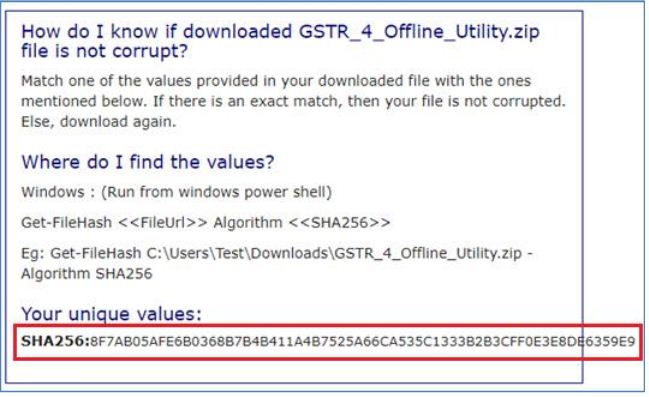 Image 7 GSTR 4 Return Filing
GSTR-4 Offline Utility Installation Procedure
Once the GSTR 4 Offline Utility is downloaded, you will need to unzip these downloaded files from your system. The procedure to install GSTR-4 Offline Utility is explained below: Step 1: Unzip the downloaded files and extract the files from the downloaded zip folder GSTR_4_Offline_Utility_v3.0.zip. The Zip folder will contain the GSTR4_Excel_Utility_v3.0 file as shown in the image below: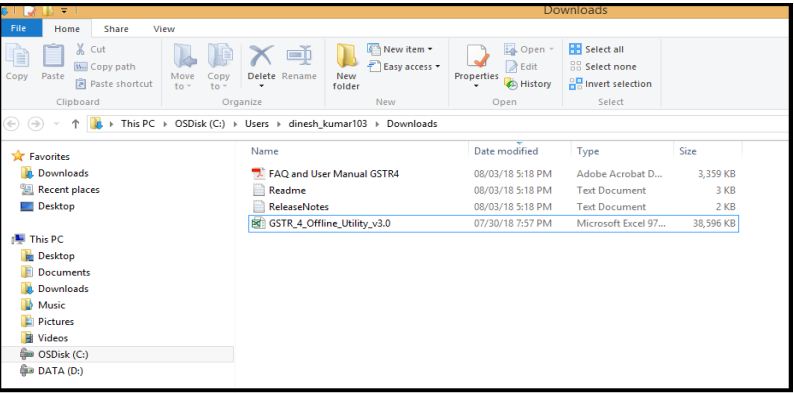 Image 8 GSTR 4 Return Filing
Step 2: Once the folder is unzipped, double-click the GSTR4_Excel_Utility file_v3.0. The excel file will be opened.
Step 3: You need to click on the Enable Editing button in the excel sheet. Then click on the Enable Content button in the excel sheet.
Image 8 GSTR 4 Return Filing
Step 2: Once the folder is unzipped, double-click the GSTR4_Excel_Utility file_v3.0. The excel file will be opened.
Step 3: You need to click on the Enable Editing button in the excel sheet. Then click on the Enable Content button in the excel sheet.
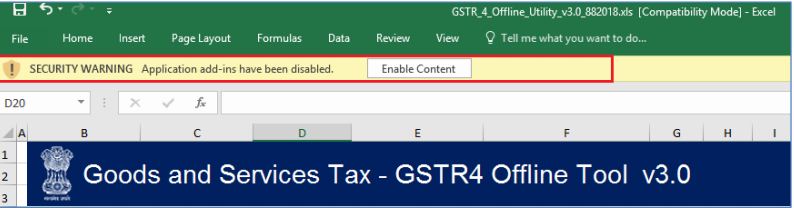 Image 9 GSTR 4 Return Filing
Procedure to Prepare GSTR-4 Return Utility
The procedure to prepare GSTR-4 return utility is explained in detail below:- Enter details in the GSTR-4 worksheet
- Validate the details entered using 'Validate Sheet' button.
- Generate JSON (JSON) file
- Upload Generated JSON to GST Portal
Enter details in GSTR-4 worksheet of GSTR-4 Offline Tool
Step 1: Launch GSTR-4 Excel-based Offline Utility and navigate to worksheet GSTR-4.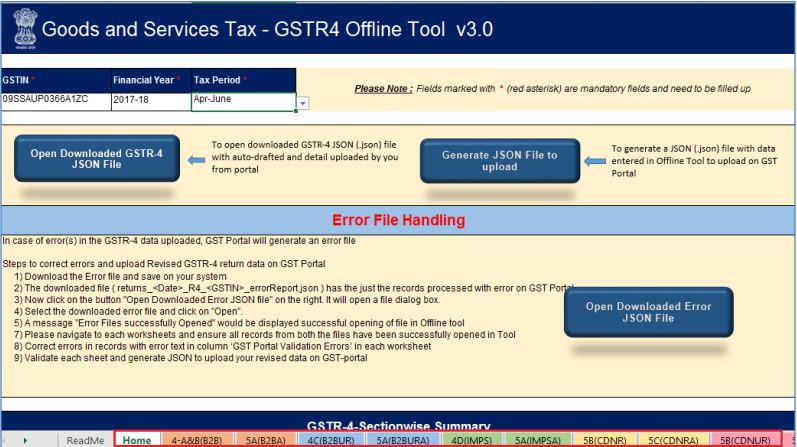 Image 10 GSTR 4 Return Filing
Step 2: Click on the Read Me tab. The Read Me tab provides the Introduction to Excel Based GSTR 4 Offline Tool in brief. Once you have read the details in the Read Me tab, move to the next tab Home.
Image 10 GSTR 4 Return Filing
Step 2: Click on the Read Me tab. The Read Me tab provides the Introduction to Excel Based GSTR 4 Offline Tool in brief. Once you have read the details in the Read Me tab, move to the next tab Home.
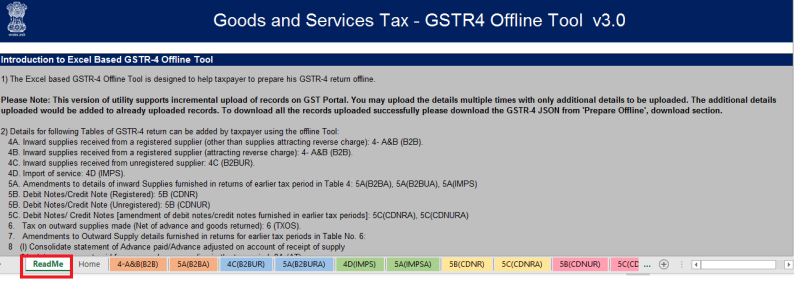 Image 11 GSTR 4 Return Filing
Step 3: In the GSTIN field, provide GSTIN.
Step 4: Select the applicable Financial Year from the Year drop-down list for which GSTR-4 needs to be prepared. Select the tax period from the drop-down menu.
Image 11 GSTR 4 Return Filing
Step 3: In the GSTIN field, provide GSTIN.
Step 4: Select the applicable Financial Year from the Year drop-down list for which GSTR-4 needs to be prepared. Select the tax period from the drop-down menu.
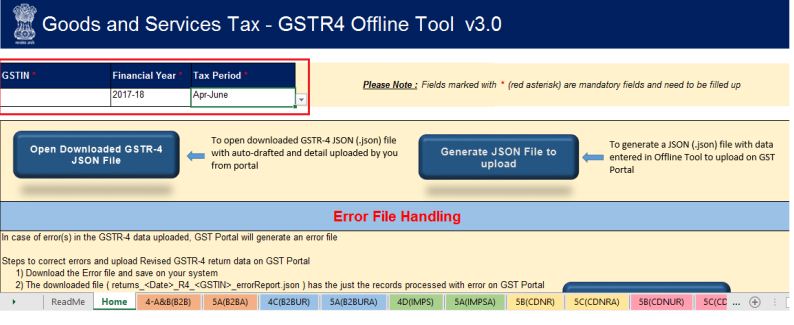 Image 12 GSTR 4 Return Filing
Step 5: After selecting the financial year and tax period, add the invoice details in the Offline tool in each worksheet.
Note: Carefully go through Column ACTION, which depicts what will be done on upload of the worksheet.
Image 12 GSTR 4 Return Filing
Step 5: After selecting the financial year and tax period, add the invoice details in the Offline tool in each worksheet.
Note: Carefully go through Column ACTION, which depicts what will be done on upload of the worksheet.
- If the Add option is selected, then the data will be added. If there is any existing data of the same GSTIN, the same will be replaced by the current data.
- If Delete is selected then the data existing of the same GSTIN, will be deleted.
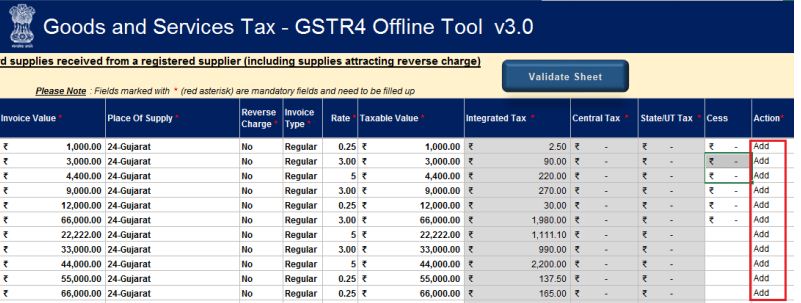 Image 13 GSTR 4 Return Filing
Step 6: Details which are to be added to each worksheet are mentioned below:
Image 13 GSTR 4 Return Filing
Step 6: Details which are to be added to each worksheet are mentioned below:
- Worksheet 4A&B (B2B) - Inward supplies received from a registered supplier (including attracting reverse charge)
- Worksheet 5A (B2BA) - Amendment of Inward Supplies received from a registered supplier (including attracting reverse charge)
- Worksheet 4C (B2BUR) - Inward supplies received from the unregistered supplier
- Worksheet 5A (B2BURA) - Amendment of Inward supplies received from the unregistered supplier
- Worksheet 4D (IMPS) - Import of services
- Worksheet 5A (IMPSA) - Amendment of Import of services.
- Worksheet 5B (CDNR) - Debit Notes/Credit Notes (for registered)
- Worksheet 5C (CDNRA) - Amendment of Debit Notes/Credit Notes (for registered)
- Worksheet 5B (CDNUR) - Debit Notes/Credit Notes (for unregistered)
- Worksheet 5C (CDNURA) - Amendment of Debit Notes/Credit Notes (for Unregistered)
- Worksheet 6 (TXOS) -Tax on outward supplies made (Net of advance and goods returned)
- Worksheet 7 (TXOSA) - Amendments of Tax on outward supplies made (Net of advance and goods returned)
- Worksheet 8A (AT) - the Advance amount paid for reverse charge supplies in the tax period
- Worksheet 8A II (ATA) - Amendment of the Advance amount paid for reverse charge supplies in the tax period
- Worksheet 8B (ATADJ) - Advance amount on which tax was paid in earlier period but invoice has been received in the current period
- Worksheet 8B – II (ATADJA) - Amendment of the Advance amount on which tax was paid in the earlier period, but the invoice has been received in the current period
Validate Details Entered using Validate Sheet Button
Add Records to the GSTR-4 offline utility worksheet and use the column Action and mark each row as added. Step 1: Once all details are entered in the worksheet, click the Validate Sheet button to validate the GSTR-4 worksheet.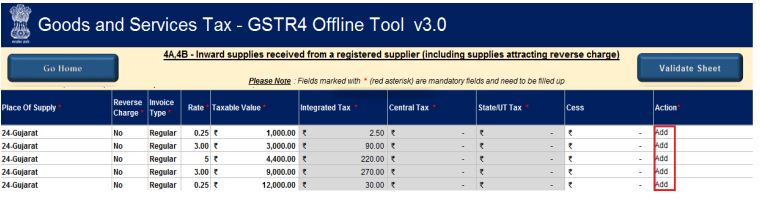 Image 14 GSTR 4 Return Filing
Note: Each worksheet needs to be validated separately.
Image 14 GSTR 4 Return Filing
Note: Each worksheet needs to be validated separately.
For Successful Validation
Step 2: In case of successful validation, a pop-up message will be displayed as the sheet is validated. If there are no errors, you can proceed to generate a JSON file by clicking on the OK button.For Unsuccessful Validation
Step 3: A pop-up message will be displayed with an error message. Click on the OK button.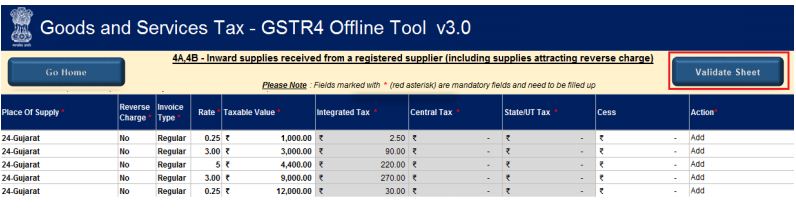 Image 15 GSTR 4 Return Filing
Step 4: In case of unsuccessful validation, the “Sheet Validation Errors” Column is updated with the error message.
Image 15 GSTR 4 Return Filing
Step 4: In case of unsuccessful validation, the “Sheet Validation Errors” Column is updated with the error message.
 Image 16 GSTR 4 Return Filing
Step 5: If the validation fails; check for cells that have failed validation and correct errors according to help text file.
Image 16 GSTR 4 Return Filing
Step 5: If the validation fails; check for cells that have failed validation and correct errors according to help text file.
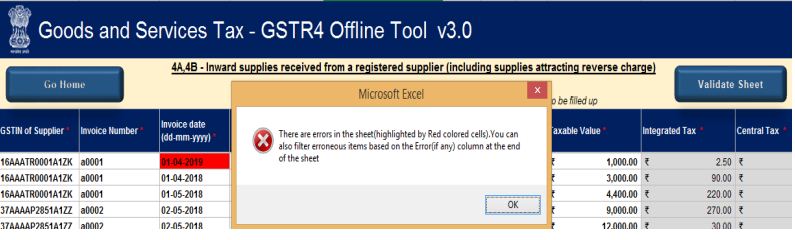 Image 17 GSTR 4 Return Filing
Note: To view the comments for fields with errors, you can click on the Review tab and select Show All Comments link.
Step 6: The rows with an error on the current worksheet need to be revisited and the error needs to be rectified. Click the Validate Sheet button again, after all error are rectified.
Image 17 GSTR 4 Return Filing
Note: To view the comments for fields with errors, you can click on the Review tab and select Show All Comments link.
Step 6: The rows with an error on the current worksheet need to be revisited and the error needs to be rectified. Click the Validate Sheet button again, after all error are rectified.
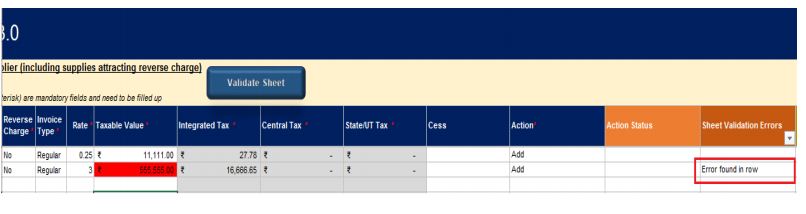 Image 18 GSTR 4 Return Filing
Step 7: A pop-up message ‘Sheet Successfully Validated, No error(s) found’ will be displayed once the sheet is validated. Click on the OK button.
Step 8: As stated above, for successful validation, the errors in Sheet Validation Errors column data will be cleared.
Image 18 GSTR 4 Return Filing
Step 7: A pop-up message ‘Sheet Successfully Validated, No error(s) found’ will be displayed once the sheet is validated. Click on the OK button.
Step 8: As stated above, for successful validation, the errors in Sheet Validation Errors column data will be cleared.
Generate JSON using the Generate File button
Upon successful validation, you will need to click on the Go Home button to navigate to the home page. Step 1: After all worksheets have been successfully validated, click on the Get Summary button to update the summary on the Home Tab. A summary of all invoices and other details will be displayed for all sections on the home worksheet. Step 2: From the main page, click on the Generate JSON File to generate JSON file. This can be uploaded to the GST Portal.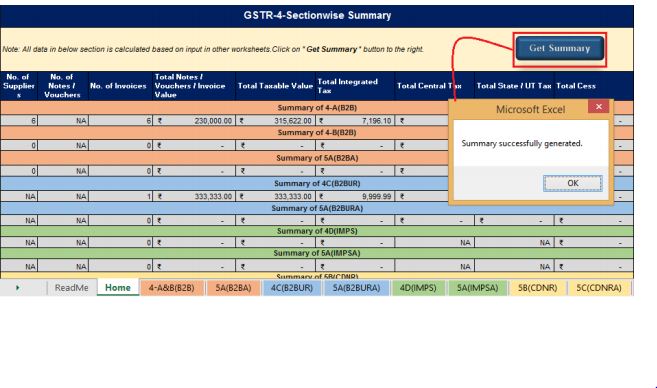 Image 19 GSTR 4 Return Filing
Step 3: A message will be shown as “Processing will take some time. Please wait….”. You will need to wait depending on the volume of data entered for each section of GSTR-4 offline utility worksheet. Once the process is complete, click on the OK button.
Note: JSON will be generated once the worksheet has been successfully validated.
Step 4: A confirmation message will be displayed. Click the OK button and save the recently generated JSON file on the system.
Image 19 GSTR 4 Return Filing
Step 3: A message will be shown as “Processing will take some time. Please wait….”. You will need to wait depending on the volume of data entered for each section of GSTR-4 offline utility worksheet. Once the process is complete, click on the OK button.
Note: JSON will be generated once the worksheet has been successfully validated.
Step 4: A confirmation message will be displayed. Click the OK button and save the recently generated JSON file on the system.
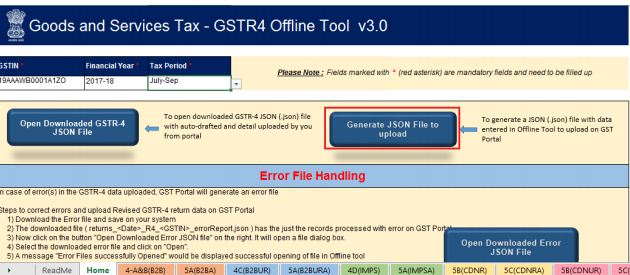 Image 20 GSTR 4 Return Filing
Step 5: Browse the location to save the JSON (.json) file in the system and click on the Save button.
Note: Please do not change the extension name of the file.
Image 20 GSTR 4 Return Filing
Step 5: Browse the location to save the JSON (.json) file in the system and click on the Save button.
Note: Please do not change the extension name of the file.
Upload Generated JSON to GST Portal
Step 1: To upload the Generated JSON file to the GST portal, you need to access the home page of Goods and Service Tax (GST). Step 2: From the main page, click on the Service option and then click on the Returns option. Now, you need to select the Returns dashboard command. Step 3: The File Returns page will be displayed. In the Financial Year drop-down menu, select the financial year for which the GSTR-4 return has to be uploaded. Step 4: From the drop-down menu, select the return filing period for which the GSTR-3B return has to be uploaded. Step 5: After providing, year and period for which the return has to be filed, click on the Search button. Step 6: Applicable returns for the selected tax period will be displayed. For the GSTR-4 file, you need to click on the PREPARE OFFLINE option.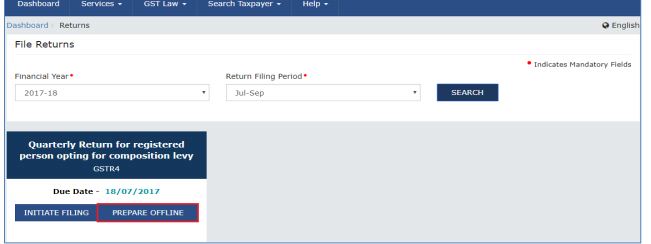 Image 21 GSTR 4 Return Filing
Step 7: Click on the Choose File button to choose the JSON file prepared using the GSTR-4 Offline utility tool.
Image 21 GSTR 4 Return Filing
Step 7: Click on the Choose File button to choose the JSON file prepared using the GSTR-4 Offline utility tool.
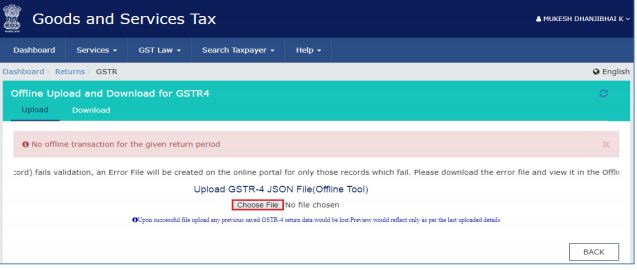 Image 22 GSTR 4 Return Filing
Step 8: Browse and navigate to the JSON file to be uploaded from the computer. Click on the Open button.
Step 9: The uploaded JSON file will be validated and processed. It could take 15 minutes for processing. Status will be changed to Processed.
Step 10: Upon successful validation and processing, the details entered will be populated in respective tiles on GSTR-4 online screen.
Image 22 GSTR 4 Return Filing
Step 8: Browse and navigate to the JSON file to be uploaded from the computer. Click on the Open button.
Step 9: The uploaded JSON file will be validated and processed. It could take 15 minutes for processing. Status will be changed to Processed.
Step 10: Upon successful validation and processing, the details entered will be populated in respective tiles on GSTR-4 online screen.
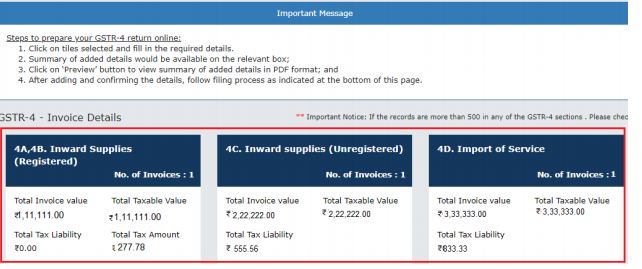 Image 23 GSTR 4 Return Filing
Step 11: In case of validation failure during processing; errors if any would be shown on the GST Portal.
Image 23 GSTR 4 Return Filing
Step 11: In case of validation failure during processing; errors if any would be shown on the GST Portal.
Filing GSTR 4
Step 1: To file GSTR 4 on GST portal, access the home page of Goods and Service Tax (GST). Step 2: From the main page, click on the Service option and then click on the Returns option. Now, you need to select the Returns dashboard command. Step 3: The File Returns page will be displayed. In the Financial Year drop-down menu, select the financial year for which the GSTR-4 return has to be uploaded. Step 4: From the Return Filing Period drop-down menu, select the return filing period for which the GSTR-4 return has to be uploaded. Step 5: After providing, year and period for which the return has to be filed, click on the Search button. Step 6: You have to click on the Prepare Online button; the data uploaded from the GSTR-4 offline tool via JSON file generated will be displayed.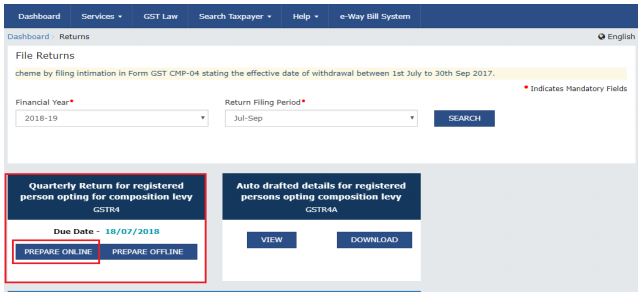 Image 24 GSTR 4 Return Filing
Step 7: Answer the question that will enable the relevant sections to appear on the next screen. Once all the questions are answered with YES or NO, click on the NEXT button.
Image 24 GSTR 4 Return Filing
Step 7: Answer the question that will enable the relevant sections to appear on the next screen. Once all the questions are answered with YES or NO, click on the NEXT button.
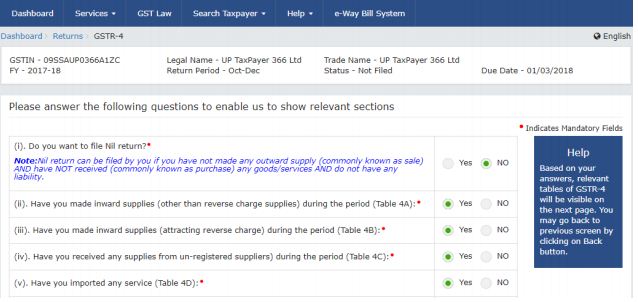 Image 25 GSTR 4 Return Filing
Step 8: The following screen will appear and the taxpayer will see all the details which he/she has uploaded via offline mode using the button “Generate JSON file to Upload” from the home page.
Image 25 GSTR 4 Return Filing
Step 8: The following screen will appear and the taxpayer will see all the details which he/she has uploaded via offline mode using the button “Generate JSON file to Upload” from the home page.
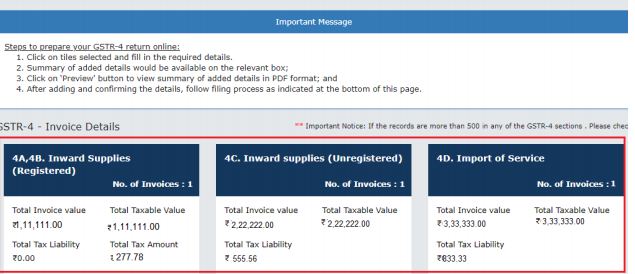 Image 26 GSTR 4 Return Filing
Step 9: Click on Proceed to file button for computation of tax, interest and late fee, if any. Ready to file as on the current date will be displayed on the screen.
Image 26 GSTR 4 Return Filing
Step 9: Click on Proceed to file button for computation of tax, interest and late fee, if any. Ready to file as on the current date will be displayed on the screen.
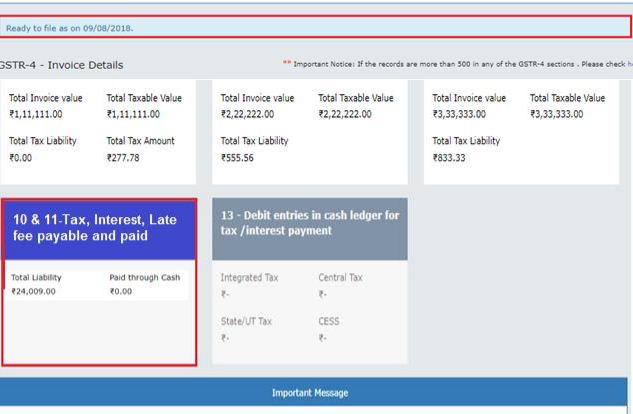 Image 27 GSTR 4 Return Filing
Step 10: Click the file 10 and 11 - Tax, Interest, Late fee payable. You need to verify the amount due in the section present quarter liability.
Image 27 GSTR 4 Return Filing
Step 10: Click the file 10 and 11 - Tax, Interest, Late fee payable. You need to verify the amount due in the section present quarter liability.
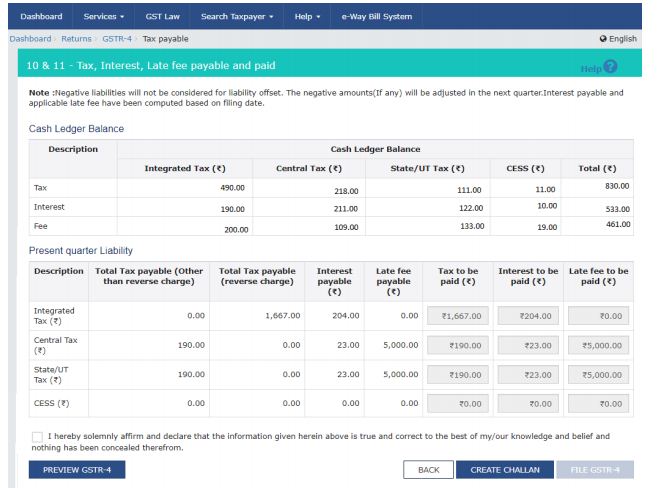 Image 28 GSTR 4 Return Filing
Step 11: Click on the file GSTR-4 button, if the Funds are less a pop up” Insufficient Balance “will appear on the screen, prompting taxpayer to make payment via CREATE CHALLAN.
Image 28 GSTR 4 Return Filing
Step 11: Click on the file GSTR-4 button, if the Funds are less a pop up” Insufficient Balance “will appear on the screen, prompting taxpayer to make payment via CREATE CHALLAN.
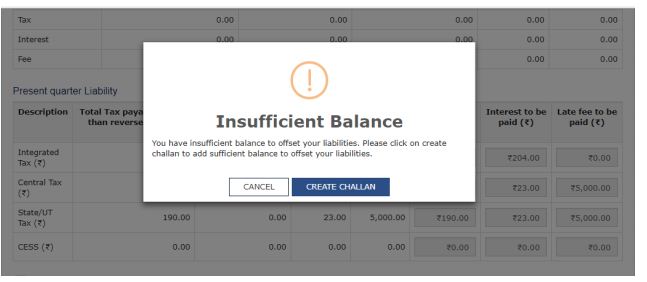 Image 29 GSTR 4 Return Filing
Step 12: The taxpayer can make the payment by clicking on CREATE CHALLAN button. He/she has the option to pay via E-payment, over the counter or NEFT/RTGS.
Image 29 GSTR 4 Return Filing
Step 12: The taxpayer can make the payment by clicking on CREATE CHALLAN button. He/she has the option to pay via E-payment, over the counter or NEFT/RTGS.
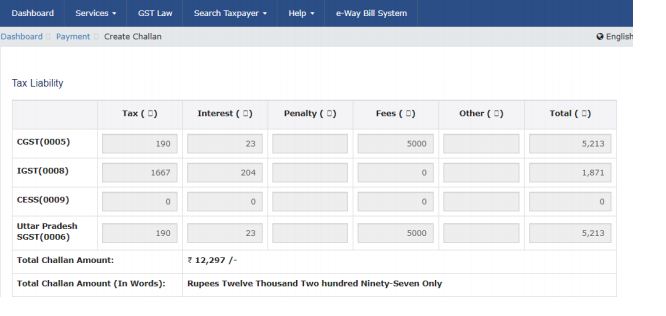 Image 30 GSTR 4 Return Filing
Step 13: After the completion of payment, the Cash Ledger Balance section will be updated. The taxpayer will be navigated back to GSTR-4 Tax Payable page.
Step 14: Click on PREVIEW GSTR-4 button. A PDF file will show a summary that can be saved for future reference by the taxpayer.
Step 15: Once the GSTR-4 Returns Filled, select the declaration Checkbox along with Authorized Signatory and then click on the File GSTR-4 button.
Step 16: Amount due will offset the amount due, and the taxpayer is navigated to the verification page. Complete GSTR-4 Filling by providing OTP in case of EVC or by using DSC.
Once the verification is completed, ARN will be generated and status will be changed to Filed.
Image 30 GSTR 4 Return Filing
Step 13: After the completion of payment, the Cash Ledger Balance section will be updated. The taxpayer will be navigated back to GSTR-4 Tax Payable page.
Step 14: Click on PREVIEW GSTR-4 button. A PDF file will show a summary that can be saved for future reference by the taxpayer.
Step 15: Once the GSTR-4 Returns Filled, select the declaration Checkbox along with Authorized Signatory and then click on the File GSTR-4 button.
Step 16: Amount due will offset the amount due, and the taxpayer is navigated to the verification page. Complete GSTR-4 Filling by providing OTP in case of EVC or by using DSC.
Once the verification is completed, ARN will be generated and status will be changed to Filed.