IndiaFilings
Expert
Published on: Apr 22, 2026
GSTR 1A Return Filing - On GST Portal
GSTR 1A return shows the amendments, modifications or deletions made by the recipient in
GSTR 2 return. In this article, we look at the details provided in GSTR 1A return in detail.Due Dates Modified
The Government has recently deferred the due date for filing GSTR 1 from the 11
th of April to the 13th. Apart from this, the following are the due dates for filing GSTR 1 for the months of April, May and June 2019:- April 2019 – 11th May 2019
- May 2019 – 11th June 2019
- June 2019 – 11th July 2019
The deadline for filing quarterly GSTR 1 for the quarter of April-June is 31
st July 2019.Import of E-way Bill Data
It is essential for taxpayers to validate the data of their transactions before proceeding with the process of filing returns, as it saves time and unnecessary data entry. To cater to this purpose, the GST portal has now been integrated with the E-way Bill Portal (EWB). The integration enables the users to import the B2B and B2C invoice sections and the HSN-wise summary of the outward supplies section. Using these details, the taxpayers may verify the data and complete the filing. The feature has been introduced considering the major data gaps between self-declared liability in Form GSTR 1 and Form GSTR 3B. A similar rule also applies to Input Tax Credit (ITC) claimed in GSTR 3B, as it could be compared with the credit available in Form GSTR 2A. Data validation and comparison can be pursued through the following tabs of the portal:
- Liability other than export/reverse charge.
- Liability due to reverse charge.
- Liability due to export and SEZ supplies.
- ITC credit claimed and due.
On a more precise note, the newly launched facility takes away the taxpayer’s need to make specifications connected with the e-way bill transactions specified in GSTR 3B as it allows the taxpayers to import data in Form GSTR 1 for all invoices for generating the e-way bill. The particulars so imported would include the details of the supplier, receiver, invoice number, the date of invoice, the type and quantity of goods, HSN Code, etc. These details are then transferred to the GST portal and classed into three categories to be used in GSTR 1 – namely, Business to Business Supplies (B2B), Business to Consumer (B2C) supplies (covering values of above Rs.2.5 lakhs) and HSN (Harmonized System of Nomenclature Code for goods and services) wise consolidated supply data. Taxpayers with more than 50 invoices but not more than 500 may download the data of the sections mentioned above in the ‘CSV’ file format, which can be imported into the GSTR1 offline tool. The form could then be filed through the offline tool after adding sufficient data and generating a JSON file, which can be uploaded on to the GST portal. If the number of invoices is above 500, the invoice details pertaining to these sections can be imported from the ‘Return’ Dashboard on the GST portal as a zip file. This can later be unzipped to three files and extracted in Excel format. The taxpayer may then add more invoices and fill the other sheets to upload in the offline tool.
GSTR 1A Return Preparation
In
GSTR 1 return, all taxpayers registered under GST are required to provide details of sales made by them in the previous month. In case of B2B invoices, the taxpayer must provide the GSTIN of the customer and upload other details pertaining to the invoice. Once the details of all B2B invoices are filed on or before the 10th of every month, the details filed in GSTR 1 return will be shown to the respective customer in GSTR 2A. Based on the information presented in GSTR 2A return, the customer would prepare and file GSTR 2 return by accepting, modifying or rejecting invoices. This information and actions taken by the customer is shown to the supplier in GSTR 1A return.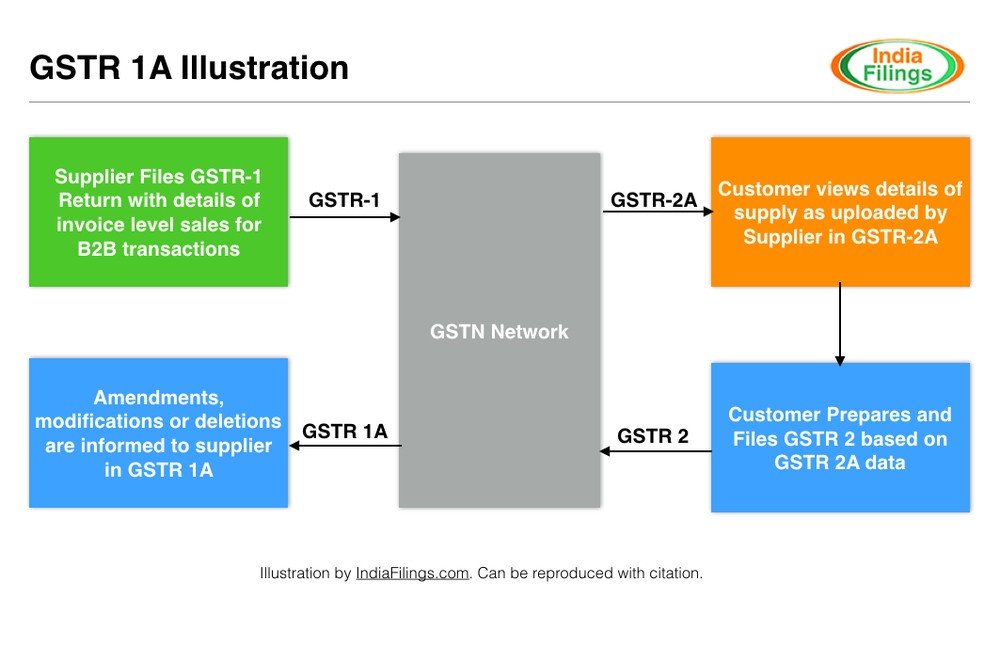 GSTR 1A
Acceptance or Rejection of Changes Proposed in GSTR 2 Return
After filing GSTR 2 return by the recipient, the amendments, modifications or deletions made by the recipient, the supplier can view the details in Form GSTR 1A. The Supplier can either accept or reject the details communicated in GSTR 1A on or before the 17th of every month. If the changes are accepted, then the GSTR 1 return will be amended accordingly. Further, in case of an acceptance of new invoices, it could lead to short payment of GST, which the supplier will be liable for paying with interest.
GSTR 1A Return Filing
All normal taxpayers and casual taxpayers are required to file GSTR-1A return every month. GSTR 1A return can be generated after the 15th of every month by accessing the GST Portal. To view or download GSTR 1A, go to Services > Returns > Returns Dashboard. After selecting the financial year and tax period, GSTR-1A in the given period will be displayed. GSTR-1A will be generated only when the recipient in GSTR 2 or GSTR 4 or GSTR 6 takes any of the following action:
- Rejects the details added by the supplier and submits the return.
- Modifies the details added by the supplier and submits the return.
- Adds any new details missed by the supplier and submits the return.
In addition to the above condition, the details in GSTR 1A return will be auto-populated to the supplier only if the following conditions are met:
- Recipient submits GSTR 2 or GSTR 4 or GSTR 6 return on or before 17th of the month.
- The supplier has not filed or generated GSTR 3.
- The supplier has not submitted GSTR-1A.
GSTR 1A Return Filing Procedure
Based on the information provided in GSTR 1A, the taxpayer can accept or reject or keep pending the changes proposed by the recipient as shown below:
Step 1: Login to GST Portal and Select GSTR 1A
 Step 1 - GSTR 1A
Step 2: View or Download GSTR 1A Summary
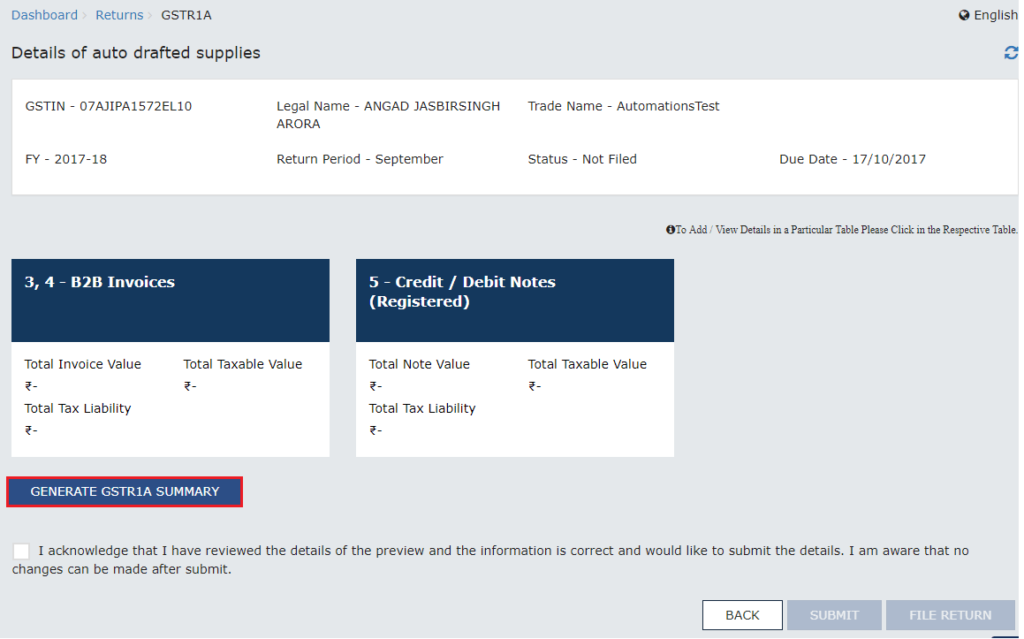 Step 2- Generate GSTR 1A Summary
Step 3: View B2B Invoices Summary
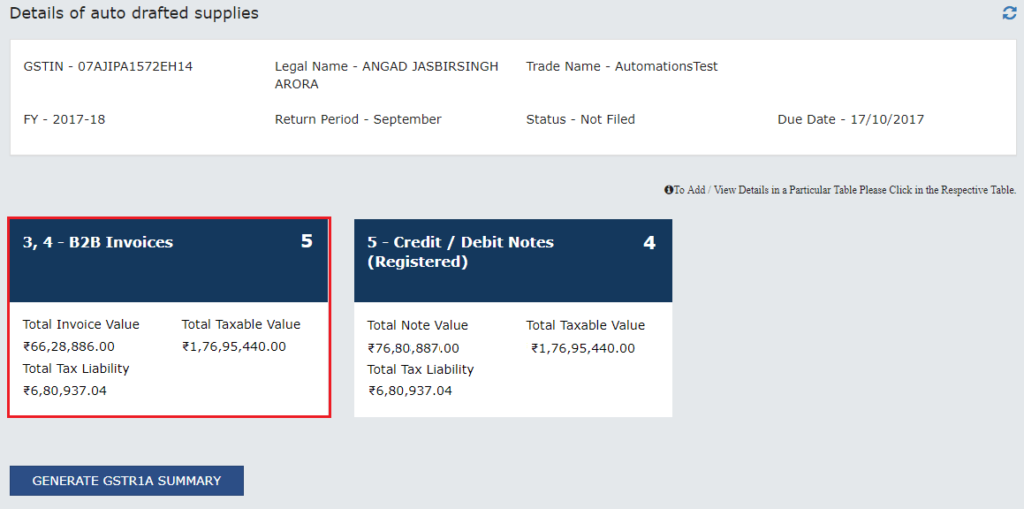 Step 3- View GSTR 1A B2B Invoices
Step 4: Take action on amendments, modifications and deletions
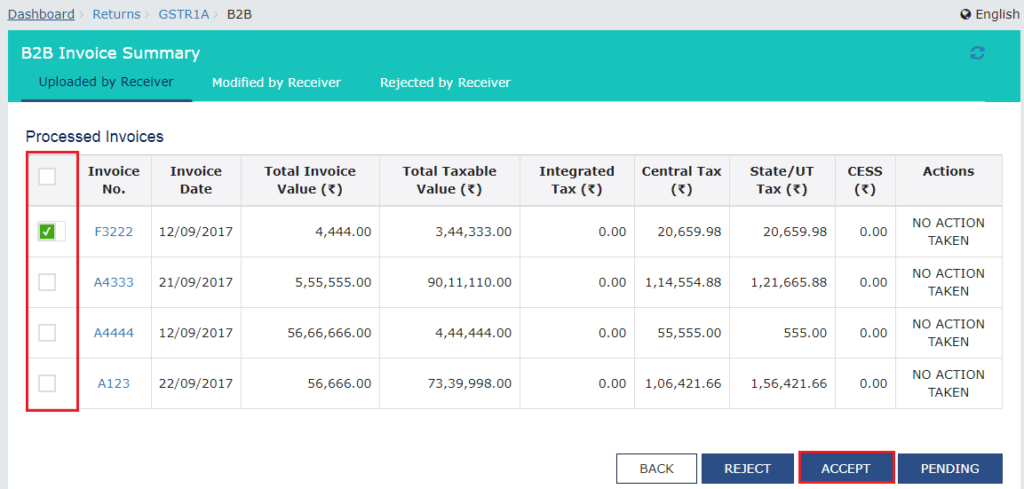 Step 4- Take Action on GSTR 1A
Step 5: File GSTR 1A Return
 Step 5- Preview & file GSTR 1A- return
Note: Taxpayers cannot add new invoices in GSTR 1A. In GSTR 1A return, the taxpayer can only accept, reject or keep pending the changes proposed by the recipient.
Step 5- Preview & file GSTR 1A- return
Note: Taxpayers cannot add new invoices in GSTR 1A. In GSTR 1A return, the taxpayer can only accept, reject or keep pending the changes proposed by the recipient.
Download GSTR 1A Return File from GST Portal
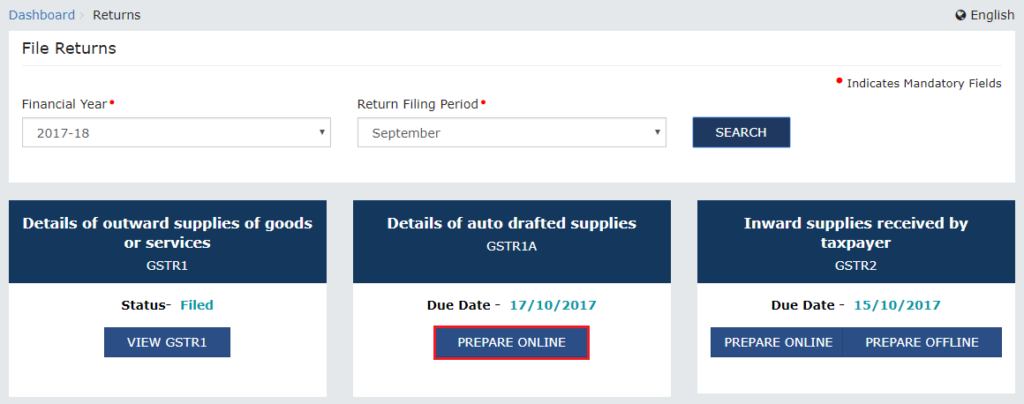
Procedure to download GSTR 1A return file from GST portal is explained in detail here: Step 1: To download the GSTR 1A return file from the GST portal, you need to login to the GST portal using the user credentials. Step 2: After login to the GST portal, select returns option from the service menu. After that, click on the Returns Dashboard option. The file return page will be displayed. Image 1 Modifying GSTR 1A Return
Step 3: From that page, you have to select the financial year for which the GSTR 1A return has to be downloaded. Click on the corresponding year from the drop-down list.
Step 4: Once the year is selected, select the return filing period for which the GSTR 1A return has to be downloaded from the drop-down list.
Step 5: After selecting the year and period, click on the search option. Applicable returns of the tax period chosen will be displayed.
Image 1 Modifying GSTR 1A Return
Step 3: From that page, you have to select the financial year for which the GSTR 1A return has to be downloaded. Click on the corresponding year from the drop-down list.
Step 4: Once the year is selected, select the return filing period for which the GSTR 1A return has to be downloaded from the drop-down list.
Step 5: After selecting the year and period, click on the search option. Applicable returns of the tax period chosen will be displayed.
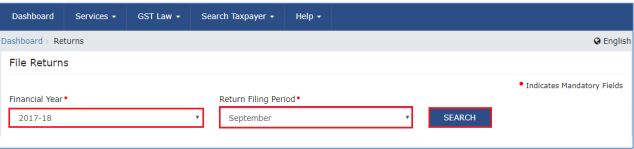 Image 2 Modifying GSTR 1A Return
Step 6: In the Inward Supplies received by taxpayer GSTR 1A title, click on the Prepare Offline button.
Image 2 Modifying GSTR 1A Return
Step 6: In the Inward Supplies received by taxpayer GSTR 1A title, click on the Prepare Offline button.
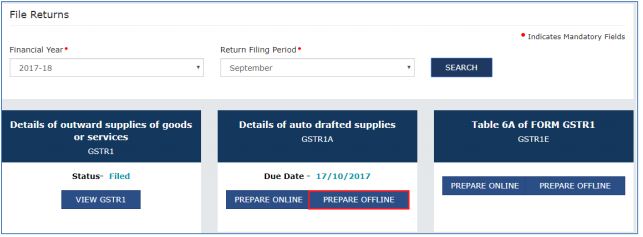 Image 3 Modifying GSTR 1A Return
Step 7: The Invoice Download page will be displayed. Click on the Generate file button. GSTR -1A return file will be downloaded in the zip format.
The Portal displays a message stating the acceptance of the message. The Portal generates the return file in 20 minutes.
Image 3 Modifying GSTR 1A Return
Step 7: The Invoice Download page will be displayed. Click on the Generate file button. GSTR -1A return file will be downloaded in the zip format.
The Portal displays a message stating the acceptance of the message. The Portal generates the return file in 20 minutes.
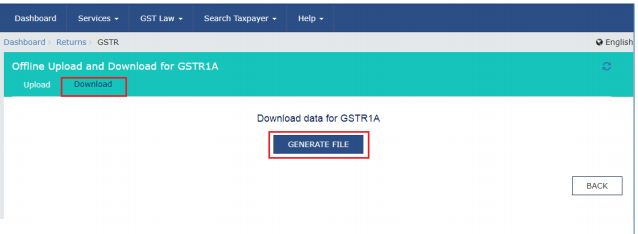 Image 4 Modifying GSTR 1A Return
Open Downloaded GSTR 1A Return File
To open downloaded GSTR 1A return file from GST Portal using the Returns Offline tool, follow the procedure explained below: Step 8: Double-click on the GST return offline tool icon from the desktop; the Offline tool main page will be displayed. Know more about GST Returns Offline Tool Installation Procedure Step 9: Click on the open button from the ‘open downloaded return file option from the GST portal’ tab.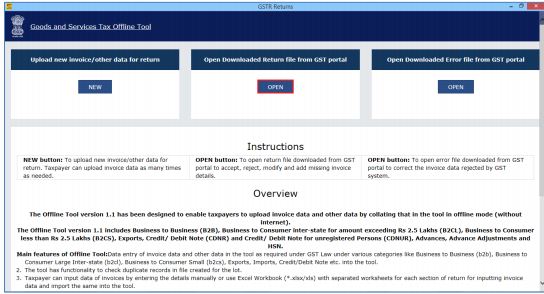 Image 5 Modifying GSTR 1A Return
Step 10: Browse and select the downloaded GSTR 1A return file in zip format and click on the open button.
Image 5 Modifying GSTR 1A Return
Step 10: Browse and select the downloaded GSTR 1A return file in zip format and click on the open button.
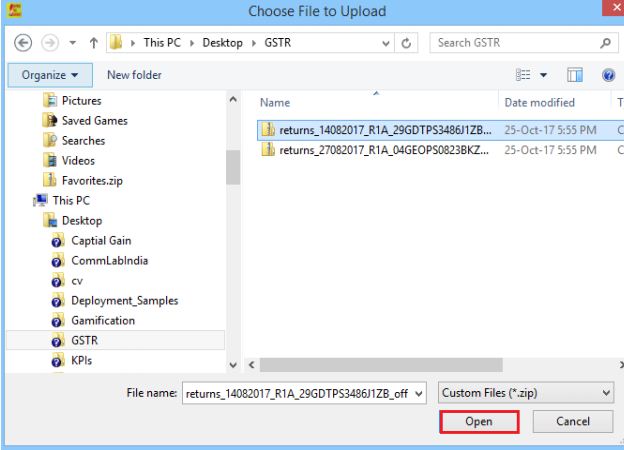 Image 6 Modifying GSTR 1A Return
Step 11: Details of the return file which you have downloaded from the GST Portal will be displayed. Click on the Proceed option to modify details.
Image 6 Modifying GSTR 1A Return
Step 11: Details of the return file which you have downloaded from the GST Portal will be displayed. Click on the Proceed option to modify details.
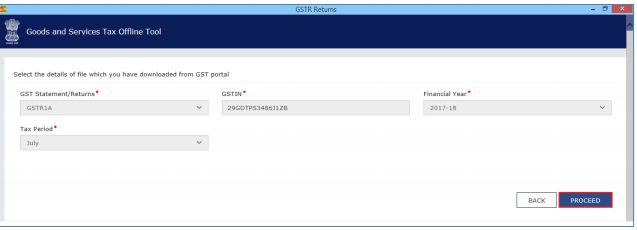 Image 7 Modifying GSTR 1A Return
Step 12: The portal displays the summary page. Select the link for the corresponding return section name to modify or add or delete invoice details.
Image 7 Modifying GSTR 1A Return
Step 12: The portal displays the summary page. Select the link for the corresponding return section name to modify or add or delete invoice details.
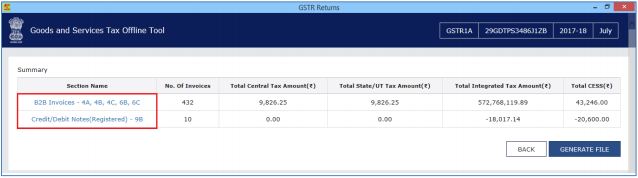 Image 8 Modifying GSTR 1A Return
Once the section details are shown, you can do the following things:
Image 8 Modifying GSTR 1A Return
Once the section details are shown, you can do the following things:
- Accept Invoices Details
- Reject Invoices Details
- Keep Pending Invoices
Accept the Invoices
Step 1: To accept the invoice, select the checkbox against the invoice and click on the Accept option.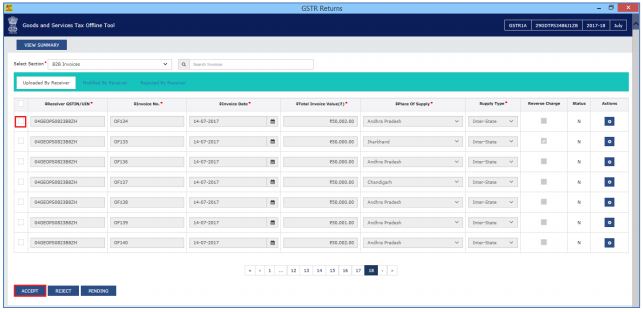 Image 9 Modifying GSTR 1A Return
Step 2: For acceptance, a success message will be displayed.
Image 9 Modifying GSTR 1A Return
Step 2: For acceptance, a success message will be displayed.
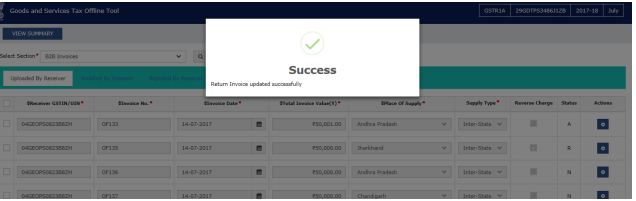 Image 10 Modifying GSTR 1A Return
Step 3: Once the invoice detail is accepted successfully, invoice status will be changed from N to A as depicted in the image below:
Image 10 Modifying GSTR 1A Return
Step 3: Once the invoice detail is accepted successfully, invoice status will be changed from N to A as depicted in the image below:
 Image 11 Modifying GSTR 1A Return
Reject the Invoices
Step 1: To reject the invoices, select the checkbox against the invoice and click on the Reject option.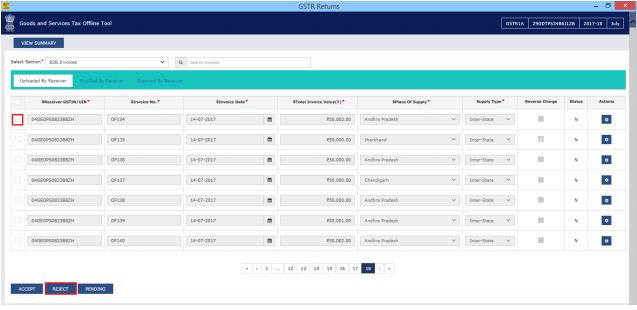 Image 12 Modifying GSTR 1A Return
Step 2: The portal displays a success message after rejection of the invoice.
Image 12 Modifying GSTR 1A Return
Step 2: The portal displays a success message after rejection of the invoice.
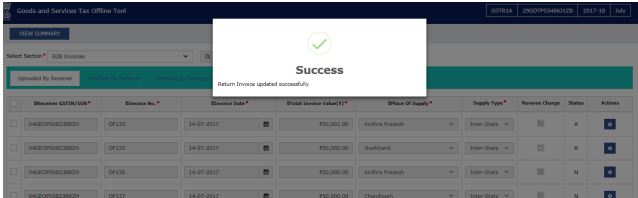 Image 13 Modifying GSTR 1A Return
Step 3: Once the invoice details are accepted successfully, invoice status will be changed from N to R as depicted in the image below:
Image 13 Modifying GSTR 1A Return
Step 3: Once the invoice details are accepted successfully, invoice status will be changed from N to R as depicted in the image below:
 Image 14 Modifying GSTR 1A Return
Keep Pending Invoices
Step 1: To keep the invoices pending in GSTR 1A return offline file, select the checkbox against the invoice and click on the Pending option.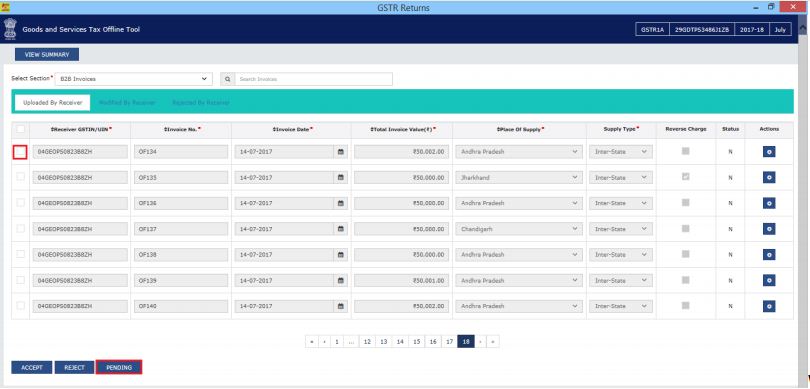 Image 15 Modifying GSTR 1A Return
Step 2: The portal displays a success message after the portal accepts the pending invoices.
Image 15 Modifying GSTR 1A Return
Step 2: The portal displays a success message after the portal accepts the pending invoices.
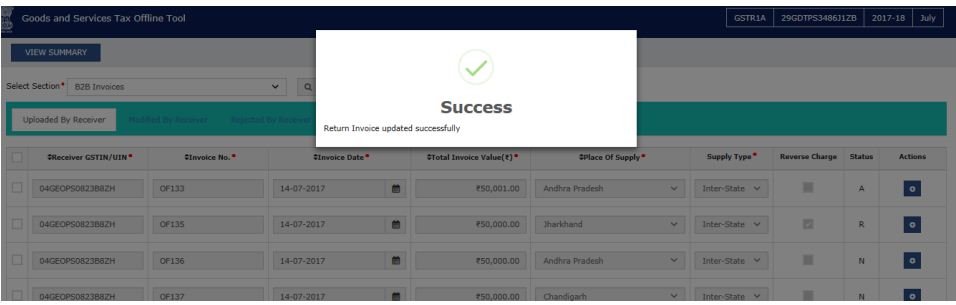 Image 16 Modifying GSTR 1A Return
Step 3: Once the invoice details are accepted successfully, invoice status will be changed from N to P as depicted in the image below:
Image 16 Modifying GSTR 1A Return
Step 3: Once the invoice details are accepted successfully, invoice status will be changed from N to P as depicted in the image below:
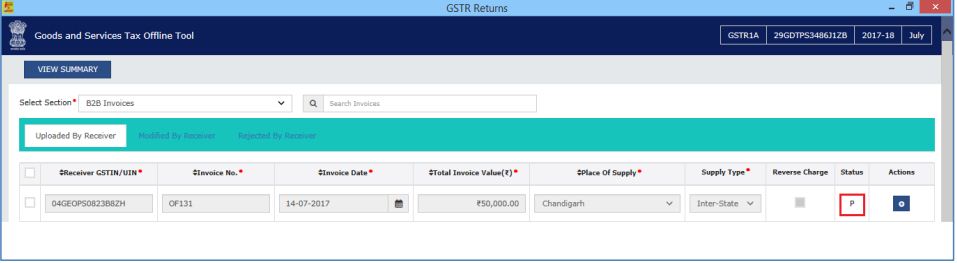 Image 17 Modifying GSTR 1A Return
Generate JSON File
Step 4: Once the action is taken on all the invoices such as Accept, Reject or Pending, click on the view Summary button.
Image 17 Modifying GSTR 1A Return
Generate JSON File
Step 4: Once the action is taken on all the invoices such as Accept, Reject or Pending, click on the view Summary button.
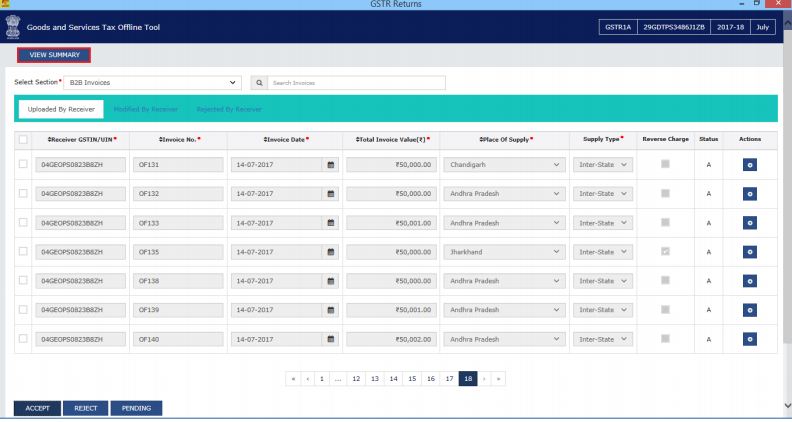 Image 18 Modifying GSTR 1A Return
Step 5: The Summary page will be displayed, click on the Generate File button.
Image 18 Modifying GSTR 1A Return
Step 5: The Summary page will be displayed, click on the Generate File button.
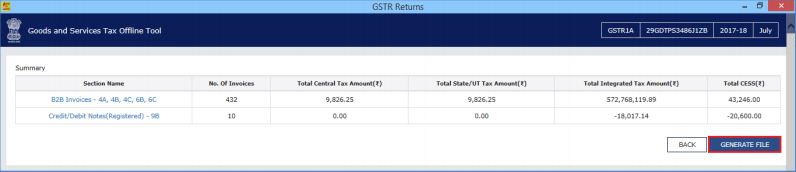 Image 19 Modifying GSTR 1A Return
Step 6: The GST compliant file generated by the GST Returns Offline tool (JSON format) will have to be saved in the computer for uploading the same on GST portal. Click on the .json file link to download the file.
Image 19 Modifying GSTR 1A Return
Step 6: The GST compliant file generated by the GST Returns Offline tool (JSON format) will have to be saved in the computer for uploading the same on GST portal. Click on the .json file link to download the file.
 Image 20 Modifying GSTR 1A Return
Step 7: Browse and select the path to save the JSON file to upload in the GST Portal.
Image 20 Modifying GSTR 1A Return
Step 7: Browse and select the path to save the JSON file to upload in the GST Portal.
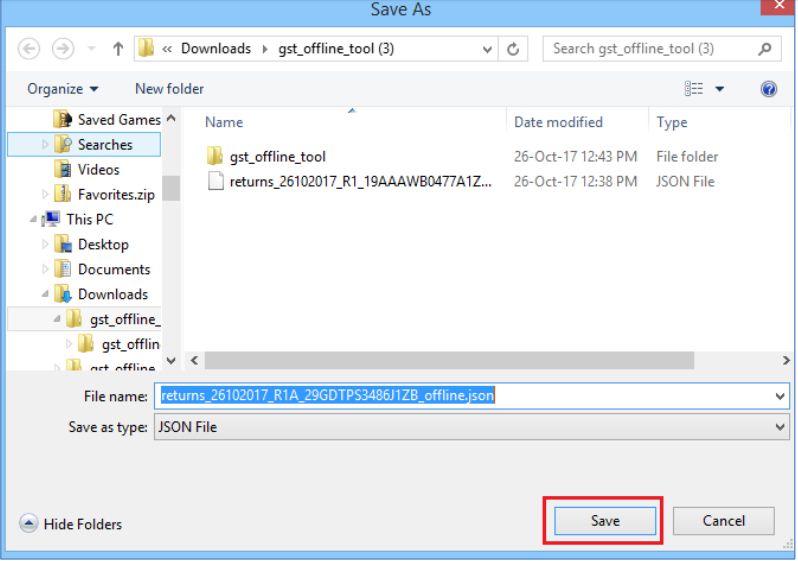 Image 21 Modifying GSTR 1A Return
Login to the GST Portal with user credential and upload the JSON file.
Know more about Procedure to Upload Invoice to GST Returns Offline Tool
Image 21 Modifying GSTR 1A Return
Login to the GST Portal with user credential and upload the JSON file.
Know more about Procedure to Upload Invoice to GST Returns Offline Tool
Invoices Kept Pending in GSTR 1A
If the taxpayer submits GSTR-1A then all the pending details recorded under the taxpayer shall roll over to GSTR-1 for the next tax period. If the taxpayer fails to file GSTR-3 after 17th of the succeeding month of the tax period, the user shall see Form GSTR-1A, however, editing the form shall become blocked.
Due Date for GSTR 1A Return
The taxpayer should file the GSTR 1A return between the 16th and 17th of each month on the GST Portal. After filing GSTR 1A return the GST Portal auto-populates at the end of the tax period, based on invoices uploaded by the suppliers. If the taxpayer fails to file GSTR-1A till 17th of the subsequent month of the tax period, then on the filing of GSTR 3 Return Filing all the details will roll over to GSTR-1 of next tax period. In case of non-filing of GSTR-1A, rollover of details shall occur on the filing of GSTR 3 return, whether the taxpayer filed GSTR 3 after or before 17th. After 17th of succeeding month of the tax period, if the taxpayer fails to file GSTR 3 return GSTR-1A might get blocked and the user cannot take any actions henceforth.
File your GST return online using IndiaFilings or LEDGERS GST Software.