
Renu Suresh
Expert
Published on: Mar 28, 2026
Modifying GSTR- 1 Return
The GSTR- 1 return file is available for download from the GST portal and is viewed in the Returns offline tool to modify, add, or delete the invoice details uploaded earlier on the GST portal. After making the necessary changes, taxpayers must prepare a JSON file for regular invoice data and furnish it on the GST portal. The JSON file has the option of re-validation. It is then ready for acceptance by GSTN after due validation. Suppose there are any auto-populated invoices in GSTR- 1 from GSTR- 2 of counterparties. In this case, these can be downloaded and viewed in the GST returns offline tool. This article will look at the procedure for modifying GSTR- 1 return file in the returns offline tool. Learn more about GSTR-1 Filing using the Returns Offline Tool.Due Dates Modified
The Government has recently deferred the due date for filing GSTR-1 from the 11th of April to the 13th. Apart from this, the following are the due dates for filing GSTR-1 for April, May and June 2019:- April 2019 – 11th of May 2019
- May 2019 – 11th of June 2019
- June 2019 – 11th of July 2019
Import of E-way Bill Data
Taxpayers need to validate the data of their transactions before proceeding with the process of filing returns, as it saves time and unnecessary data entry. To cater to this purpose, the GST portal is now integrated with the E-way Bill Portal (EWB). The integration enables the users to import B2B and B2C invoice sections and HSN-wise summary of the outward supplies section. Taxpayers may verify the data and complete the filing using these details. This feature has been introduced considering the significant data gap between self-declared liability in Form GSTR-1 and Form GSTR-3B. A similar rule applies to Input Tax Credit (ITC) claimed in GSTR-3B, as could be compared with the credit available in Form GSTR-2A. Data validation and comparison can be pursued through the following tabs in the portal:- Liability other than export/reverse charges
- Liability due to reverse charge
- Liability due to export and SEZ supplies.
No Late Fees for GSTR-1 & GSTR-3B Return
The most considerable relief extended to small businesses by the 31st GST Council is the late fee waiver for filing GSTR-1, and GSTR-3B returns. The GST Council has announced the following: “Late fee shall be completely waived for all taxpayers in case FORM GSTR-1, FORM GSTR-3B &FORM GSTR-4 for the months/quarters July 2017 to September 2018 are furnished after 22.12.2018 but on or before 31.03.2019.” Thus, filing Forms GSTR-1, GSTR-3B and GSTR-4 will not attract any late fee penalty until the 31st of March 2019.GST Annual Return Due Date Extended
All entities with GST registration must file GST annual returns in Form GSTR-9. The due date for filing a GST annual return is usually the 31st of December of each year for the financial year ending on the 31st of March of the same calendar year. As GST is newly introduced in India, the Government has decided to extend the due date for GST annual return filing to the 30th of June 2019. The due date for filing the GST annual return was initially extended to the 31st of March 2019, which has been further extended to the 30th of June 2019 by the GST Council.Download GSTR-1 Return File from GST Portal
Follow the procedure explained below to download GSTR-1 Return File from GST Portal: Step 1: To download the GSTR 1 return file from the GST portal, you need to login to the portal using the user credentials. Step 2: After logging into the portal, select the Returns option from the Service tab. Click on the Returns Dashboard option. The File Return page will be displayed. Image 1 Modify GSTR 1 Return File Using Returns Offline tool
Step 3: On this page, you have to select the financial year for which the GSTR-1 return has to be downloaded. Click on the corresponding year from the drop-down list.
Step 4: Once the year is selected, select the Return Filing Period for which the GSTR-1 return has to be downloaded from the drop-down list.
Step 5: After selecting the year and period, click on the Search option. Applicable returns for the selected tax period will be displayed.
Image 1 Modify GSTR 1 Return File Using Returns Offline tool
Step 3: On this page, you have to select the financial year for which the GSTR-1 return has to be downloaded. Click on the corresponding year from the drop-down list.
Step 4: Once the year is selected, select the Return Filing Period for which the GSTR-1 return has to be downloaded from the drop-down list.
Step 5: After selecting the year and period, click on the Search option. Applicable returns for the selected tax period will be displayed.
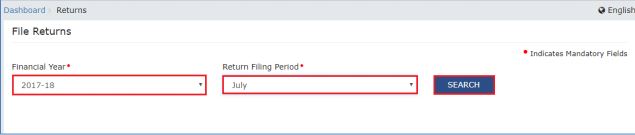 Image 2 Modify GSTR 1 Return File Using Returns Offline tool
Step 6: On the Details of outward supplies of goods or services GSTR-1 tile, click on the Prepare Offline button.
Image 2 Modify GSTR 1 Return File Using Returns Offline tool
Step 6: On the Details of outward supplies of goods or services GSTR-1 tile, click on the Prepare Offline button.
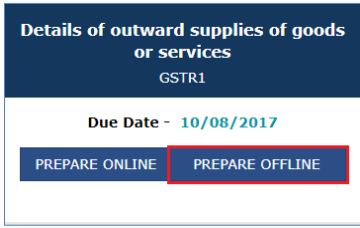 Image 3 Modify GSTR 1 Return File Using Returns Offline tool
Step 7: The Offline Upload and Download for GSTR-1 page will be displayed. Click on the Download tab and then click on Generate File.
Image 3 Modify GSTR 1 Return File Using Returns Offline tool
Step 7: The Offline Upload and Download for GSTR-1 page will be displayed. Click on the Download tab and then click on Generate File.
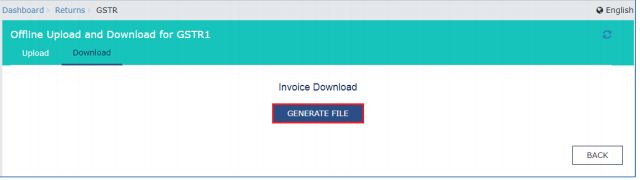 Image 4 Modify GSTR 1 Return File Using Returns Offline tool
Step 8: A message will be displayed that the request has been accepted and it will take 20 minutes to generate the return file.
Step 9: Click on the Click here to download option. GSTR-1 Return file will be downloaded in zip format.
Image 4 Modify GSTR 1 Return File Using Returns Offline tool
Step 8: A message will be displayed that the request has been accepted and it will take 20 minutes to generate the return file.
Step 9: Click on the Click here to download option. GSTR-1 Return file will be downloaded in zip format.
 Image 5 Modify GSTR 1 Return File Using Returns Offline tool
Learn more about the Types of GST Returns and Due Dates.
Image 5 Modify GSTR 1 Return File Using Returns Offline tool
Learn more about the Types of GST Returns and Due Dates.
Open Downloaded GSTR-1 Return File
To open the downloaded GSTR-1 return file from GST Portal using the Returns Offline tool, follow the procedure explained below: Step 10: Double-click on the GST return offline tool icon on the desktop; the Offline tool Home Page will be displayed. Step 11: From the open downloaded return file option from the GST portal tab, click on the Open button.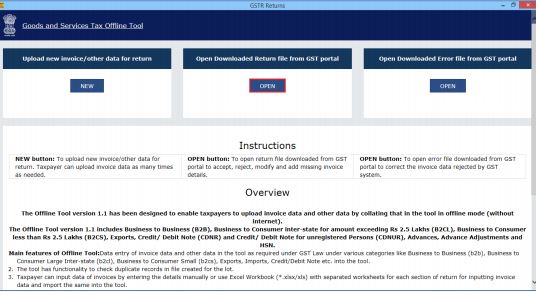 Image 6 Modify GSTR 1 Return File Using Returns Offline tool
Step 12: Browse and select the downloaded return file in zip format and click on the open button.
Image 6 Modify GSTR 1 Return File Using Returns Offline tool
Step 12: Browse and select the downloaded return file in zip format and click on the open button.
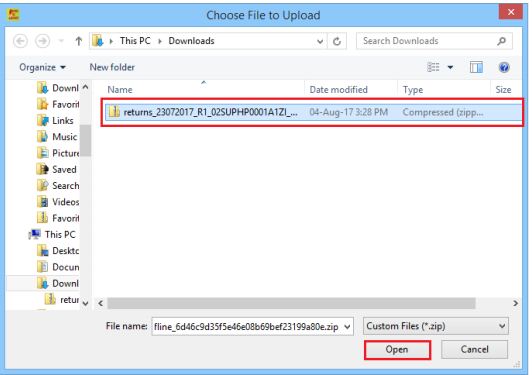 Image 7 Modify GSTR 1 Return File Using Returns Offline tool
Step 13: Details of the downloaded file from the GST Portal will be displayed. Click on the Proceed button.
Image 7 Modify GSTR 1 Return File Using Returns Offline tool
Step 13: Details of the downloaded file from the GST Portal will be displayed. Click on the Proceed button.
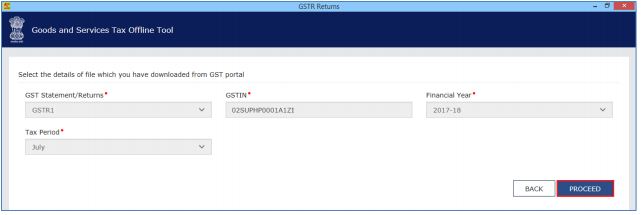 Image 8 Modify GSTR 1 Return File Using Returns Offline tool
Step 14: The summary page will be displayed. Select the link for the corresponding section name to modify, add or delete invoice details.
Image 8 Modify GSTR 1 Return File Using Returns Offline tool
Step 14: The summary page will be displayed. Select the link for the corresponding section name to modify, add or delete invoice details.
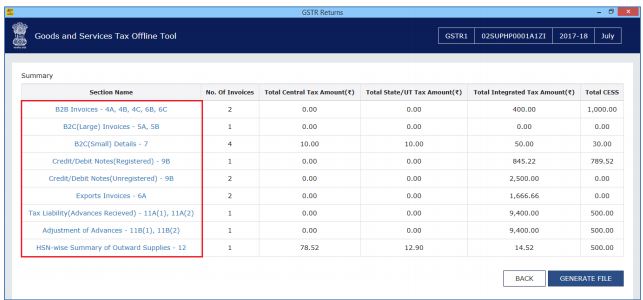 Image 9 Modify GSTR 1 Return File Using Returns Offline tool
Once the section details are displayed, you can do the following things:
Image 9 Modify GSTR 1 Return File Using Returns Offline tool
Once the section details are displayed, you can do the following things:
- Modify Invoice Details
- Add Invoice Details
- Delete Invoice Details
Modify Invoice Details
To modify the invoice details, follow the procedure explained below: Step 1: Click on the Edit button to edit the invoices and make the required corrections to the invoices or details uploaded or added earlier to the GST Portal.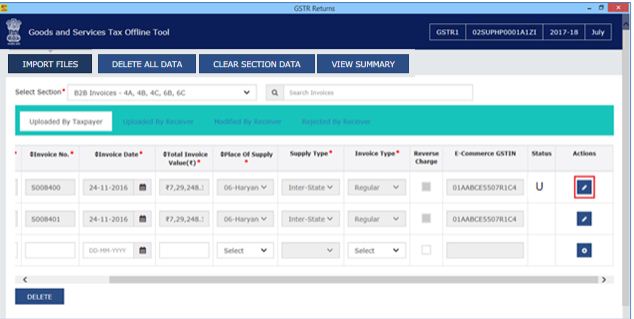 Image 10 Modify GSTR 1 Return File Using Returns Offline tool
Step 2: To modify the details or records at the rate level, click on the ’ +’ option and navigate to the rate level records.
Image 10 Modify GSTR 1 Return File Using Returns Offline tool
Step 2: To modify the details or records at the rate level, click on the ’ +’ option and navigate to the rate level records.
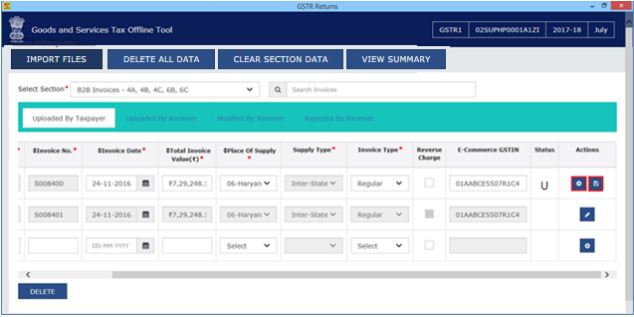 Image 11 Modify GSTR 1 Return File Using Returns Offline tool
Note: You can also make the changes at field level by clicking on the Save button to save the invoice details.
Step 3: Do all the necessary corrections and click on the Update button.
Image 11 Modify GSTR 1 Return File Using Returns Offline tool
Note: You can also make the changes at field level by clicking on the Save button to save the invoice details.
Step 3: Do all the necessary corrections and click on the Update button.
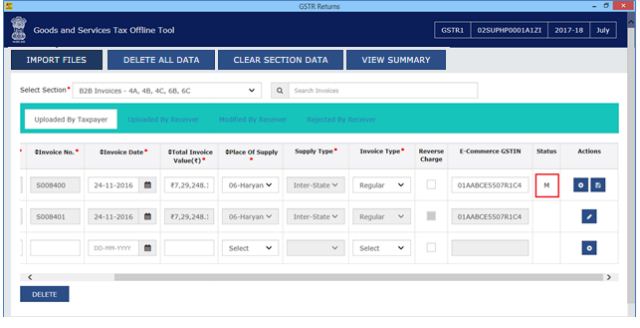 Image 13 Modify GSTR 1 Return File Using Returns Offline tool
Step 4: A success message will be displayed. The status will be changed to modify. Similarly, you can modify the invoice details and other returns data from other sections.
Image 13 Modify GSTR 1 Return File Using Returns Offline tool
Step 4: A success message will be displayed. The status will be changed to modify. Similarly, you can modify the invoice details and other returns data from other sections.
Add Invoice Details
You can add the invoice details by following the procedure explained below: Step 1: Provide the invoice details and click on the Add button. Image 13 Modify GSTR 1 Return File Using Returns Offline tool
Step 2: In the new window, add the necessary details and click on the Save button.
Image 13 Modify GSTR 1 Return File Using Returns Offline tool
Step 2: In the new window, add the necessary details and click on the Save button.
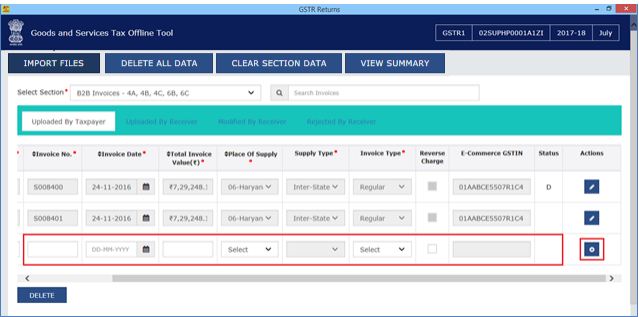 Image 14 Modify GSTR 1 Return File Using Returns Offline tool
Step 3: A success message will be displayed and invoice details will be added. Similarly, you can add returns data from other sections.
Image 14 Modify GSTR 1 Return File Using Returns Offline tool
Step 3: A success message will be displayed and invoice details will be added. Similarly, you can add returns data from other sections.
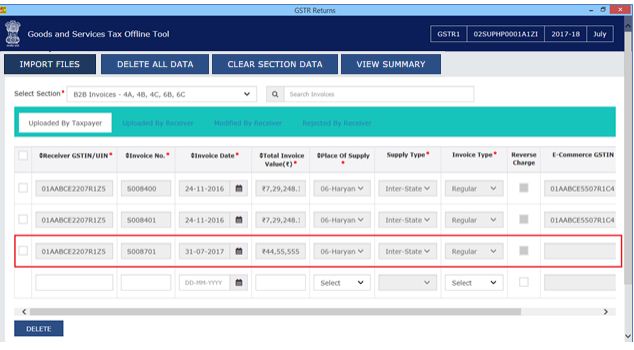 Image 15 Modify GSTR 1 Return File Using Returns Offline tool
Delete Invoice Details
You can click on the Import files option to import the invoice data using Excel and CSV import. Step 1: Select the checkbox for the invoice to be deleted. Click on the Delete button.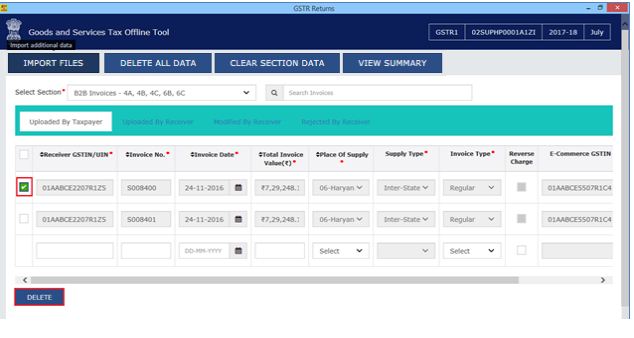 Image 16 Modify GSTR 1 Return File Using Returns Offline tool
Step 2: A success message will be displayed. The status will be changed to deleted. Similarly, you can delete other invoice details and returns data from other sections.
Image 16 Modify GSTR 1 Return File Using Returns Offline tool
Step 2: A success message will be displayed. The status will be changed to deleted. Similarly, you can delete other invoice details and returns data from other sections.
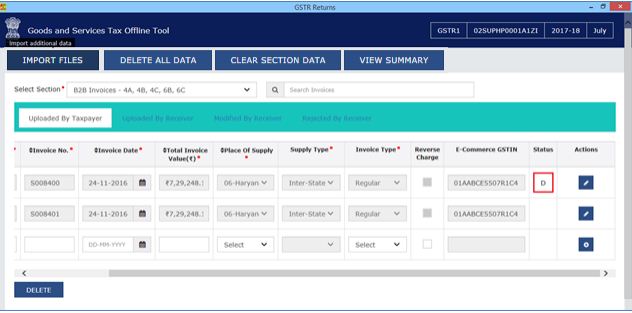 Image 17 Modify GSTR 1 Return File Using Returns Offline tool
Note: You can select the checkbox as depicted in the image below to select all invoices to delete in one go. Click on the Delete button to delete all invoices.
Image 17 Modify GSTR 1 Return File Using Returns Offline tool
Note: You can select the checkbox as depicted in the image below to select all invoices to delete in one go. Click on the Delete button to delete all invoices.
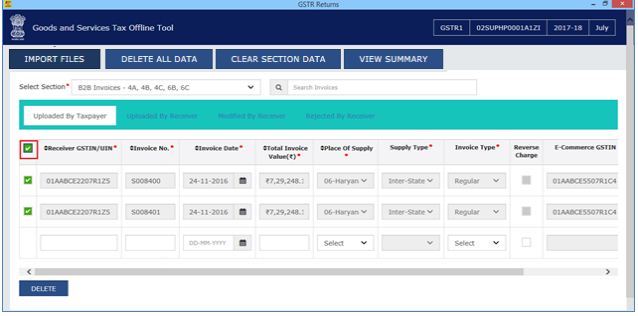 Image 18 Modify GSTR 1 Return File Using Returns Offline tool
Step 3: Once all the corrections have been made, click on the View Summary button.
Image 18 Modify GSTR 1 Return File Using Returns Offline tool
Step 3: Once all the corrections have been made, click on the View Summary button.
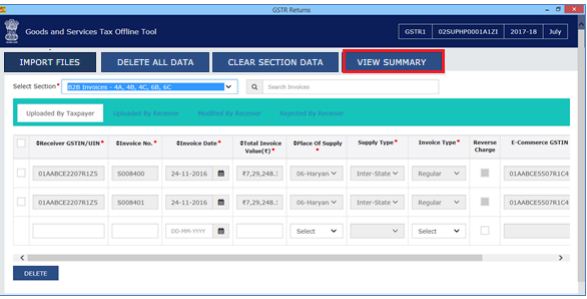 Image 19 Modify GSTR 1 Return File Using Returns Offline tool
Step 4: The summary page will be displayed. Click on the Generate file button.
Image 19 Modify GSTR 1 Return File Using Returns Offline tool
Step 4: The summary page will be displayed. Click on the Generate file button.
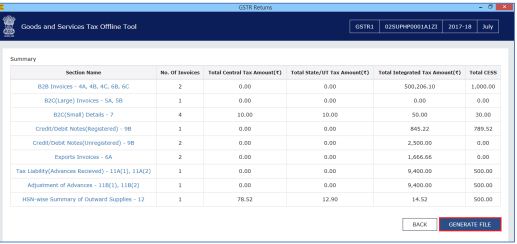 Image 20 Modify GSTR 1 Return File Using Returns Offline tool
Step 5: The file generated by the GST Returns Offline tool (JSON format) must be saved on the computer to upload the same to the GST portal. Click on the Save button.
Image 20 Modify GSTR 1 Return File Using Returns Offline tool
Step 5: The file generated by the GST Returns Offline tool (JSON format) must be saved on the computer to upload the same to the GST portal. Click on the Save button.
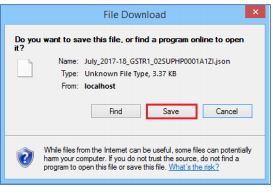 Image 21 Modify GSTR 1 Return File Using Returns Offline tool
Step 6: Browse and select the path to save the JSON file which needs to be uploaded to the GST Portal.
Image 21 Modify GSTR 1 Return File Using Returns Offline tool
Step 6: Browse and select the path to save the JSON file which needs to be uploaded to the GST Portal.
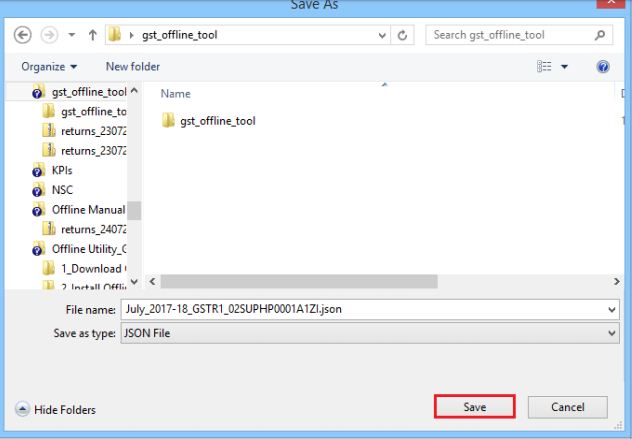 Image 22 Modify GSTR 1 Return File Using Returns Offline tool
Login to the GST Portal with your credentials and upload the JSON file.
Image 22 Modify GSTR 1 Return File Using Returns Offline tool
Login to the GST Portal with your credentials and upload the JSON file.