Renu Suresh
Expert
Published on: Jun 15, 2026
GSTR-7 Return Filing: Meaning, Due Date & Procedure
GSTR-7 is a mandatory monthly return under the Goods and Services Tax (GST), filed by individuals and entities who deduct tax at source (TDS). Every GST-registered tax deductor must submit Form GSTR-7 by the 10th of the following month, providing details of TDS deducted, TDS payable, TDS refund, and payment information. This GST return plays a crucial role in maintaining transparency, ensuring compliance, and enabling the smooth flow of input credits to the deductees. Structured as per GST rules and eligibility criteria, the GSTR-7 format includes dedicated sections for TDS details, adjustments, and other relevant reporting requirements. This article provides detailed information on GSTR-7 filing, eligibility criteria, due date and procedure.
What is GSTR-7?
GSTR-7 is a monthly return under the Goods and Services Tax (GST) framework in India, specifically designed for entities that are required to deduct Tax Deducted at Source (TDS). Its primary purpose is to report the TDS collected on payments made to suppliers, ensuring transparency and compliance in tax deductions. The return contains details such as the total TDS deducted, TDS payable, TDS refunds claimed, and a summary of supplier-wise transactions. By filing GSTR-7, entities contribute to the accurate reconciliation of Input Tax Credit (ITC) for suppliers and enhance governance in the TDS mechanism.
Who should file GSTR-7?
GSTR-7 must be filed by registered taxpayers who are required to deduct Tax Deducted at Source (TDS) under the Goods and Services Tax (GST) framework. This includes:
- Departments or establishments of the Central Government or State Government
- Local authorities
- Governmental agencies
- Other specified persons or categories as notified by the government
These entities are legally obligated to report their TDS liabilities monthly, detailing the tax deducted from payments made to suppliers.
GSTR-7 Due Date
The due date for filing GSTR-7 is the 10th day of the month following the month in which Tax Deducted at Source (TDS) was deducted. This monthly GST return captures details such as the amount of TDS deducted, TDS payable, and any refunds claimed. Filing GSTR-7 on time ensures compliance with GST regulations and facilitates accurate reconciliation of tax credits for suppliers.
Details to be provided in GSTR-7 Returns
GSTR-7 consists of eight key sections where taxpayers need to furnish important information related to TDS deductions. Each section plays a vital role in ensuring accurate reporting and compliance. Here’s a detailed overview of the sections in GSTR-7:
- Provide GSTIN: The taxpayer’s unique state-wise PAN-based 15-digit GSTIN (Goods and Services Taxpayer Identification Number) will be auto-populated during the return filing process.
- Legal Name of the Deductor: The legal name and trade name of the taxpayer will automatically appear when logged into the GST portal, ensuring accuracy and consistency.
- Details of the Tax Deducted at Source: In this section, the deductor must provide details such as the GSTIN of the deductee, the total transaction amount, and the corresponding TDS amount under central, state, or integrated tax.
- Changes to Details of TDS for Any Earlier Tax Period: Any corrections to previously filed TDS data can be made here by submitting both the original and revised details. These amendments will also reflect in the updated TDS certificate (GSTR-7A).
- Tax Deduction at Source and Paid: This section requires the details of TDS amounts deducted from the deductee and the amounts paid to the government under integrated, central, or state tax.
- Interest, Late Fee Payable, and Paid: If interest or late fees are applicable on the TDS amount, taxpayers must mention these charges along with the amount paid so far.
- Refund Claimed from Electronic Cash Ledger: Taxpayers can claim refunds for excess TDS from their electronic cash ledger by providing the relevant details and the bank account where the refund should be credited.
- Debit Entries in Electronic Cash Ledger for TDS/Interest Payment: After the return is submitted and payment is made, this section will automatically display debit entries for TDS and interest payments.
Finally, after furnishing all details, the deductor must submit a declaration confirming the accuracy of the information. The return can be authenticated using either a Digital Signature Certificate (DSC) or an Electronic Verification Code (EVC).
Penalty for Non-Filing GSTR-7
Failure to file GSTR-7 on time attracts a late fee of ₹100 per day under CGST and ₹100 per day under SGST, totaling ₹200 per day. However, the maximum late fee is capped at ₹5,000. Notably, there is no late fee applicable on IGST for delayed filing. In addition to the late fee, an interest charge of 18% per annum is also payable on the TDS amount. This interest is calculated from the day after the due date of filing until the actual date of payment.
GSTR-7 Filing through Offline Utility
To help taxpayers prepare their GSTR-7 return offline, Goods and Service Tax Network (GSTN) provides an Excel-based GSTR-7 offline utility. Deductor or GST practitioners can prepare their GSTR-7 details offline by generating a JSON file. Once the return is prepared using the offline utility, it is to be uploaded on GST Portal for payment of liabilities, signing, and filing. In this article, we look at the procedure to file GSTR-7 returns using the offline utility in detail.
Features of GSTR-7 Offline Utility
- Using Offline Utility, Deductor or GST practitioners can able to prepare the GSTR-7 details of Table 4 and Table 3 in offline mode.
- Most of the business validations and data entry are inbuilt into the GSTR 7 offline utility, reducing errors upon upload to GST Portal.
Worksheet -Tabs in GSTR-7 Offline Utility
There are five worksheet tabs in GSTR-7 Offline Utility:- Read Me
- Home
- 3 TDS
- 4 Amend (maybe TDSA)
- Suppliers Master
Read Me Worksheet Tab
The ReadMe tab contains Introduction and helps instructions for the taxpayer to fill in data in GSTR-7 Offline Utility.Home Worksheet Tab
The Home Worksheet Tab is the main page of the GSTR-7 offline utility tool. It is used to perform the following functions:- To enter mandatory details — GSTIN, Financial Year and Tax Period
- Generate JSON file for upload of GSTR-7 return details prepared offline on the GST portal
- Generate a Summary of data provided in various worksheets
- Import and open the error file downloaded from the GST portal
- Import and open data files downloaded from the GST portal
3 TDS Worksheet Tab
The three TDS (Details of Tax Deducted at Source) sheet contains Table 3. It is used to perform the following three functions:- Enter Tax Deducted at Source details
- Validate the entered TDS details
- Navigate to the Homepage
4 Amend Worksheet Tab
- Enter Amendments details related to previous tax periods or take action on auto-populated rejected details of TDS
- Validate the entered amendments details
- Navigate to the Homepage
Suppliers Master worksheet Tab
The Suppliers Master worksheet Tab contains GSTIN Master Sheet. It can be used to perform the following functions:- Provide details of the Deductee or suppliers, which would then be readily available
- To fill in details in Table 3 and Table 4 of the worksheet
- Validate the furnished further information using the Validate Sheet button
- You can navigate to the home page using the Go Home button.
Basic System Configurations
To use the GSTR-7 Offline Utility tool efficiently, ensure that your system has the following basic configuration.- System Requirement: The GSTR-7 Offline Utility tool functions work best on Windows 7 and above, but the GSTR-7 Offline Utility tool does not work on Linux and Mac.
- MS Excel: Microsoft Excel 2007 and above is needed for running the GSTR-7 Offline Utility tool. Alternatively, for any below version, the tool will open in a default browser.
Download GSTR-7 Offline Utility from the GST Portal
Downloading the GSTR-7 Offline Utility tool is a one-time activity; however, it may require an update in the future if the tool is updated at the GST Portal. Note: You need to check the version of the GSTR-7 Offline Utility tool used by you with the one available for download on the GST Portal at regular intervals. Follow the steps by step guidelines given here to download and install the GSTR-7 Offline Utility tool on your computer: Note: The taxpayer can download the GSTR-7 Offline Utility from the GST Portal without login into the Portal. Step 1: Access the home page of the Goods and Service Tax (GST)web portal. Step 2: Select the Downloads option from the GST portal home page. From the list of offline tools, select the GSTR-7 Offline Utility.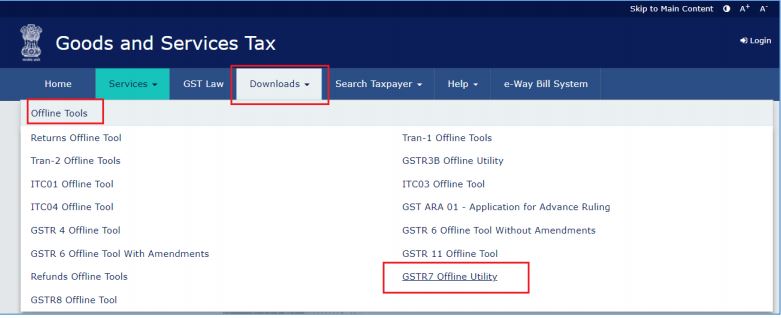 Image 1 Gstr 7 Return Filling
Step 3: The GSTR-7 Offline Utility tool page will be displayed. Click on the Download option to download the file.
Image 1 Gstr 7 Return Filling
Step 3: The GSTR-7 Offline Utility tool page will be displayed. Click on the Download option to download the file.
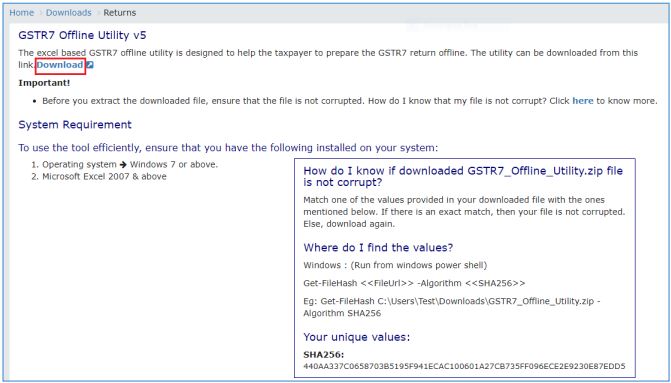 Image 2 Gstr 7 Return Filling
Step 4: A confirmation message will be displayed. Click on the PROCEED button to download the GSTR-7 Offline Utility from the GST Portal.
Image 2 Gstr 7 Return Filling
Step 4: A confirmation message will be displayed. Click on the PROCEED button to download the GSTR-7 Offline Utility from the GST Portal.
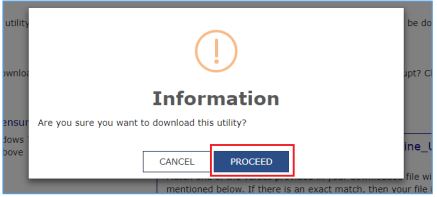 Image 3 Gstr 7 Return Filling
Step 5: The GSTR-7 Offline Tool will be downloaded in the Downloads folder.
Image 3 Gstr 7 Return Filling
Step 5: The GSTR-7 Offline Tool will be downloaded in the Downloads folder.
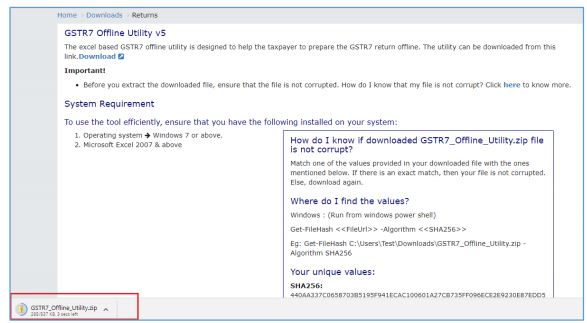 Image 4 3Gstr 7 Return Filling
GSTR-7 Offline Utility Installation Procedure
Once the GSTR-7 Offline Utility is downloaded, you need to unzip these downloaded files and prepare a return offline. The procedure to install the GSTR-7 Offline Utility is explained in detail below: Step 1: Unzip the downloaded files and extract the files from the downloaded zip folder GSTR GSTR_7_Offline_Utility folder. Step 2: Once the folder is unzipped, you can see the GSTR7_Offline_Utility excel file. Right-click on the excel file to open. The excel file will be opened.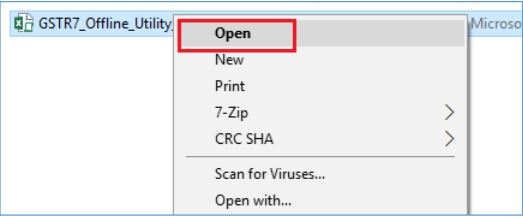 Image 5 Gstr 7 Return Filling
Step 3: You need to click on the Enable Editing and enable content buttons in the excel sheet.
Image 5 Gstr 7 Return Filling
Step 3: You need to click on the Enable Editing and enable content buttons in the excel sheet.
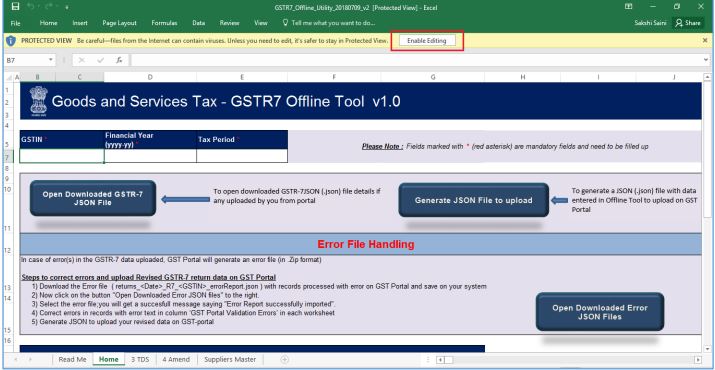 Image 6 Gstr 7 Return Filling
 Image 7 Gstr 7 Return Filling
Procedure to Prepare GSTR-7 Return Utility
The procedure to prepare the GSTR-7 return utility is explained in detail below. You need to perform the following steps to prepare the GSTR-7 return utility:- Add table-wise details in the Worksheet
- Generate JSON File to upload
- Upload the generated GSTR-7 JSON File on GST Portal
- Preview Form GSTR-7 on the GST Portal
- Payment of tax
- File Form GSTR-7 with DSC/EVC
- View debit details/entries in the electronic cash ledger for tax payment
- Download Filed Return
Add Table-Wise details in the worksheet
Step 1: Launch GSTR-7 Excel-based Offline, A pop-up window will appear, and it will ask you to open the saved version Yes/No.- By clicking on No, GSTR-7 excel based offline will open with no saved data
- By clicking on yes, GSTR-7 excel based offline will open with data saved in the last session
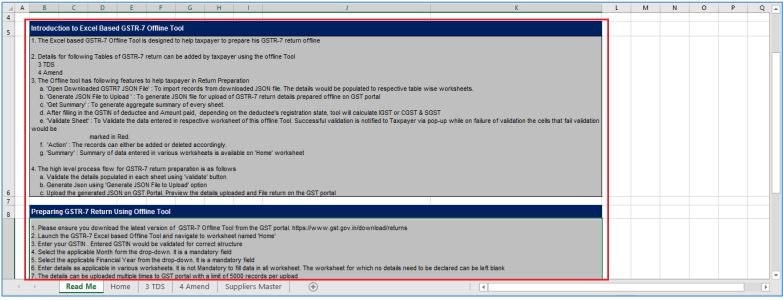 Image 8 Gstr 7 Return Filling
Step 4: Select the applicable Financial Year from the Year drop-down list for which the GSTR-7 needs to be prepared. Select the tax period from the drop-down menu.
Image 8 Gstr 7 Return Filling
Step 4: Select the applicable Financial Year from the Year drop-down list for which the GSTR-7 needs to be prepared. Select the tax period from the drop-down menu.
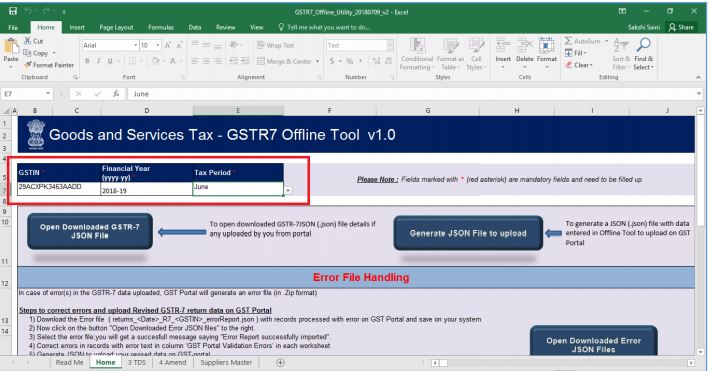 Image 9 Gstr 7 Return Filling
Step 5: After selecting the financial year and tax period, select the suppliers master tab and provide GSTIN and other details of the Deductee or suppliers. This will help you easily populate data in Table 3 and Table 4 of GSTR-7.
Image 9 Gstr 7 Return Filling
Step 5: After selecting the financial year and tax period, select the suppliers master tab and provide GSTIN and other details of the Deductee or suppliers. This will help you easily populate data in Table 3 and Table 4 of GSTR-7.
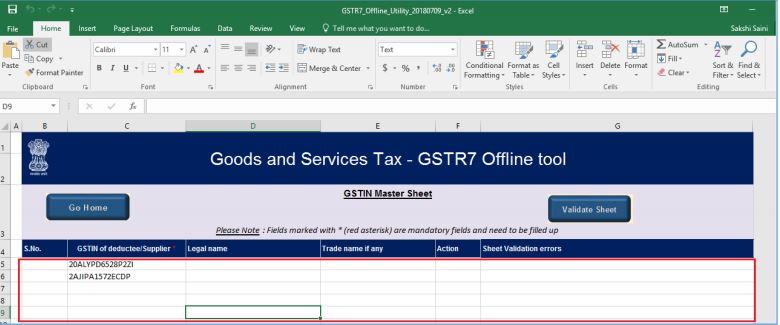 Image 10 Gstr 7 Return Filling
Note: Entering details in the Suppliers Master sheet is not mandatory. You can update the details in Tables 3 and 4 without updating the details in suppliers Master.
Step 6: After providing details in the supplier’s master sheet, click on the Validate Sheet button. A small window with no errors will appear. Click OK.
Image 10 Gstr 7 Return Filling
Note: Entering details in the Suppliers Master sheet is not mandatory. You can update the details in Tables 3 and 4 without updating the details in suppliers Master.
Step 6: After providing details in the supplier’s master sheet, click on the Validate Sheet button. A small window with no errors will appear. Click OK.
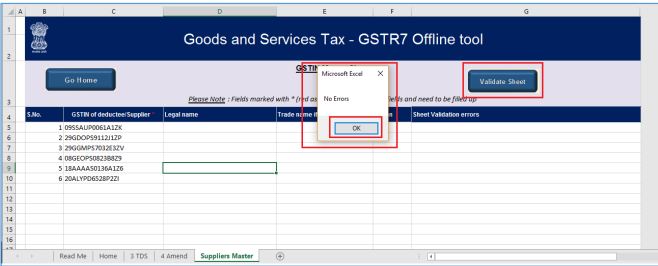 Image 11 Gstr 7 Return Filling
Step 7: Once the validation is successful, go to the 3 TDS tab and provide data in Columns B, C, D, E, F, and G.
Image 11 Gstr 7 Return Filling
Step 7: Once the validation is successful, go to the 3 TDS tab and provide data in Columns B, C, D, E, F, and G.
- You need to provide the GSTIN of the Deductee in Column B
- Details of the Amount paid to the Deductee on which tax is deducted needs to be provided in Column C
- Column D - Integrated Tax
- Column E - Central Tax
- Column F - State/UT Tax
- When you go to Column G, a drop-down list with two options: Add and Delete will be displayed. Select Add for each row with TDS data.
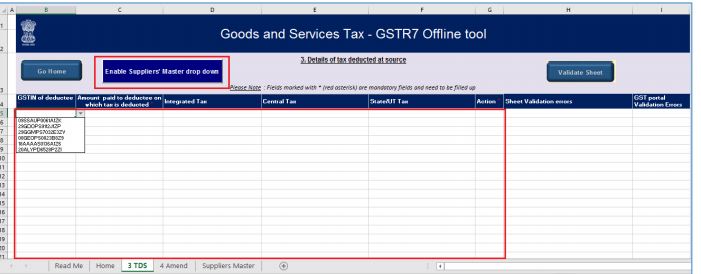 Image 12 Gstr 7 Return Filling
Step 8: Once you have provided all the TDS details, click on the Validate Sheet button.
Image 12 Gstr 7 Return Filling
Step 8: Once you have provided all the TDS details, click on the Validate Sheet button.
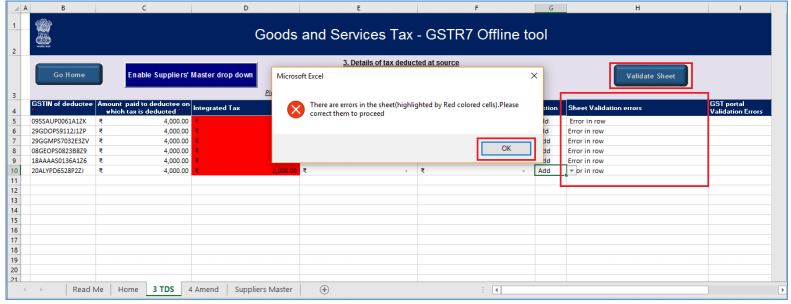 Image 13 Gstr 7 Return Filling
Step 9: In case of successful validation, Column H of this sheet will be empty and you can directly proceed further.
Step 10: In case of unsuccessful validation, an error-intimation popup will appear and the cells of Column H will show “Error found in a row”. Close the popup by clicking OK.
Step 11: Select the red-highlighted cells to read the error description. A yellow description box will appear. Correct the errors as described in the description box.
Image 13 Gstr 7 Return Filling
Step 9: In case of successful validation, Column H of this sheet will be empty and you can directly proceed further.
Step 10: In case of unsuccessful validation, an error-intimation popup will appear and the cells of Column H will show “Error found in a row”. Close the popup by clicking OK.
Step 11: Select the red-highlighted cells to read the error description. A yellow description box will appear. Correct the errors as described in the description box.
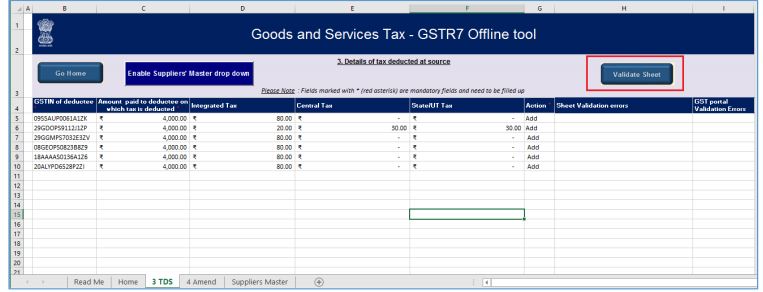 Image 15 Gstr 7 Return Filling
Step 12: After correcting the errors, again click on the Validate Sheet button. In case no errors were found, Column H of this sheet will be empty and a No errors popup will appear. Click on the OK button.
Image 15 Gstr 7 Return Filling
Step 12: After correcting the errors, again click on the Validate Sheet button. In case no errors were found, Column H of this sheet will be empty and a No errors popup will appear. Click on the OK button.
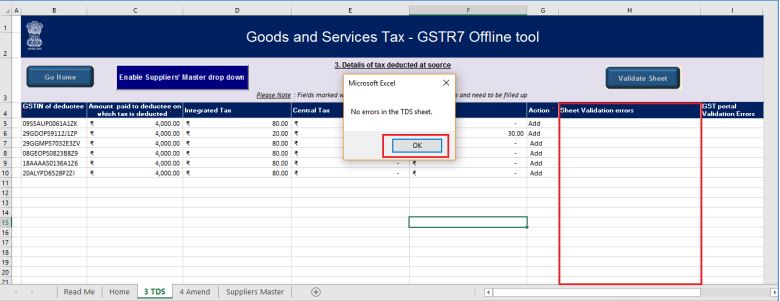 Image 16 Gstr 7 Return Filling
Step 11: If you have to make any amendments related to the previous month(s), go to the 4 Amend tab. Otherwise, you can Generate JSON File to upload.
Image 16 Gstr 7 Return Filling
Step 11: If you have to make any amendments related to the previous month(s), go to the 4 Amend tab. Otherwise, you can Generate JSON File to upload.
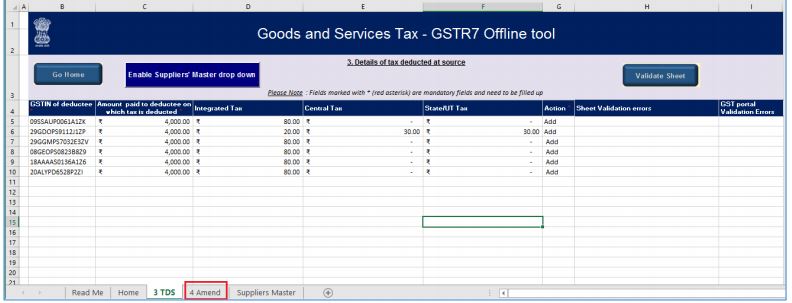 Image 17 Gstr 7 Return Filling
Generate JSON File to Upload
To generate a JSON File of GSTR-7 return to upload on GST Portal, perform the following steps: Step 1: Upon successful validation, you need to click on the Go Home button to navigate to the home page.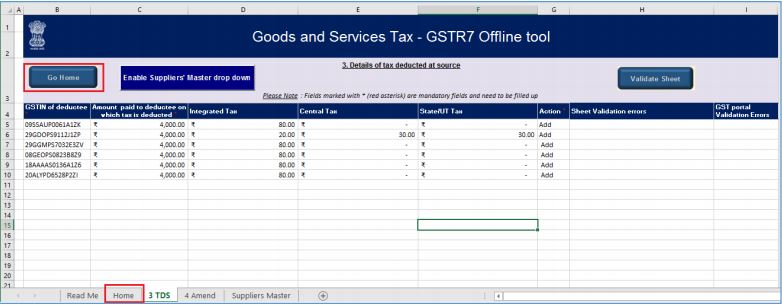 Image 18 Gstr 7 Return Filling
Step 2: On the Home tab, scroll down and select the Get Summary option.
Image 18 Gstr 7 Return Filling
Step 2: On the Home tab, scroll down and select the Get Summary option.
 Image 19 Gstr 7 Return Filling
Step 3: A summary of all the data filled in 3 TDS and 4 Amend sheets will be displayed.
Image 19 Gstr 7 Return Filling
Step 3: A summary of all the data filled in 3 TDS and 4 Amend sheets will be displayed.
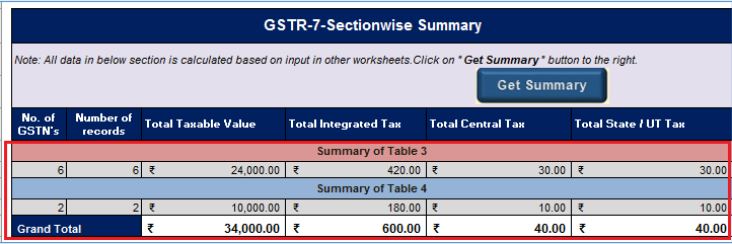 Image 20 Gstr 7 Return Filling
Step 4: Scroll up and click on the Generate JSON File to upload button.
Image 20 Gstr 7 Return Filling
Step 4: Scroll up and click on the Generate JSON File to upload button.
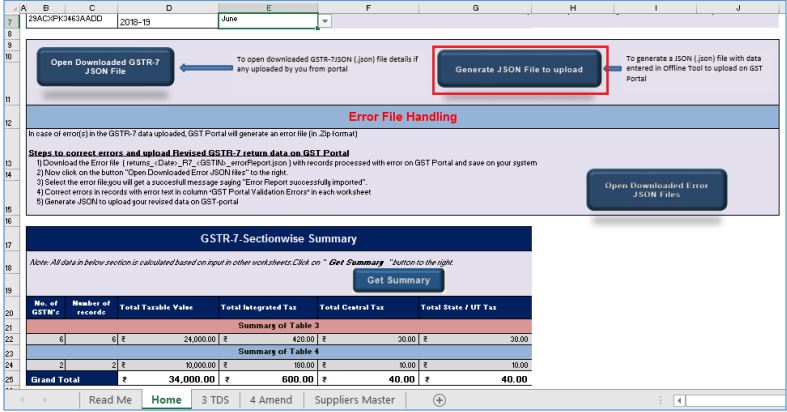 Image 21 Gstr 7 Return Filling
Step 5: A Save As pop-up window will appear. Select the location where you need to save the JSON file, enter the file name and click on the SAVE button.
Image 21 Gstr 7 Return Filling
Step 5: A Save As pop-up window will appear. Select the location where you need to save the JSON file, enter the file name and click on the SAVE button.
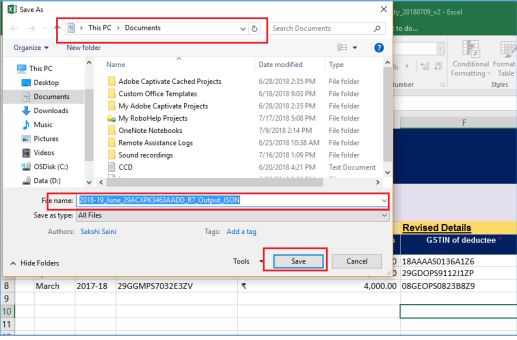 Image 22 GSTR -7 Return Filling
Step 6: A window pop-up will appear with a message that the file has been generated and saved at the desired location and it can be uploaded on the portal. Click on OK.
Image 22 GSTR -7 Return Filling
Step 6: A window pop-up will appear with a message that the file has been generated and saved at the desired location and it can be uploaded on the portal. Click on OK.
 Image 23 Gstr 7 Return Filling
Upload the generated JSON File on GST Portal
Step 1: To upload Generated JSON file on the GST web portal, you need to access the Goods and Service Tax (GST) home page. Step 2: From the main page, click on the Service option and then click on the Returns option. Now, you need to select the Returns dashboard command. Step 3: The File Returns page will be displayed. From the Financial Year drop-down menu, select the financial year for which the GSTR-7 return has to be uploaded.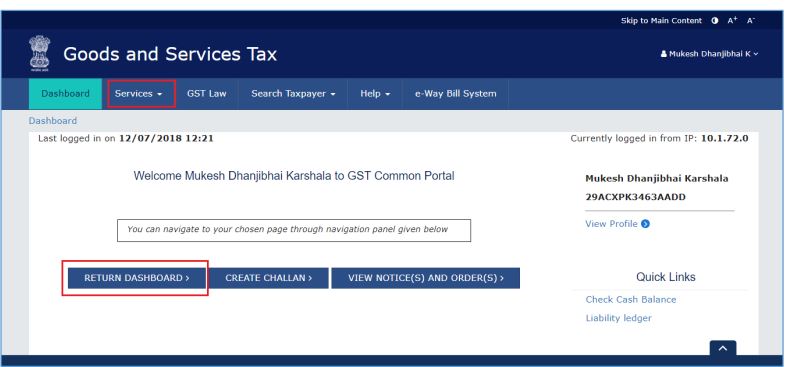 Image 24 Gstr 7 Return Filling
Step 4: Select the return filing period for which the GSTR-7 return has to be uploaded from the return filing period drop-down list.
Image 24 Gstr 7 Return Filling
Step 4: Select the return filing period for which the GSTR-7 return has to be uploaded from the return filing period drop-down list.
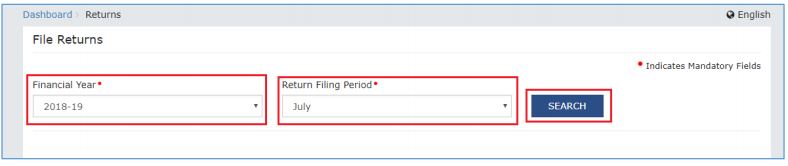 Image 25 Gstr 7 Return Filling
Step 5: After providing details, click on the Search button.
Step 6: Applicable returns of the selected tax period will be displayed. From the GSTR-7 tile, you need to click on the PREPARE OFFLINE option.
Image 25 Gstr 7 Return Filling
Step 5: After providing details, click on the Search button.
Step 6: Applicable returns of the selected tax period will be displayed. From the GSTR-7 tile, you need to click on the PREPARE OFFLINE option.
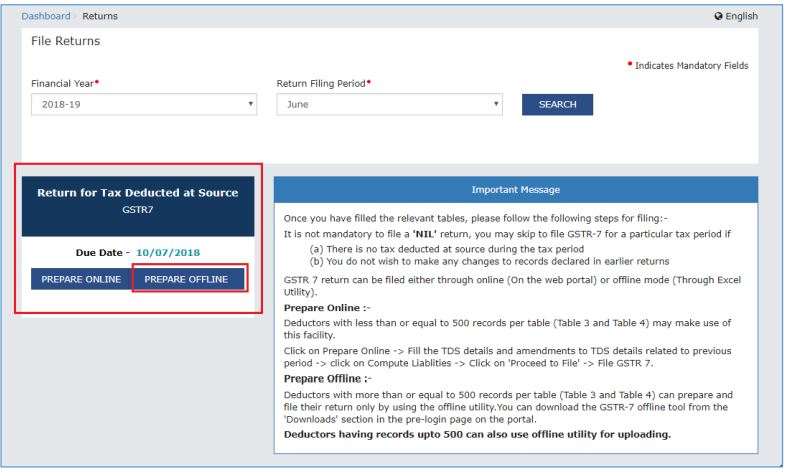 Image 26 Gstr 7 Return Filling
Step 7: Click on the Choose File button to choose the JSON file prepared using the GSTR-7 Offline utility tool.
Image 26 Gstr 7 Return Filling
Step 7: Click on the Choose File button to choose the JSON file prepared using the GSTR-7 Offline utility tool.
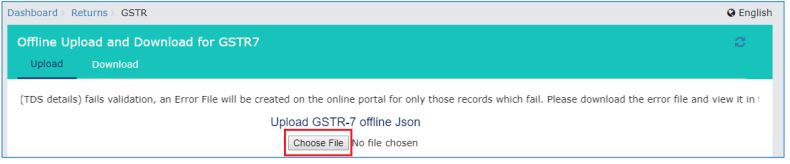 Image 27 Gstr 7 Return Filling
Step 8: Browse and navigate to the JSON file to be uploaded from the system. Click on the Open button.
Image 27 Gstr 7 Return Filling
Step 8: Browse and navigate to the JSON file to be uploaded from the system. Click on the Open button.
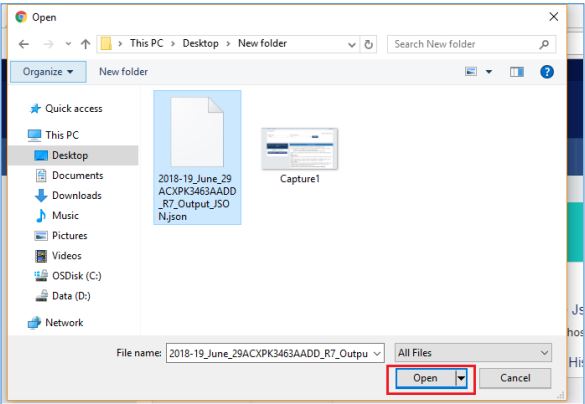 Image 28 Gstr 7 Return Filling
Step 9: The Upload section page will be displayed. A green message will appear confirming the successful upload and asking you to wait while the GST system validates the uploaded data.
Image 28 Gstr 7 Return Filling
Step 9: The Upload section page will be displayed. A green message will appear confirming the successful upload and asking you to wait while the GST system validates the uploaded data.
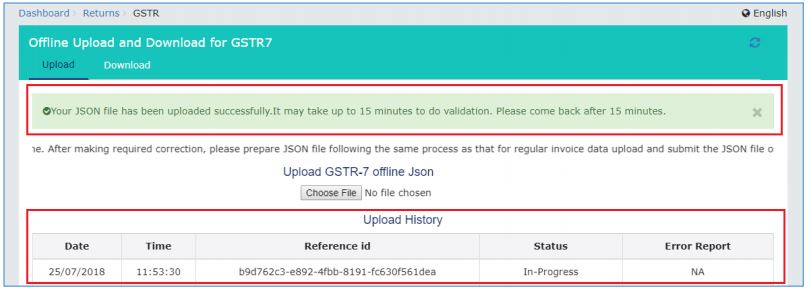 Image 29 Gstr 7 Return Filling
Step 10: Once the validation is completed, one of the following two instances can occur:
If no error were found, the upload history table would show the Status as “Processed” and Error Report as “NA”.
Image 29 Gstr 7 Return Filling
Step 10: Once the validation is completed, one of the following two instances can occur:
If no error were found, the upload history table would show the Status as “Processed” and Error Report as “NA”.
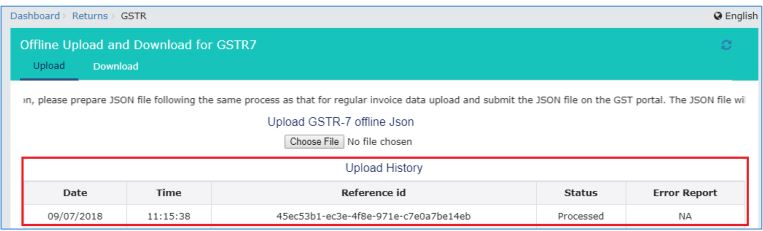 Image 30 Gstr 7 Return Filling
- You can download the uploaded details under ‘Download’ section. Click on the generate file button. A message will be displayed confirming your request and asking you to wait for 20 minutes.
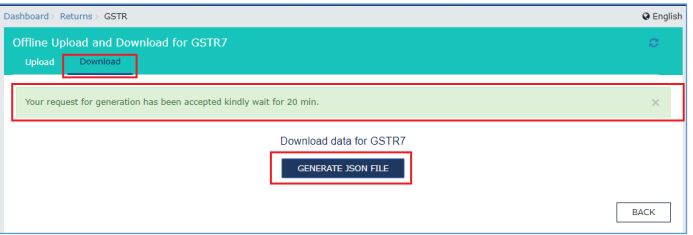 Image 31 Gstr 7 Return Filling
- After 20 minutes, a link will be displayed. Click on that to download your validated zipped file.
- Unzip and save the JSON File in the system.
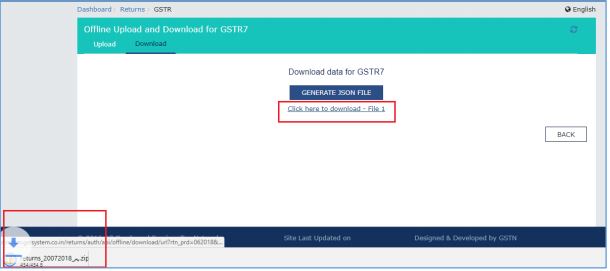 Image 32 Gstr 7 Return Filling
In case, any error was found, the upload history table will show the Status as Processed with Errors and Error Report as Generate error report.
Image 32 Gstr 7 Return Filling
In case, any error was found, the upload history table will show the Status as Processed with Errors and Error Report as Generate error report.
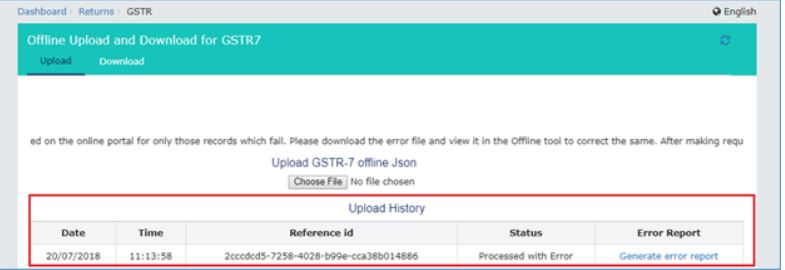 Image 33 Gstr 7 Return Filling
- Click on Generate error report hyperlink. A confirmation message will be displayed, and Columns Status and Error Report change as shown.
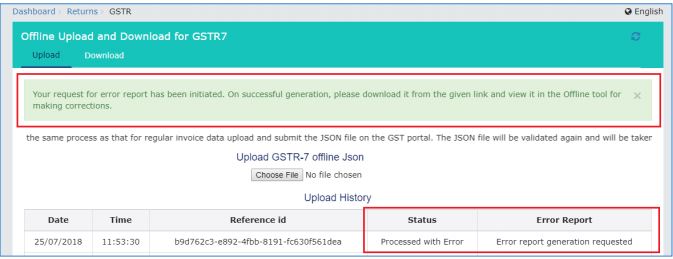 Image 34 Gstr 7 Return Filling
- Once the error report is generated, download error report link will be displayed in the Column Error Report. Click on the Download error report link to download the zipped error report.
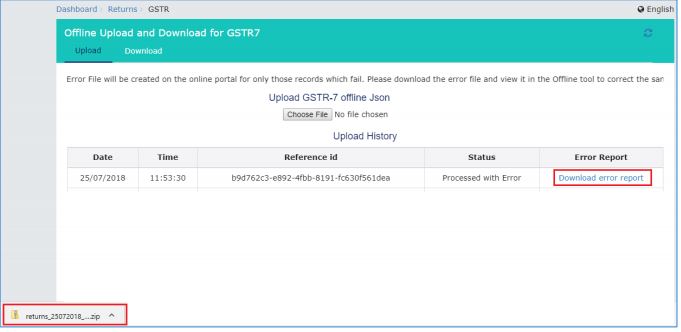 Image 35 Gstr 7 Return Filling
Preview Form GSTR-7 on the GST Portal
Step 1: To preview GSTR-7 on GST portal, you need to access the home page of Goods and Service Tax (GST).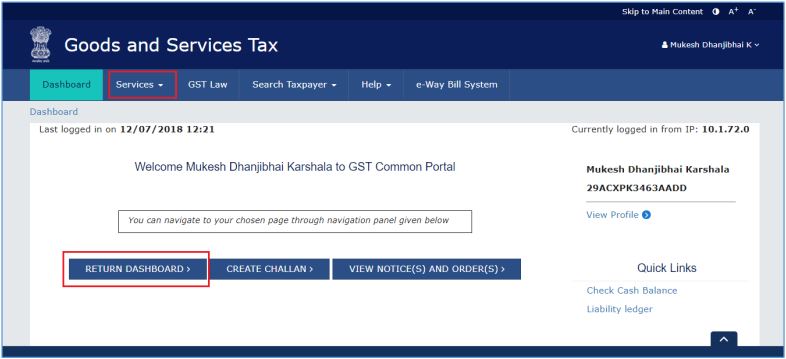 Image 36 GST- 7 Return Filling
Step 2: From the main page, click on Service option and then click on Returns option. Now, you need to select the Returns dashboard command.
Image 36 GST- 7 Return Filling
Step 2: From the main page, click on Service option and then click on Returns option. Now, you need to select the Returns dashboard command.
 Image 37 Gstr 7 Return Filling
Step 3: The File Returns page will be displayed. Select the Financial Year and Return Filing Period (Month) for which you want to file the return from the drop-down list.
Step 5: After providing details, click on the Search button.
Step 6: The GSTR-7 box will be displayed, with an Important Message box on the right. In the GSTR-7 box, click on the PREPARE ONLINE button.
Image 37 Gstr 7 Return Filling
Step 3: The File Returns page will be displayed. Select the Financial Year and Return Filing Period (Month) for which you want to file the return from the drop-down list.
Step 5: After providing details, click on the Search button.
Step 6: The GSTR-7 box will be displayed, with an Important Message box on the right. In the GSTR-7 box, click on the PREPARE ONLINE button.
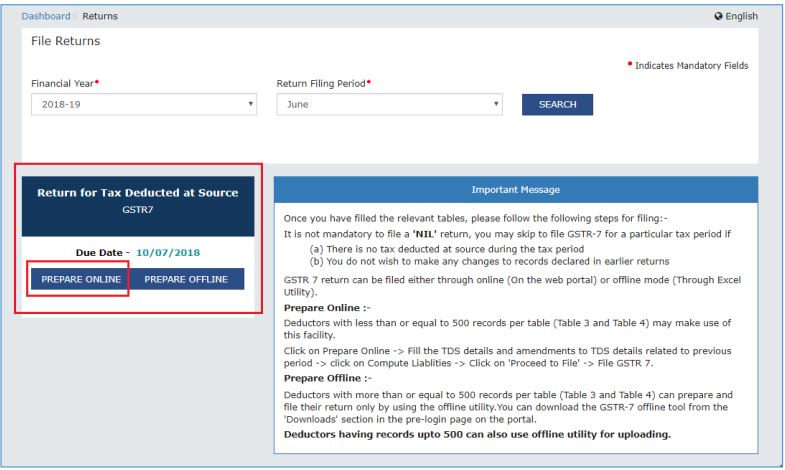 Image 38 Gstr 7 Return Filling
Step 7: The details you had uploaded on the portal using the GSTR-7 Offline Utility will be displayed in boxes 3 and 4. Click on the PREVIEW button. The draft Summary page of Form GSTR-7 will be downloaded.
Image 38 Gstr 7 Return Filling
Step 7: The details you had uploaded on the portal using the GSTR-7 Offline Utility will be displayed in boxes 3 and 4. Click on the PREVIEW button. The draft Summary page of Form GSTR-7 will be downloaded.
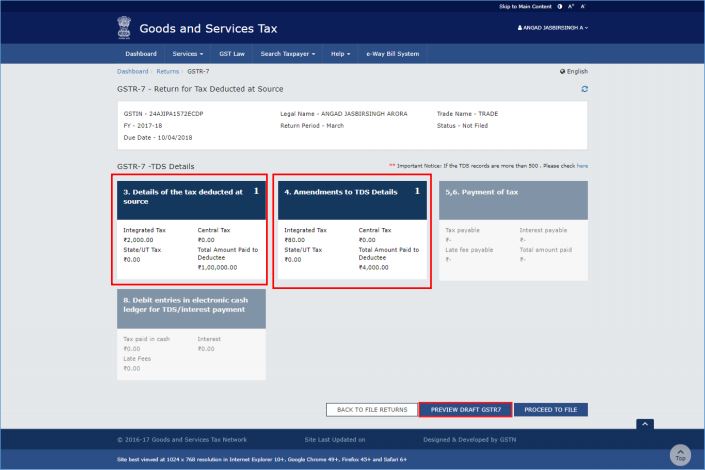 Image 39 3Gstr 7 Return Filling
Note: It is recommended to review the summary of entries made in different sections carefully.
Image 39 3Gstr 7 Return Filling
Note: It is recommended to review the summary of entries made in different sections carefully.