Karthiga
Expert
Published on: Apr 21, 2026
GST Refund - Electronic Cash Ledger
Any individual having GST registration can claim a refund under the GST Act for tax, penalty, interest, fees or any other amount paid by the taxpayer.
GST RFD-01A form has to be filled by the taxpayer to claim the refund of excess amount in electronic cash ledger. In this article, we look at the procedure for claiming refund of excess amount in electronic cash ledger.Electronic Cash Ledger
Electronic cash ledger is a cash ledger maintained in the electronic form on the GST portal. Electronic cash ledger contains details of all the deposits made by a taxpayer under GST. Tax Deducted at Source (TDS) and Tax Collected at Source (TCS) is also reflected in electronic cash ledger of the taxpayer. Know more about Electronic Cash Ledger
click hereDocuments Required
The applicant has to upload the required documents along with Form RFD-01A, as notified under CGST Rules or Circulars stated. Additionally, the taxpayer needs to upload any supporting documents, if required by the sanctioning authority.
Online Procedure To Claim Refund In Electronic Cash Ledger
To claim for the refund in electronic cash ledger online, follow the steps mentioned below:
Step 1: Visit the official portal of GST department. Step 2: Click the Services and select “Application for Refund” tab from the Refund menu. GST-Refund-Electronic-Cash-Ledger-Refund-Application
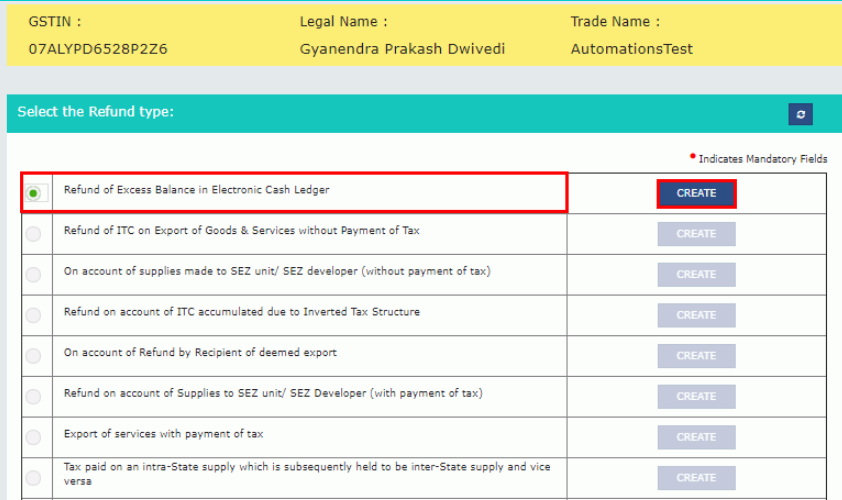
Step 3: Select the refund type page is displayed. Select the reason as Refund of Excess Balance in Electronic Cash Ledger option.
Step 4: Now click the "Create " button.
GST-Refund-Electronic-Cash-Ledger-Refund-Application
Step 3: Select the refund type page is displayed. Select the reason as Refund of Excess Balance in Electronic Cash Ledger option.
Step 4: Now click the "Create " button.
 GST-Refund-Electronic-Cash-Ledger-Refund-Type
Step 5: The GST RFD-01 A - Excess Balance in Electronic Cash Ledger page will open up on the next screen.
GST-Refund-Electronic-Cash-Ledger-Refund-Type
Step 5: The GST RFD-01 A - Excess Balance in Electronic Cash Ledger page will open up on the next screen.
 GST-Refund-Electronic-Cash-Ledger-Refund-Details
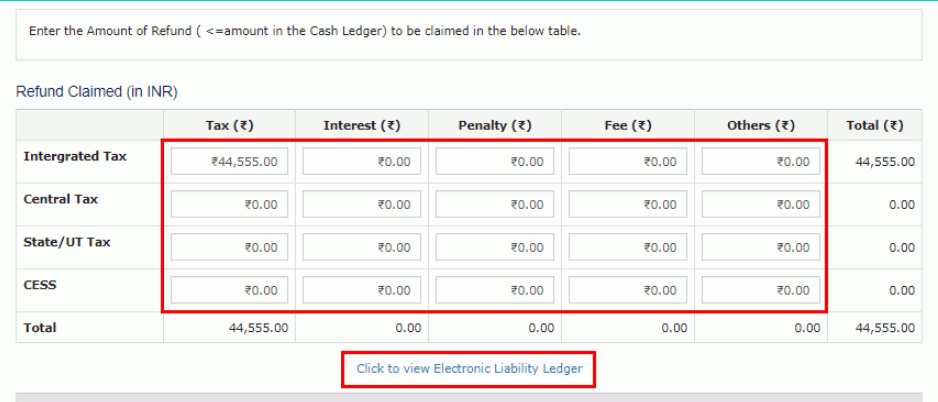
Step 6: Enter the amount of Refund to be claimed for IntegrateExports - GST Refund Tax, Central Tax, State/ UT Tax and tax in table “Refund Claimed”.
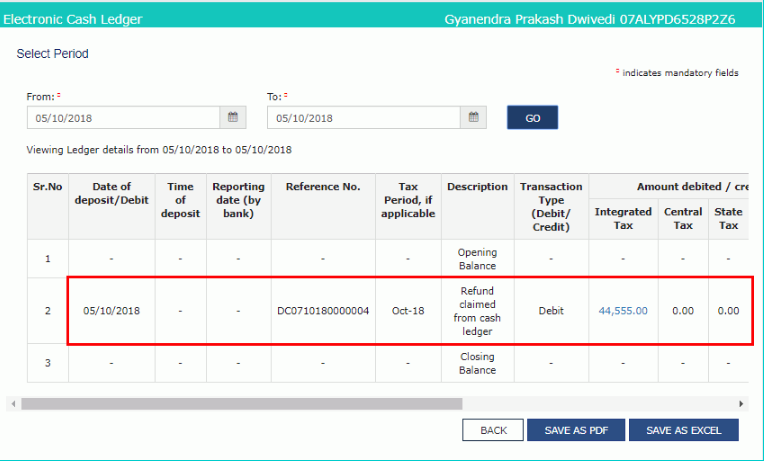
Step 7: click the link "Click to view Electronic Liability Ledger" to view details of Electronic Liability Ledger that displays liabilities/ dues of Returns and other than Returns.
GST-Refund-Electronic-Cash-Ledger-Refund-Details
Step 6: Enter the amount of Refund to be claimed for IntegrateExports - GST Refund Tax, Central Tax, State/ UT Tax and tax in table “Refund Claimed”.
Step 7: click the link "Click to view Electronic Liability Ledger" to view details of Electronic Liability Ledger that displays liabilities/ dues of Returns and other than Returns.
 GST-Refund-Electronic-Cash-Ledger-view-ledger
Step 8: Select the "Go back to refund form" to return to the refund application page.
Step 9: Click on "Account number " from the "Select account Number" drop-down list.
Step 10: Now upload the documents if required.
GST-Refund-Electronic-Cash-Ledger-view-ledger
Step 8: Select the "Go back to refund form" to return to the refund application page.
Step 9: Click on "Account number " from the "Select account Number" drop-down list.
Step 10: Now upload the documents if required.
 GST-Refund-Electronic-Cash-Ledger-Upload-Document
Step 11: Now enter the Document Description and click the Add Document button.
Step 12: Click the Delete button, in case of deletion any document and click on the "Save" button.
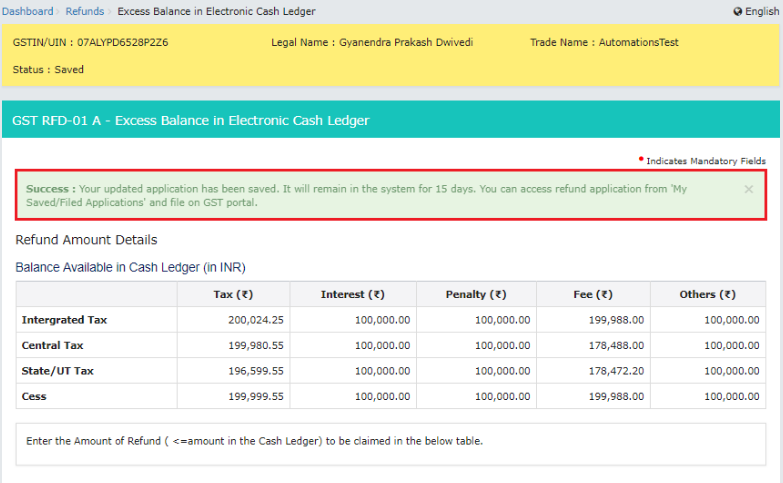
Step 13: Now, receive the message to submit the application within 15 days from the date of application.
Step 14: A success message is displayed that the application has been saved and submit within fifteen days from the date of application.
GST-Refund-Electronic-Cash-Ledger-Upload-Document
Step 11: Now enter the Document Description and click the Add Document button.
Step 12: Click the Delete button, in case of deletion any document and click on the "Save" button.
Step 13: Now, receive the message to submit the application within 15 days from the date of application.
Step 14: A success message is displayed that the application has been saved and submit within fifteen days from the date of application.
 GST-Refund-Electronic-Cash-Ledger-Refund-Details
Step 15: The applicant can access the Application by clicking on Services and My Saved or Filed Applications file from the Refunds menu on the GST Portal.
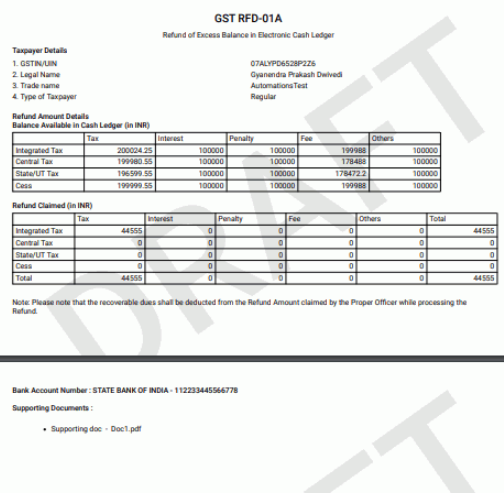
Step 16: Click on the "Preview" button to download the form in PDF format.
Step 17: Click on the "Proceed" button to download the form in the pdf format.
GST-Refund-Electronic-Cash-Ledger-Refund-Details
Step 15: The applicant can access the Application by clicking on Services and My Saved or Filed Applications file from the Refunds menu on the GST Portal.
Step 16: Click on the "Preview" button to download the form in PDF format.
Step 17: Click on the "Proceed" button to download the form in the pdf format.
 GST-Refund-Electronic-Cash-Ledger-Download-Form
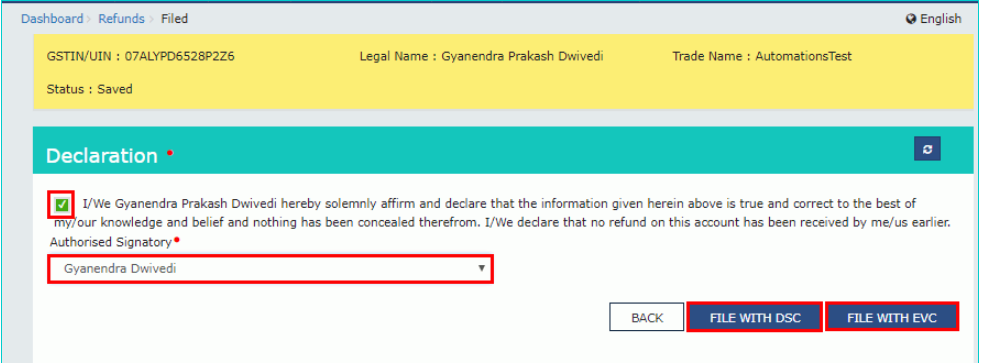
Step 18: Select the Declaration checkbox, in the Name of Authorized Signatory drop-down list, select the name of the authorised signatory.
Step 19: Click the File with DSC or File with EVC button.
GST-Refund-Electronic-Cash-Ledger-Download-Form
Step 18: Select the Declaration checkbox, in the Name of Authorized Signatory drop-down list, select the name of the authorised signatory.
Step 19: Click the File with DSC or File with EVC button.
 GST-Refund-Electronic-Cash-Ledger-Image-8
File With DSC- Method
- Click the Proceed button and select the certificate and click the Sign button.
File With EVC – Method
- Enter the OTP sent on email and mobile number of the Authorized Signatory registered at the GST Portal and click the Verify button.
 GST-Refund-Electronic-Cash-Ledger-debit-entry