Karthiga
Expert
Published on: Jun 24, 2026
Input Tax Credit Refund - Exports
GST refund can be claimed by the taxpayer for input tax which is the central tax (CGST), state tax (SGST), integrated tax (IGST) or tax paid by a person having GST registration on the supply of goods or services. GST RFD-01A form has to be filled at
GST portal by the taxpayer to claim the refund of the input tax credit on exports. In this article, we look at the eligibility, documents and procedure for claiming the refund on the input tax credit for multiple tax period.Input Tax Credit
The input tax credit is provided to set off tax paid on the purchase of raw materials, consumables, goods or services that were used in the manufacturing of goods or services. GST input tax credit mechanism helps in avoiding double taxation and the cascading effect of taxes.
Documents Required
The applicant has to upload the required documents along with Form RFD-01A, as notified under CGST Rules or Circulars stated. Additionally, any supporting documentation can be uploaded by the taxpayer, if needed by the sanctioning authority.
Concerned Authority
After filing the Form-RFD-1A refund, the application will be assigned to the Refund Processing Officer, and the applicant can track the status of the refund application.
Online Procedure To Claim Refund of Input Tax Credit
Before filing a claim for refund of an input tax credit, please ensure that all
GST returns are filed up to date. To claim for the refund in input tax credit online, follow the steps mentioned below: Step 1: Kindly visit the official portal of GST department. Step 2: Click the Services and select “Application for Refund” tab from the Refund menu. Input Tax Credit Gst Refund-Services
Step 3: On the next page, select the Refund of ITC on Export of Goods and Services without Payment of Tax option.
Input Tax Credit Gst Refund-Services
Step 3: On the next page, select the Refund of ITC on Export of Goods and Services without Payment of Tax option.
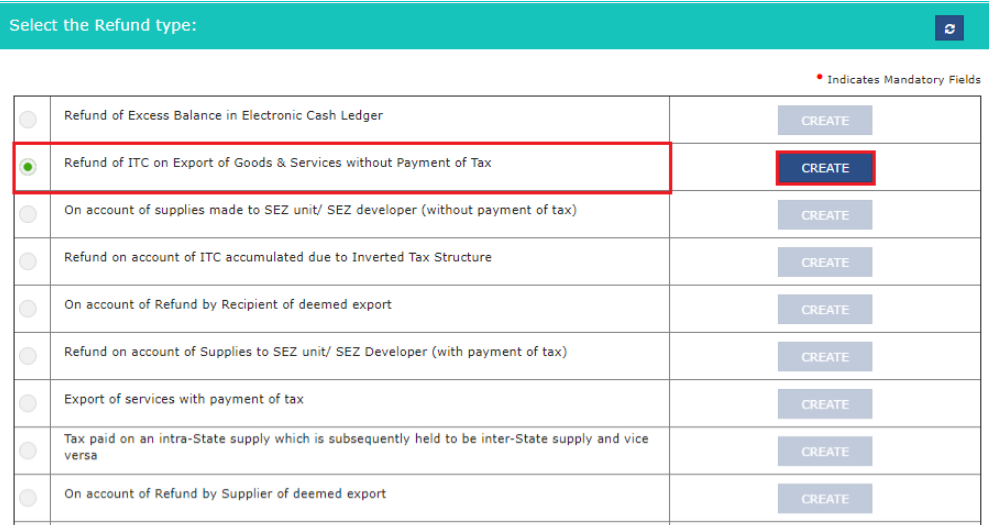 Input Tax Credit Gst Refund-Refund-Type
Step 4: Select the Financial Year for which application has to be filed from the drop-down list.
Step 5: Select the Tax Period for which application has to be filed from the drop-down list and click the "Create" button.
Step 6: Choose Yes to file a nil refund or else, select No.
In the case of Yes
Step 7: Select the Declaration checkbox.
Step 8: In the Name of Authorized Signatory drop-down list, select the name of the authorised signatory.
Step 9: Click the File with DSC or File with EVC button.
File With DSC- Method
Input Tax Credit Gst Refund-Refund-Type
Step 4: Select the Financial Year for which application has to be filed from the drop-down list.
Step 5: Select the Tax Period for which application has to be filed from the drop-down list and click the "Create" button.
Step 6: Choose Yes to file a nil refund or else, select No.
In the case of Yes
Step 7: Select the Declaration checkbox.
Step 8: In the Name of Authorized Signatory drop-down list, select the name of the authorised signatory.
Step 9: Click the File with DSC or File with EVC button.
File With DSC- Method
- Click the Proceed button and select the certificate and click the Sign button.
- Enter the OTP sent on email and mobile number of the Authorized Signatory registered at the GST Portal and click the Verify button.
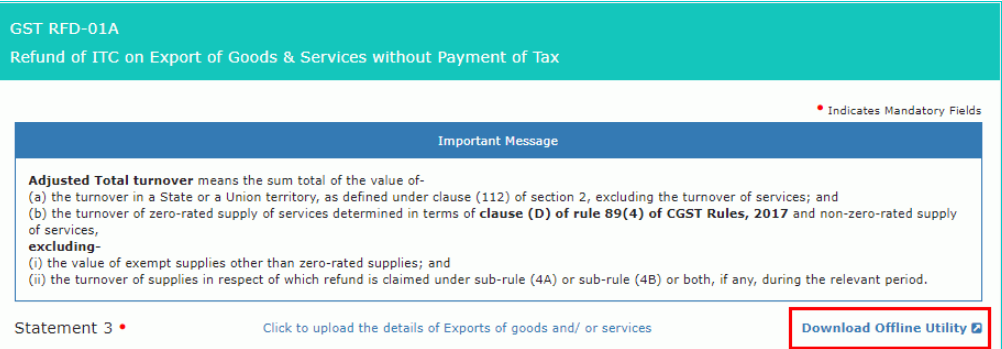 Input Tax Credit Gst Refund-Download-Offline-Utility
Step 13: Now the Zip file is downloaded on the system and select Extract All to unzip the downloaded file.
Step 14: The GST refund statement will be downloaded in the excel format. Provide the invoice details for which refund has to be claimed.
Step 15: Provide the GSTIN and “From Return Period” and “To Return Period” in the prescribed format for which refund has to be claimed and press Validate and Calculate button.
Step 16: Click the "Ok" button when the total number of records in the sheet is displayed.
Step 17: Click the Create File To Upload button and click the "Save" button.
Step 18: The message is displayed that file is created and upload the file on the GST Portal. Click the "Ok" button.
Input Tax Credit Gst Refund-Download-Offline-Utility
Step 13: Now the Zip file is downloaded on the system and select Extract All to unzip the downloaded file.
Step 14: The GST refund statement will be downloaded in the excel format. Provide the invoice details for which refund has to be claimed.
Step 15: Provide the GSTIN and “From Return Period” and “To Return Period” in the prescribed format for which refund has to be claimed and press Validate and Calculate button.
Step 16: Click the "Ok" button when the total number of records in the sheet is displayed.
Step 17: Click the Create File To Upload button and click the "Save" button.
Step 18: The message is displayed that file is created and upload the file on the GST Portal. Click the "Ok" button.
Upload Details of Exports of Goods and Services
Step 19: Click the tab Click to upload the details of Exports of goods and services.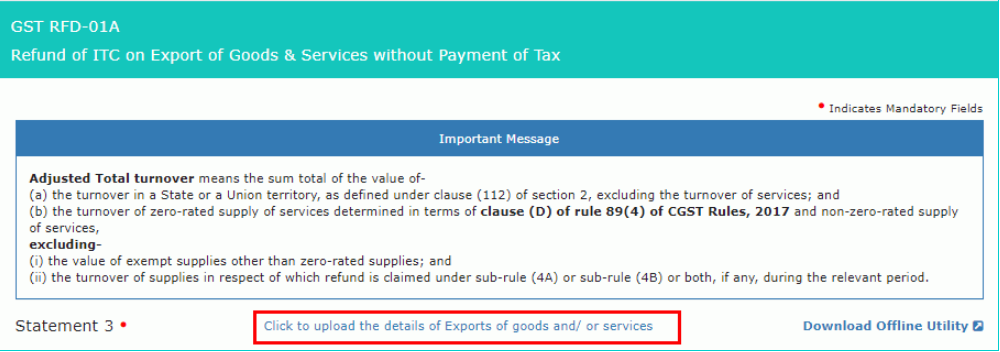 Input Tax Credit Gst Refund-Export-Details
Step 20: Click the "Click here to upload" button.
Input Tax Credit Gst Refund-Export-Details
Step 20: Click the "Click here to upload" button.
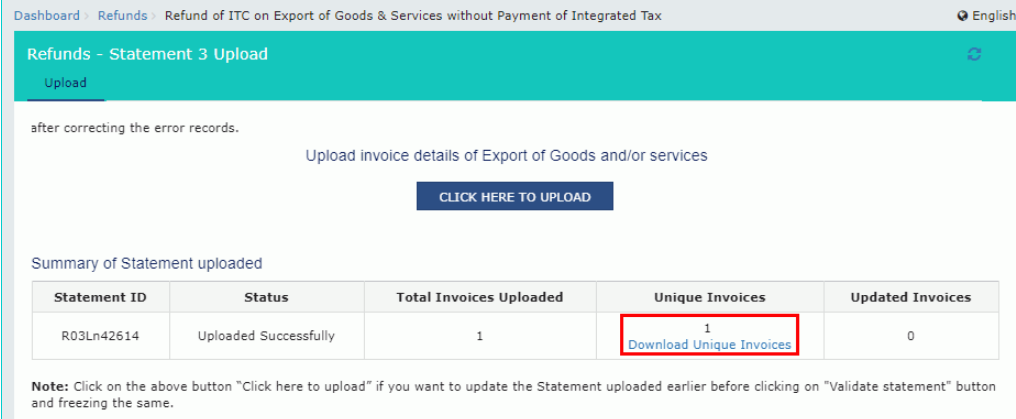
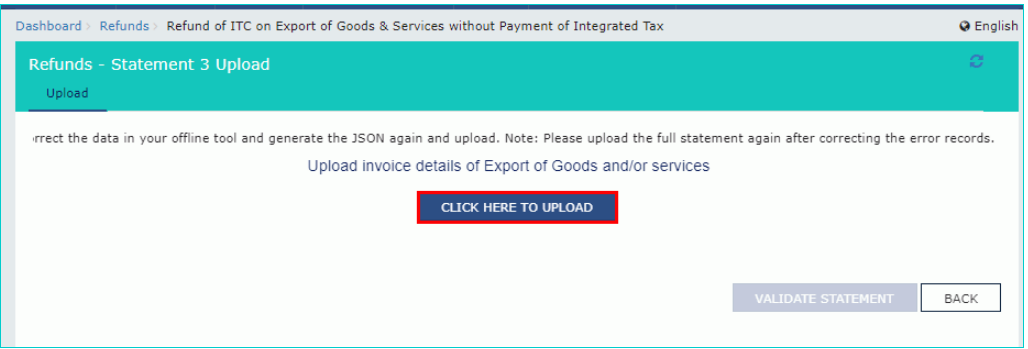 Input Tax Credit Gst Refund-Upload-Details
Step 21: Now save the refund statement file and click the Open button.
Step 22: Click the "Download Unique Invoices" tab to view the invoices that have been uploaded successfully and click Validate statement button.
Input Tax Credit Gst Refund-Upload-Details
Step 21: Now save the refund statement file and click the Open button.
Step 22: Click the "Download Unique Invoices" tab to view the invoices that have been uploaded successfully and click Validate statement button.
 Input Tax Credit Gst Refund-Download-Invoice
Step 23: Upon statement validation, a confirmation message on the screen that the statement has been submitted successfully for validation. Click the Back button.
Input Tax Credit Gst Refund-Download-Invoice
Step 23: Upon statement validation, a confirmation message on the screen that the statement has been submitted successfully for validation. Click the Back button.
Refund of ITC on Export of Goods and Services without Payment of Tax
Step 24: Enter the value in the statement 3A below for the tax period for which the refund to be claimed.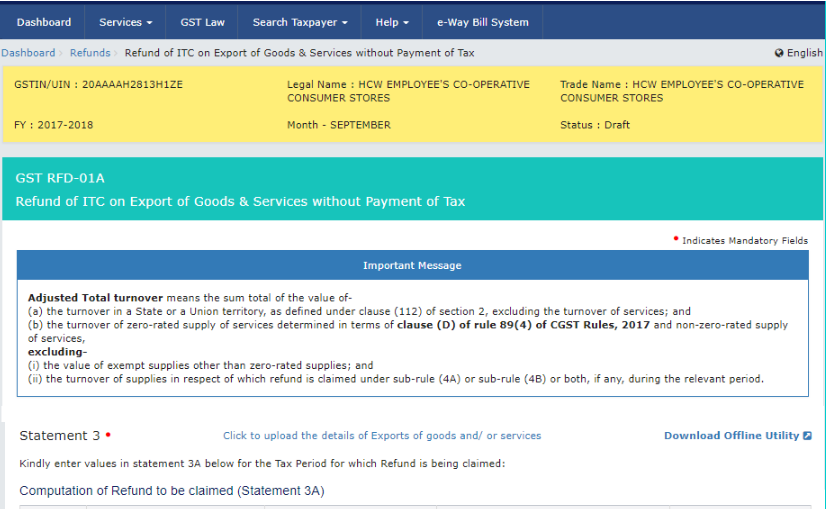 Input Tax Credit Gst Refund-Tax-Payment
Step 25: Select the Bank Account Number from the drop-down list. In case the applicant has filed the (Form GST RFD-11), select Yes and enter the Reference Number of RFD-11 filing or else No and click the Save button.
Step 26: Select the name of authorised signatory in the Name of Authorized Signatory drop-down list.
Step 27: Click the File with DSC or File with EVC button.
File With DSC- Method
Input Tax Credit Gst Refund-Tax-Payment
Step 25: Select the Bank Account Number from the drop-down list. In case the applicant has filed the (Form GST RFD-11), select Yes and enter the Reference Number of RFD-11 filing or else No and click the Save button.
Step 26: Select the name of authorised signatory in the Name of Authorized Signatory drop-down list.
Step 27: Click the File with DSC or File with EVC button.
File With DSC- Method
- Click the Proceed button and select the certificate and click the Sign button.
- Enter the OTP sent on email and mobile number of the Authorized Signatory registered at the GST Portal and click the Verify button.