
Chris John
Expert
Published on: Apr 21, 2026
Filing of Form GST ITC-03
Form GST ITC-03 is filed by a taxpayer who is liable to pay an amount that is equal to the
input tax credit through cash ledger or electronic credit. This form is filed under certain circumstances when the input tax credit that has been availed has to be reversed. Input Tax Credit reversal may be related to the input held in stock, input contained in semi-finished goods or finished goods held in stock and, capital goods held in stock.Downloading and Installing the Offline Tool
Form GST ITC-03 Offline Tool needs to be downloaded only once and may require regular updates as released by the
GST Portal. Ensure to recheck the version of the software before downloading the file from the Portal. The following steps have to follow to download and install the FORM GST ITC-03 Offline Tool. Step 1: Visit the official webpage of the GST Portal by clicking here. Step 2: After the home page is loaded completely, click on the Downloads option. Under the Offline Tools section, click on the ITC-03 Offline Tool.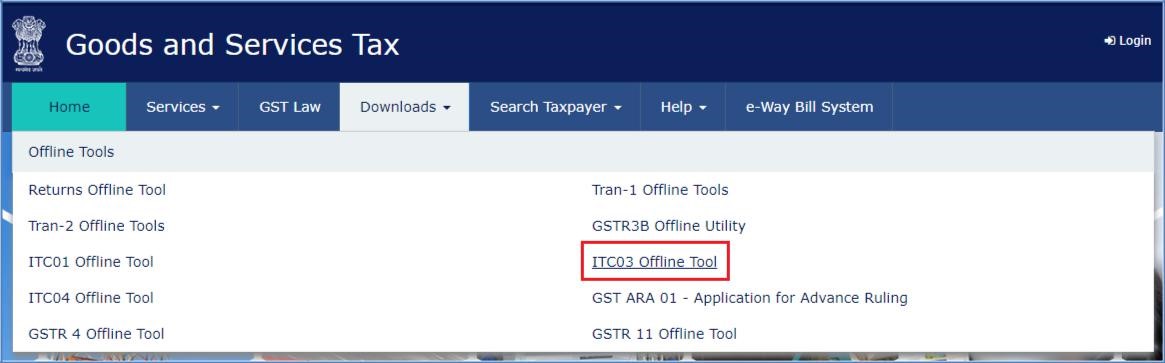 Step 2- Offline Filing of Form GST ITC-03
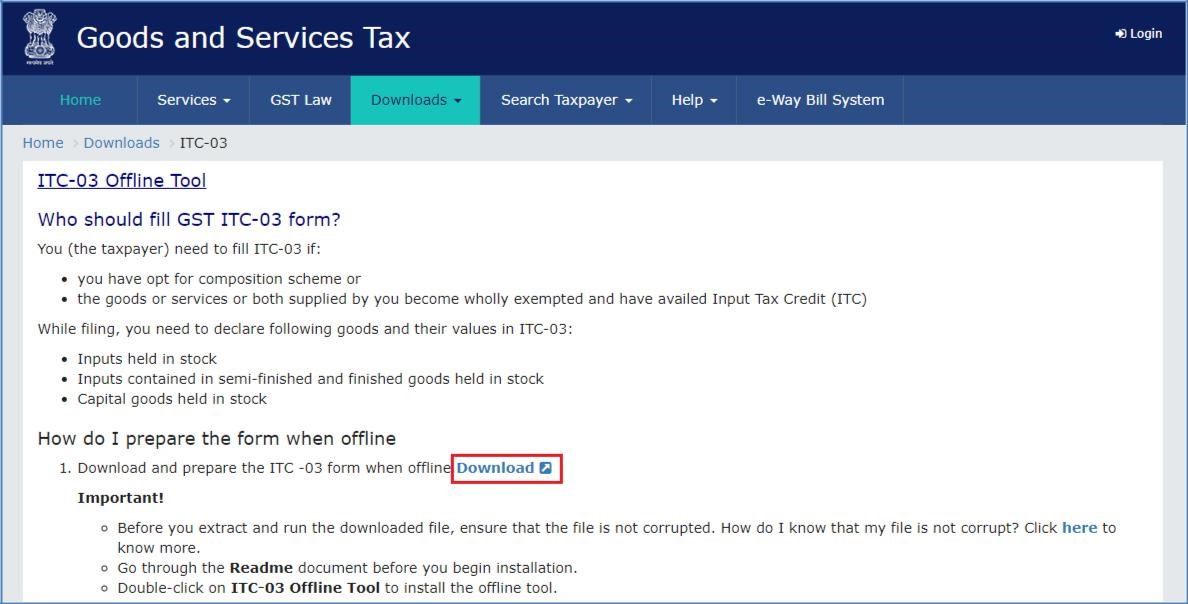
Step 3: Click on the Download icon after the Form GST ITC-03 Offline Tool page is loaded.
Step 2- Offline Filing of Form GST ITC-03
Step 3: Click on the Download icon after the Form GST ITC-03 Offline Tool page is loaded.
 Step 3- Offline Filing of Form GST ITC-03
Downloading the Form GST ITC-01 Offline Tool takes about 2 to 3 minutes depending on the speed of the internet connection.
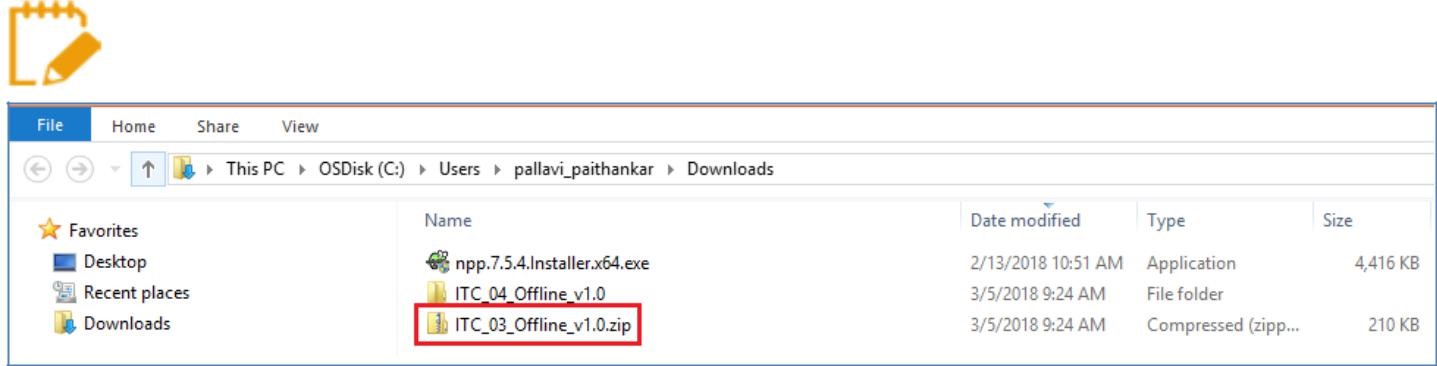
Step 4: Form GST ITC-03 Offline Tool is downloaded into the system's Downloads folder.
Step 3- Offline Filing of Form GST ITC-03
Downloading the Form GST ITC-01 Offline Tool takes about 2 to 3 minutes depending on the speed of the internet connection.
Step 4: Form GST ITC-03 Offline Tool is downloaded into the system's Downloads folder.
 Step 4- Offline Filing of Form GST ITC-03
Step 5: After ensuring that the file is uncorrupted, the files need to be unzipped and saved in the required location on the system.
Step 6: The unzipped folder would consist of the ITC_03_Offline_Utility file as a Microsoft Excel sheet. Along with the Excel file, other files such as Readme and Release notes files would be included.
Step 4- Offline Filing of Form GST ITC-03
Step 5: After ensuring that the file is uncorrupted, the files need to be unzipped and saved in the required location on the system.
Step 6: The unzipped folder would consist of the ITC_03_Offline_Utility file as a Microsoft Excel sheet. Along with the Excel file, other files such as Readme and Release notes files would be included.
 Step 6- Offline Filing of Form GST ITC-03
Step 7: Open the ITC_03_Offline_Utility.xls file.
Note: The Excel worksheet template would contain four significant worksheets to help in filing the form.
Step 6- Offline Filing of Form GST ITC-03
Step 7: Open the ITC_03_Offline_Utility.xls file.
Note: The Excel worksheet template would contain four significant worksheets to help in filing the form.
- Instructions Sheet: This sheet consists of an introduction to the offline tool along with other helpful instruction.
- Home: Details regarding the ITC-03 JSON/ Error file and generating the JSON file from the data entered in Invoice_vailable & Invoice_Not_Available sheets.
- Invoice_Available: To enter the details of ITC-03 declaration with the help of invoices.
- Invoice_Not_Available: To enter the details of ITC-03 declaration without invoices.
Preparing the Form GST ITC-03 Return
To prepare the Form GST ITC-03 Return, the following steps have to be performed in order.
- Enter the details in the available worksheets of Form GST ITC-03 Offline Tool.
- Generate JSON file using the Generate File to Upload icon and save the JSON file on the system.
- Upload the generated JSON on the GST Portal. Review the information uploaded, submit, offset liability and file returns on the GST Portal.
Below are the actions explained in detail for ease.
Entering the details in the Invoice worksheets
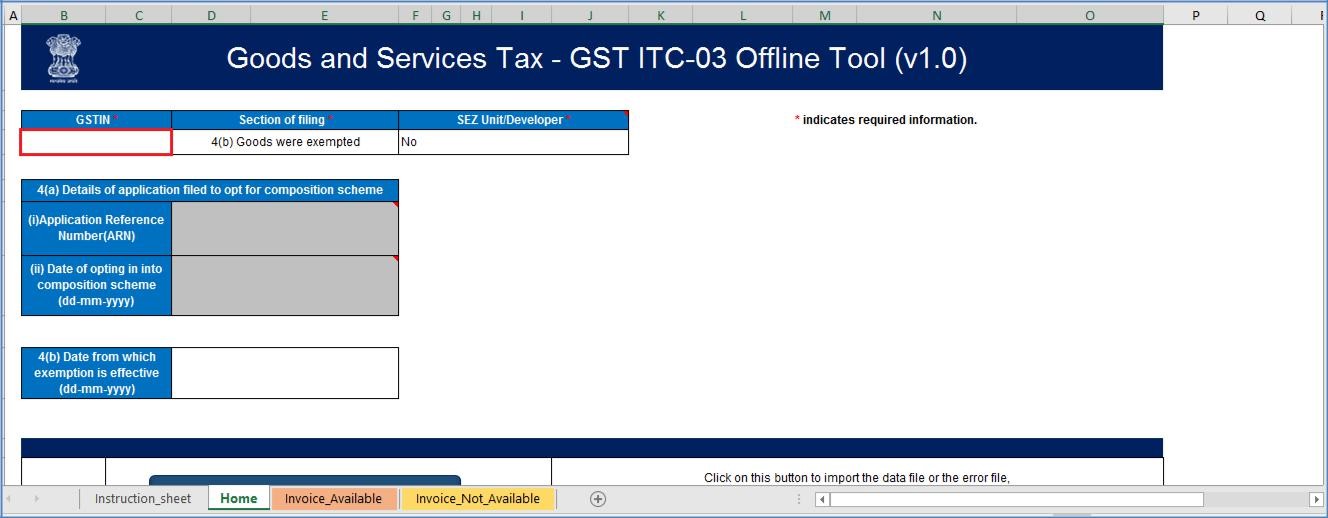
Step 1: Open the Form GST ITC-03 Microsoft Excel-based offline tool and navigate to the sheet termed as Home.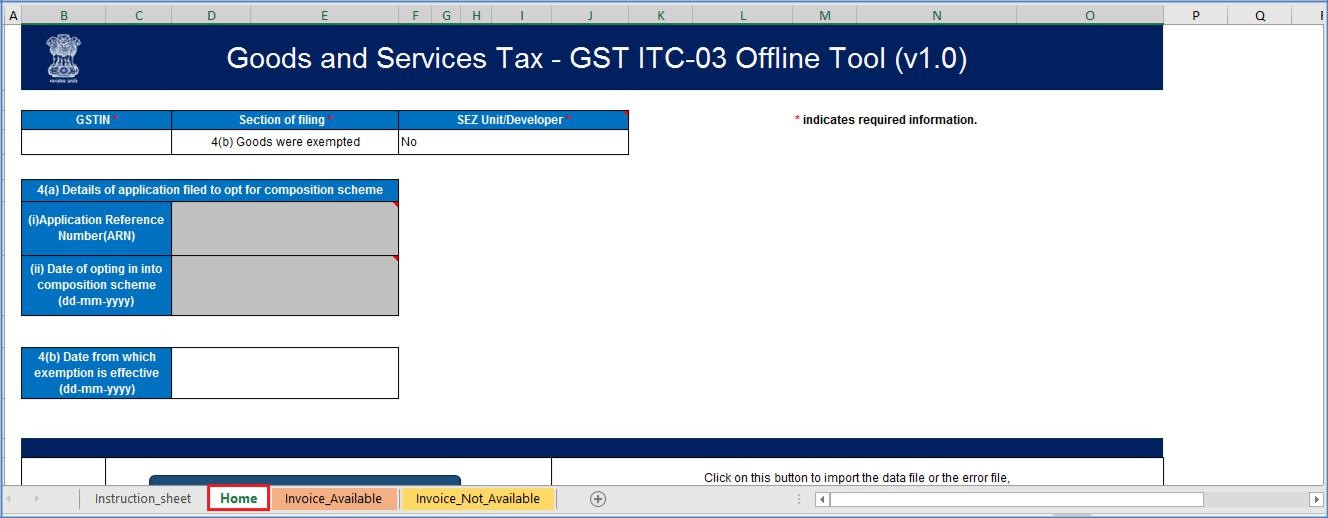 Step 1- Offline Filing of Form GST ITC-03
Step 2: In the field given for GSTIN, enter the appropriate GSTIN.
Step 1- Offline Filing of Form GST ITC-03
Step 2: In the field given for GSTIN, enter the appropriate GSTIN.
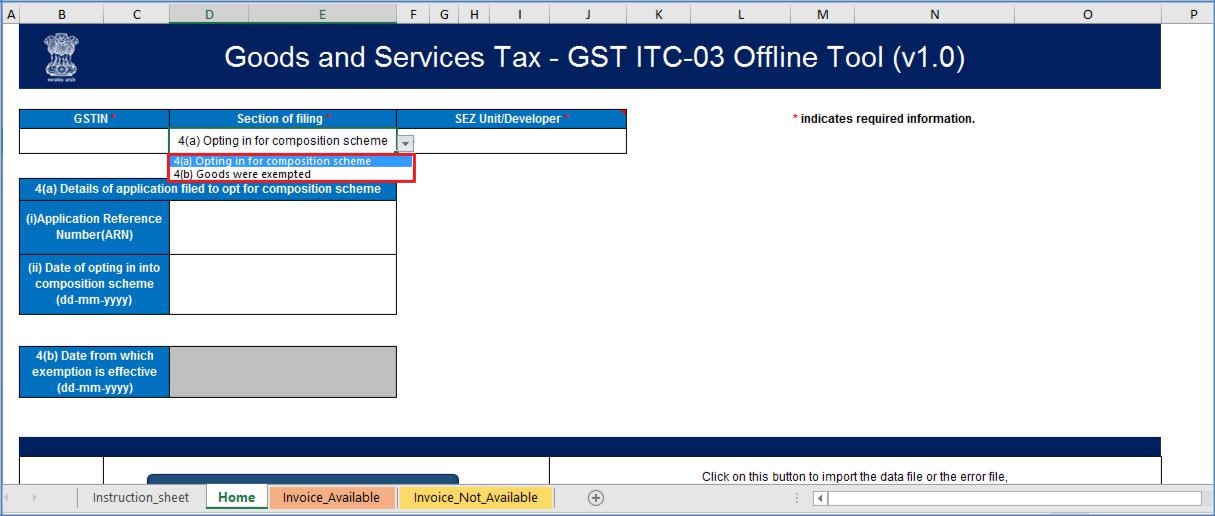
 Step 2- Offline Filing of Form GST ITC-03
Step 3: Choose the appropriate Section of Filing from the drop-down menu.
Step 2- Offline Filing of Form GST ITC-03
Step 3: Choose the appropriate Section of Filing from the drop-down menu.
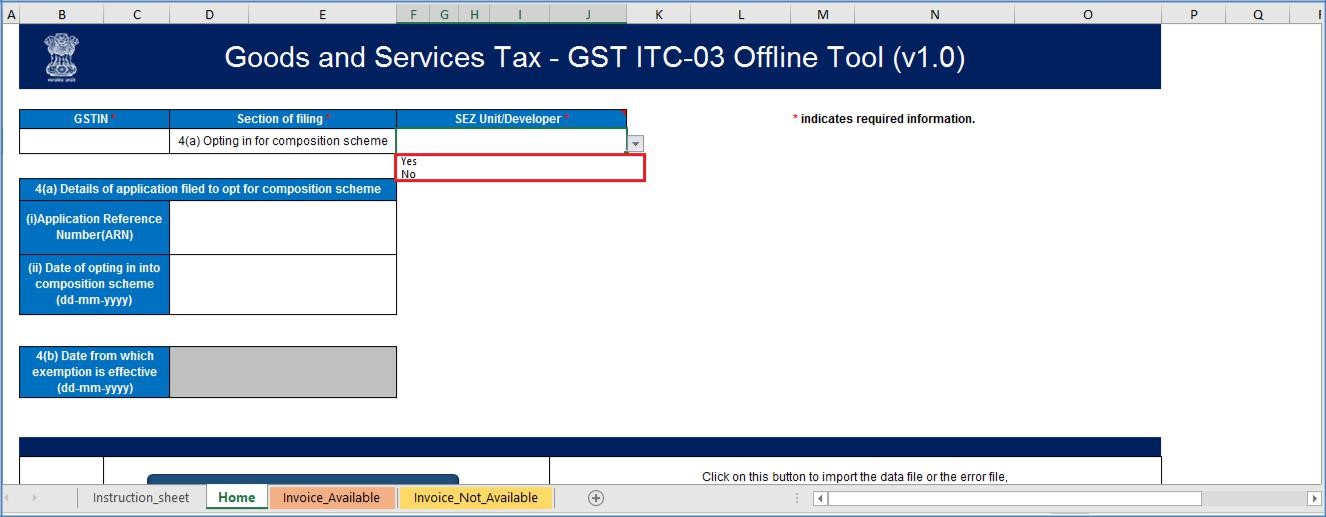
 Step 3- Offline Filing of Form GST ITC-03
Step 4: Select the SEZ Unit/ Developer and choose the Yes/ No option from the drop-down list.
Step 3- Offline Filing of Form GST ITC-03
Step 4: Select the SEZ Unit/ Developer and choose the Yes/ No option from the drop-down list.
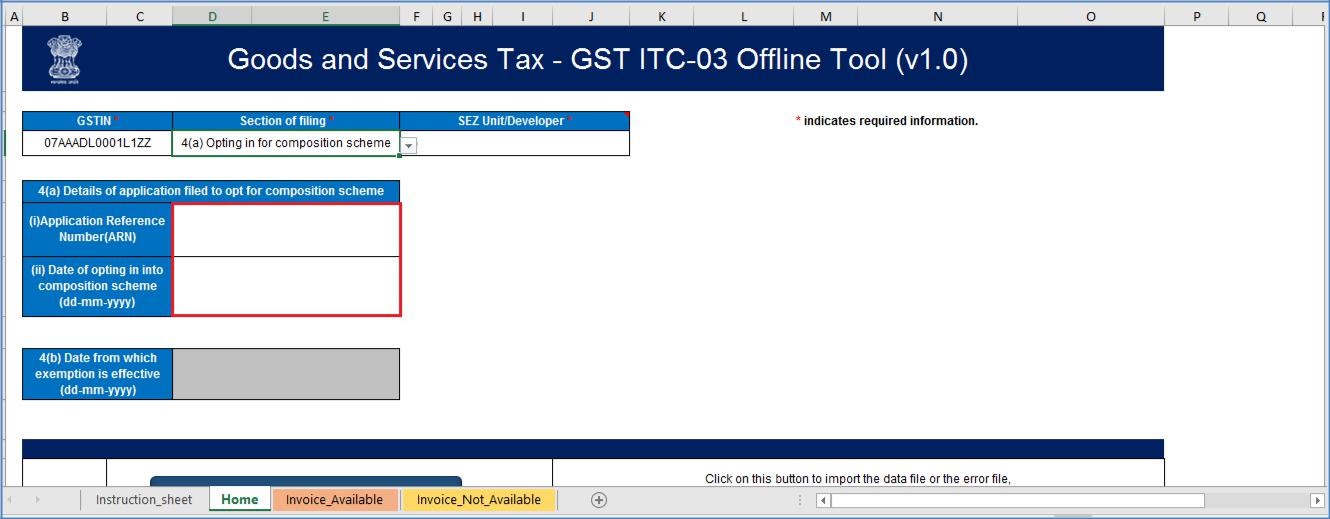
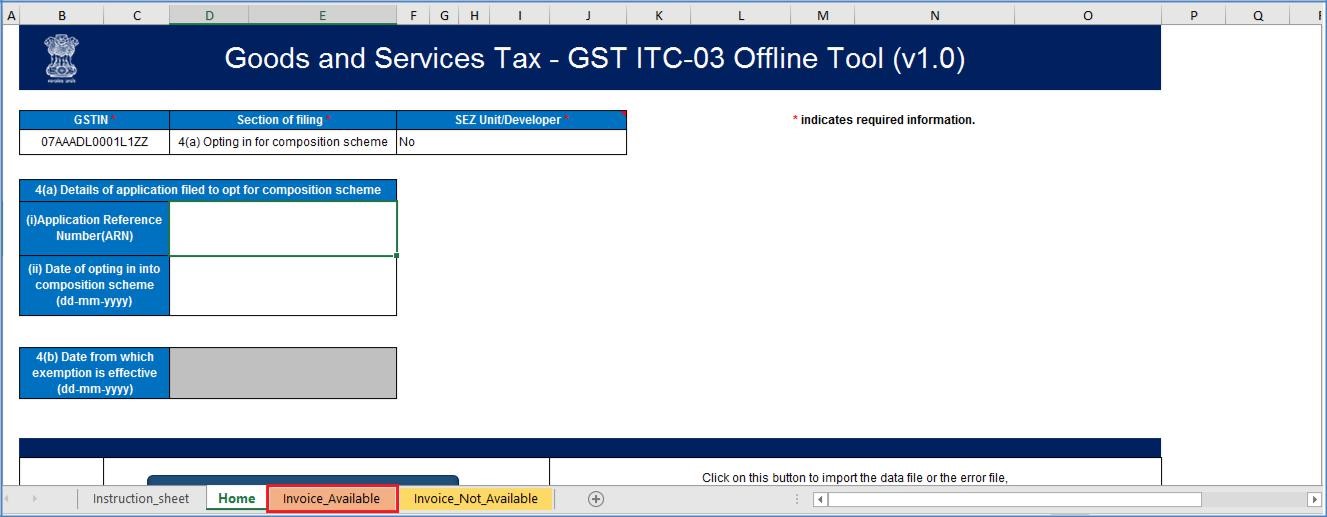
 Step 4- Offline Filing of Form GST ITC-03
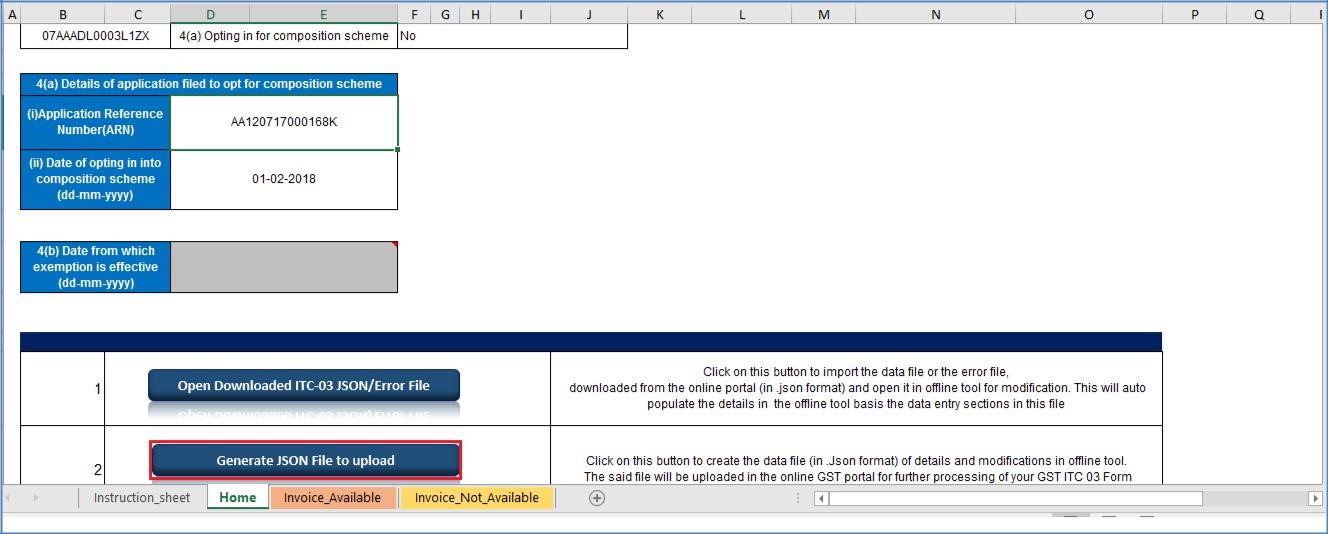
Step 5: As stated in Section 4(a) Details of Application filed to Opt for Composition Scheme, complete the details such as Application Reference Number (ARN) and Date of Opting in into the Composition Scheme.
Step 4- Offline Filing of Form GST ITC-03
Step 5: As stated in Section 4(a) Details of Application filed to Opt for Composition Scheme, complete the details such as Application Reference Number (ARN) and Date of Opting in into the Composition Scheme.
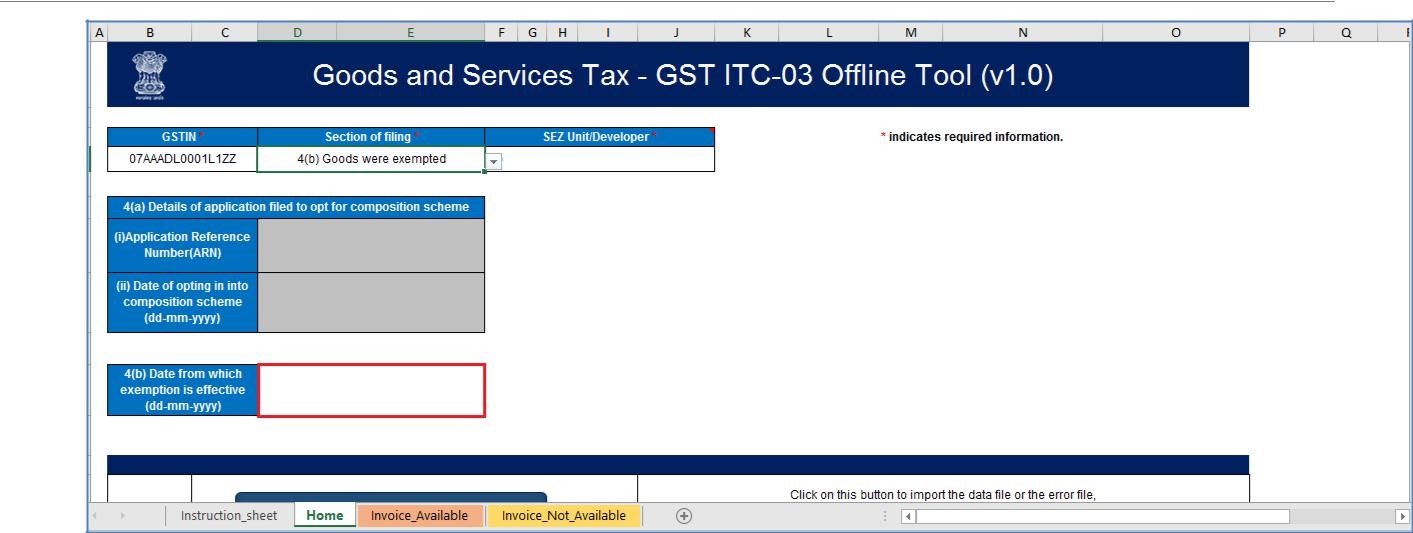
 Step 5- Offline Filing of Form GST ITC-03
Note: If the taxpayer chooses the option 4(b) Goods were exempted under the filing section, the Date from which exemption is valid should be entered.
Step 5- Offline Filing of Form GST ITC-03
Note: If the taxpayer chooses the option 4(b) Goods were exempted under the filing section, the Date from which exemption is valid should be entered.
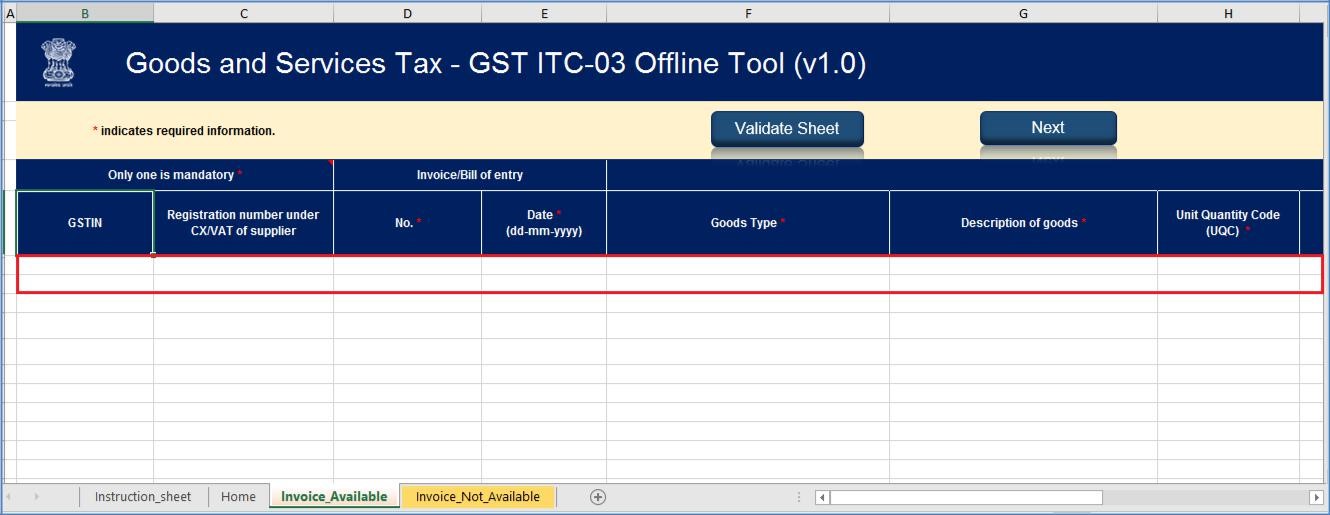
 Step 5a- Offline Filing of Form GST ITC-03
Step 6: Navigate to the Invoice_Available worksheet.
Step 5a- Offline Filing of Form GST ITC-03
Step 6: Navigate to the Invoice_Available worksheet.
 Step 6- Offline Filing of Form GST ITC-03
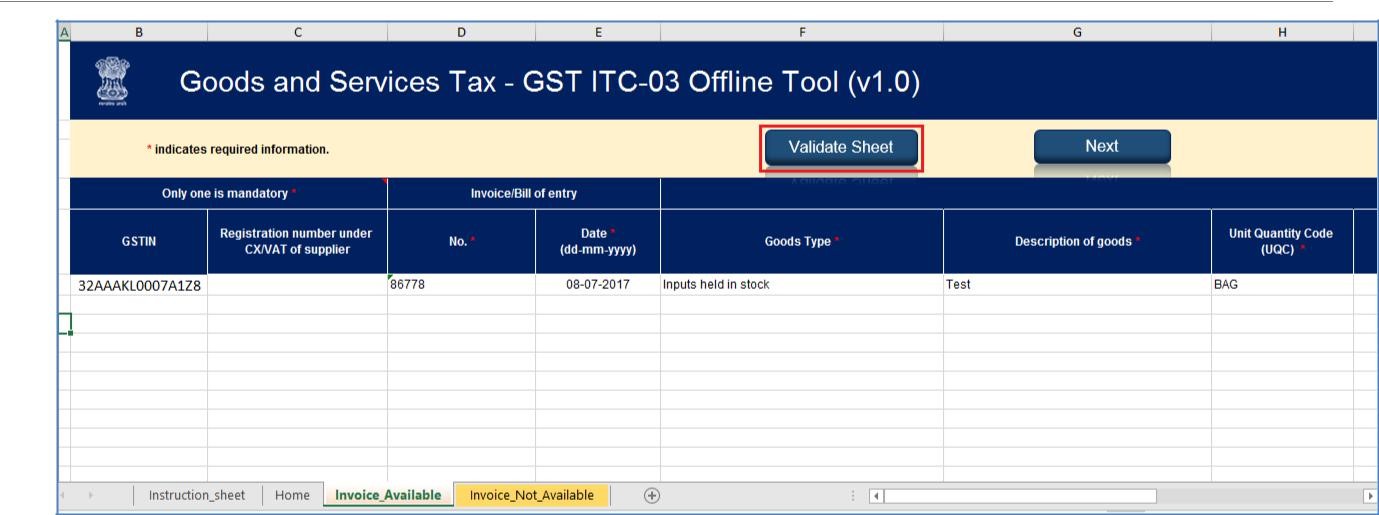
Step 7: Enter the information in the fields as applicable.
Step 6- Offline Filing of Form GST ITC-03
Step 7: Enter the information in the fields as applicable.
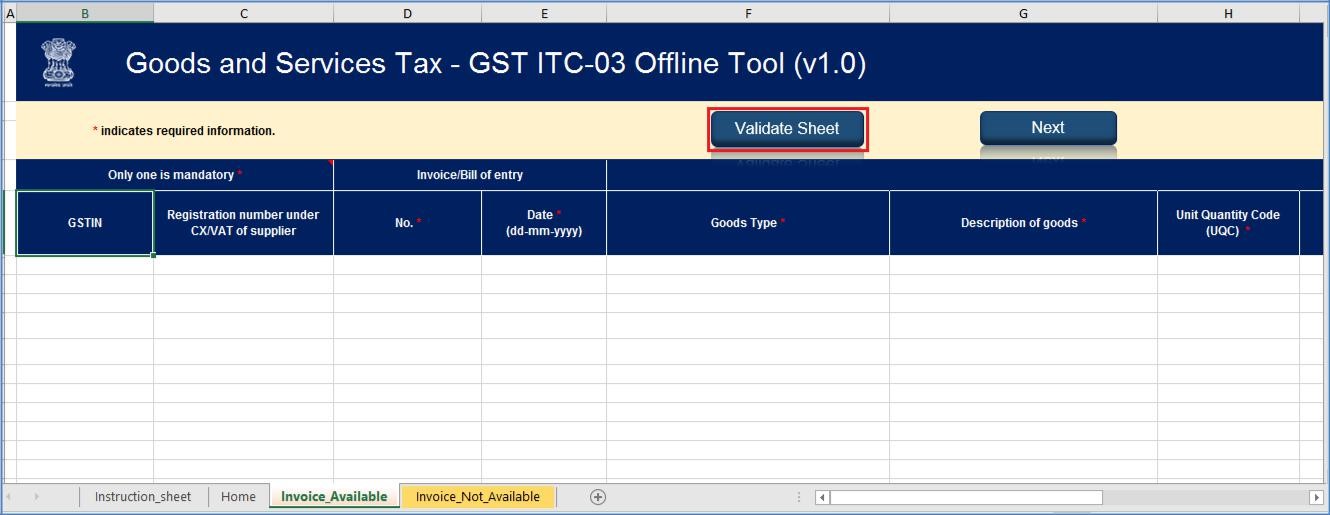
 Step 7- Offline Filing of Form GST ITC-03
Step 8: Once all the data is entered, select the Validate Sheet icon to validate the Invoice_Available worksheet.
Step 7- Offline Filing of Form GST ITC-03
Step 8: Once all the data is entered, select the Validate Sheet icon to validate the Invoice_Available worksheet.
 Step 8- Offline Filing of Form GST ITC-03
Note: Only standard values available in the drop-down list may be selected. If a slight difference is noticed, it may not get detected during validation but will cause an error while uploading on the GST Portal.
Step 8- Offline Filing of Form GST ITC-03
Note: Only standard values available in the drop-down list may be selected. If a slight difference is noticed, it may not get detected during validation but will cause an error while uploading on the GST Portal.
In the case of a successful validation
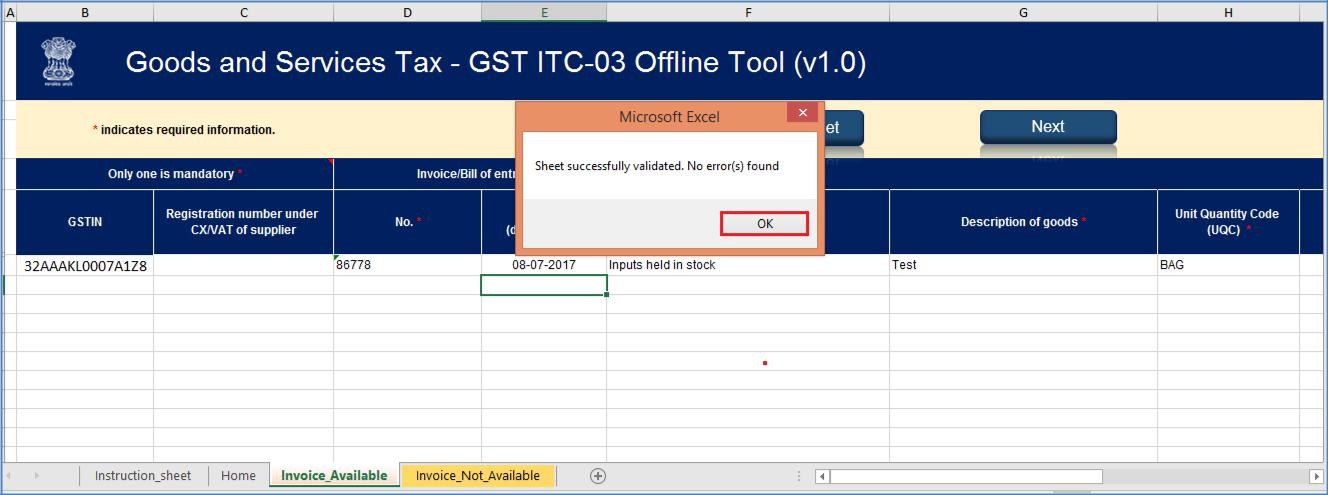
Step 9: The Sheet Validation error(s) column would show that the row is validated.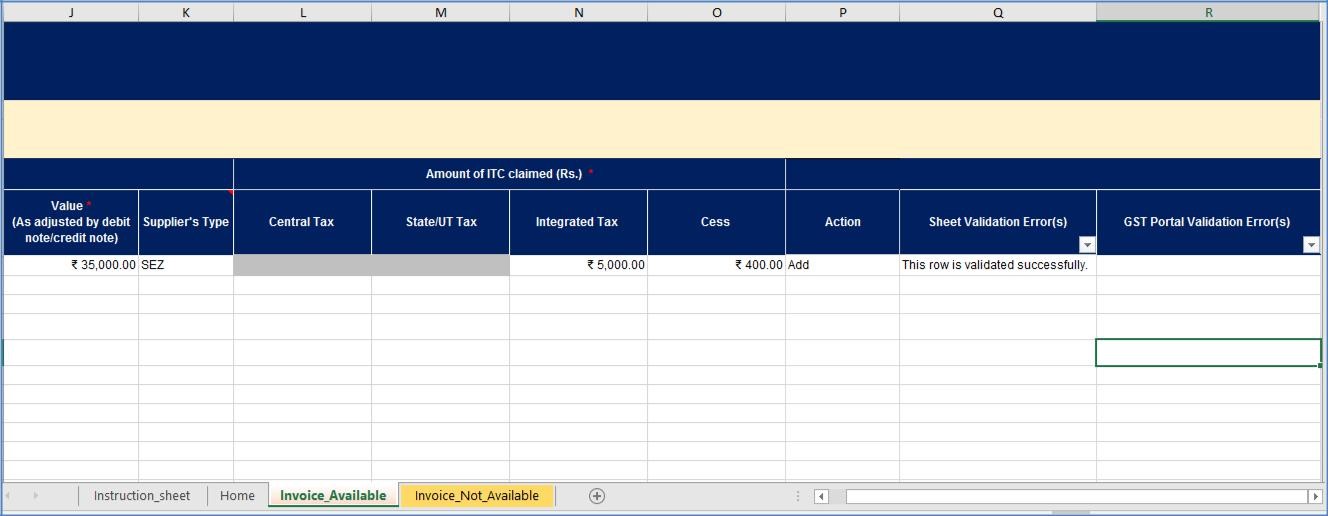 Step 9a- Offline Filing of Form GST ITC-03
In the case of an unsuccessful validation:
Step 9: A error message would pop up indicating that the errors are displayed in the cells highlighted in red. Select the OK icon to continue further.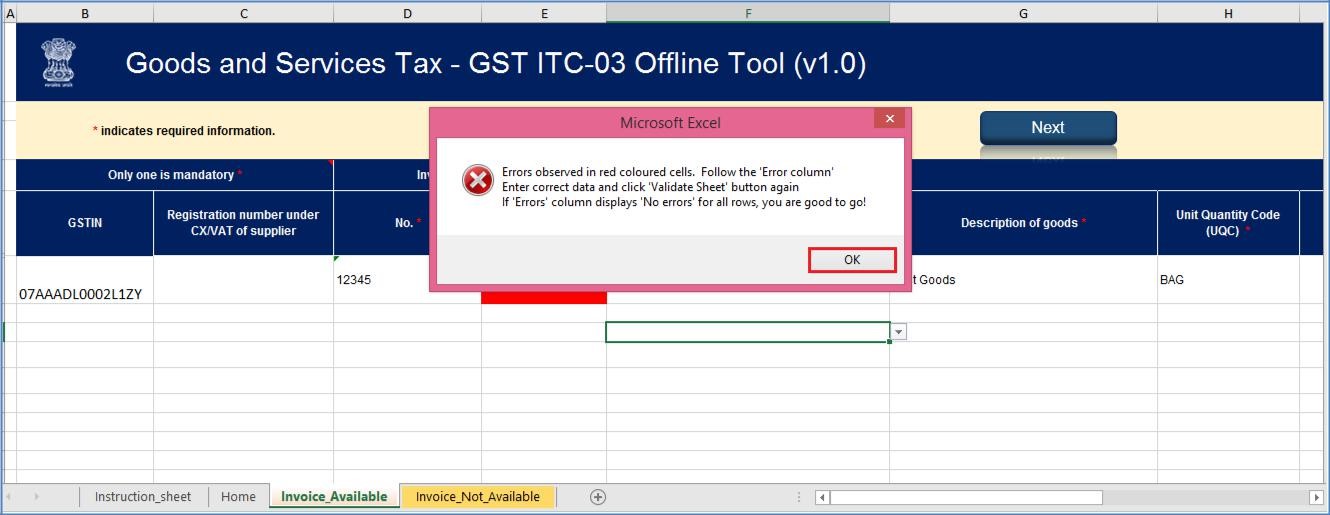 Step 9b- Offline Filing of Form GST ITC-03
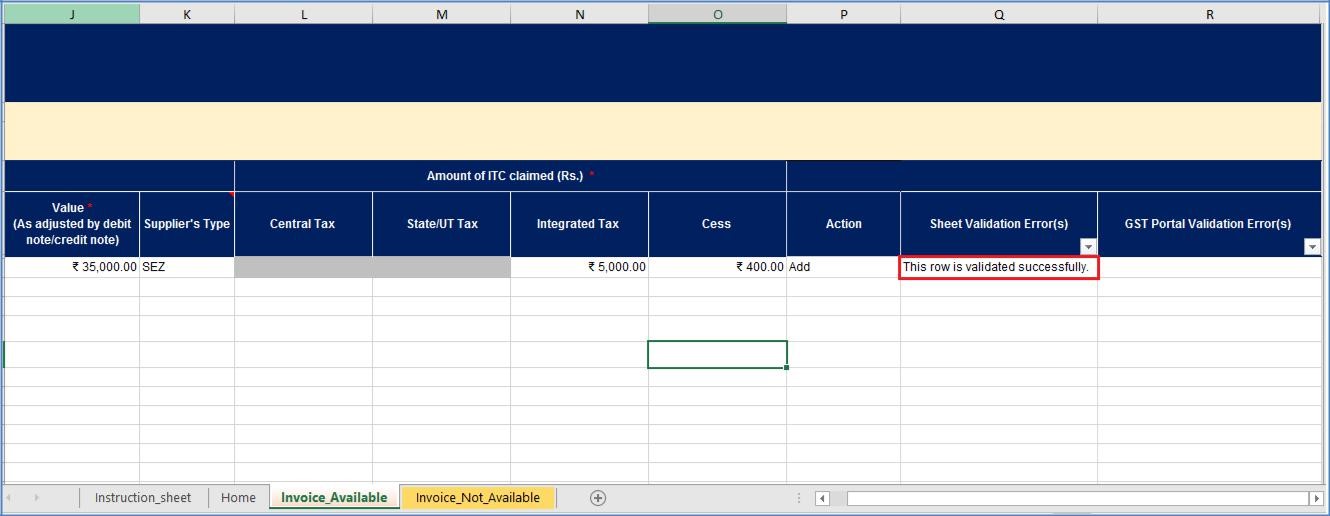
Step 10: Once all the errors are cleared and corrected, click on the Validate Sheet icon to validate the worksheet again. The Sheet Validation Error(s) column would show that the row is validated.
Step 9b- Offline Filing of Form GST ITC-03
Step 10: Once all the errors are cleared and corrected, click on the Validate Sheet icon to validate the worksheet again. The Sheet Validation Error(s) column would show that the row is validated.
 Step 10- Offline Filing of Form GST ITC-03
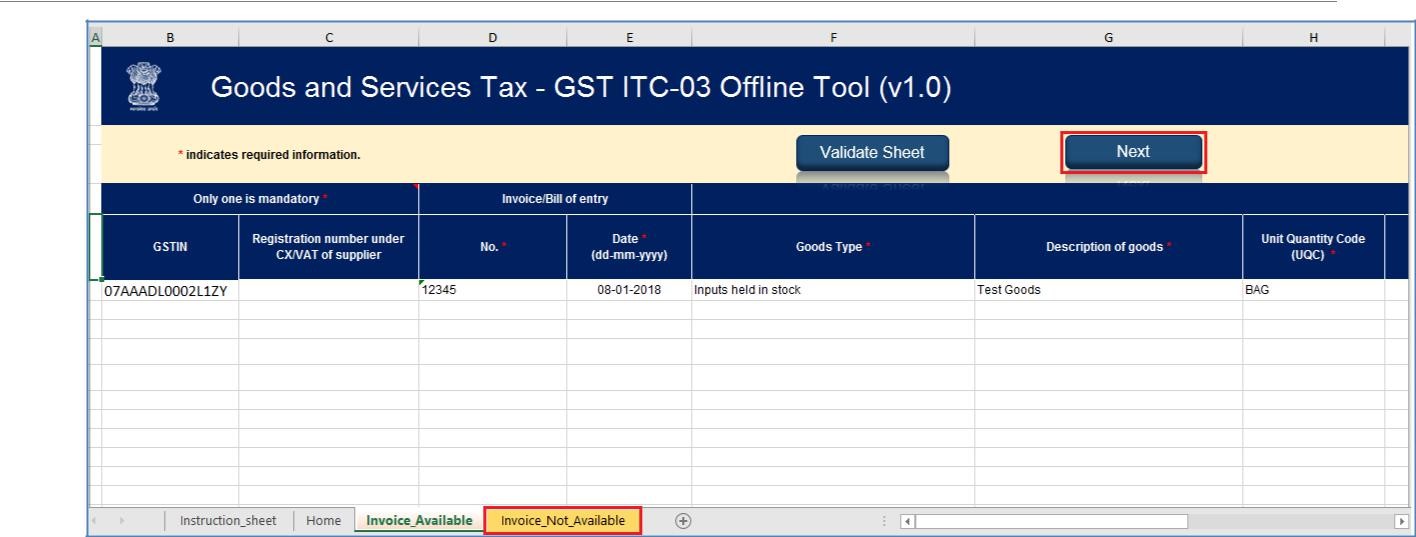
Step 11: Navigate to the Invoice_Not_Available sheet. The Next icon may be clicked to navigate to the next worksheet as mentioned.
Step 10- Offline Filing of Form GST ITC-03
Step 11: Navigate to the Invoice_Not_Available sheet. The Next icon may be clicked to navigate to the next worksheet as mentioned.
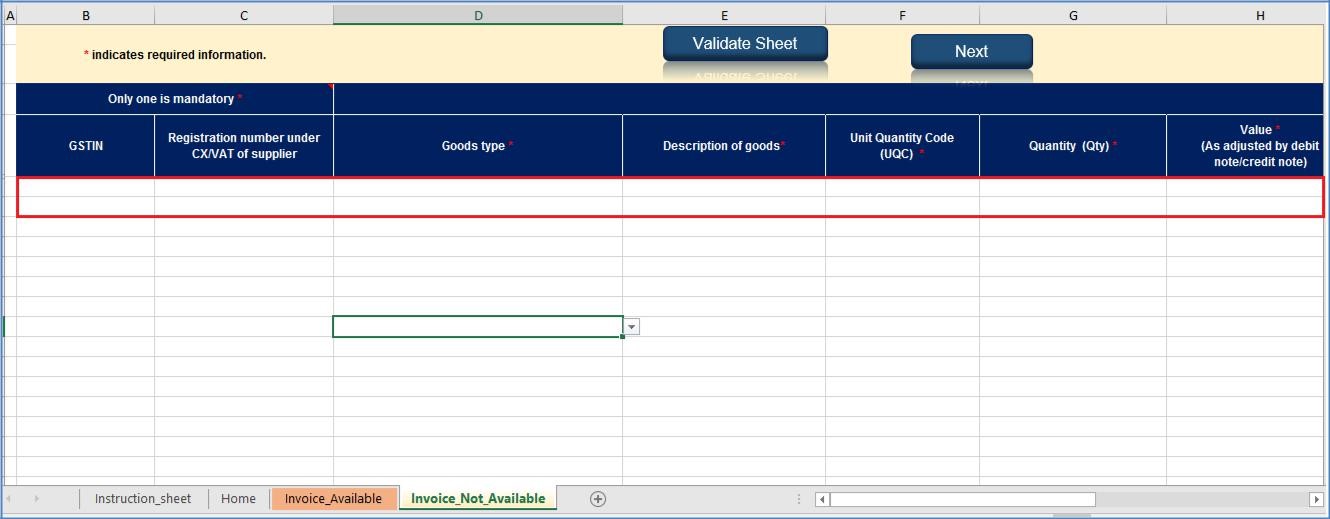
 Step 11- Offline Filing of Form GST ITC-03
Step 12: Enter the appropriate details in the fields as applicable.
Step 11- Offline Filing of Form GST ITC-03
Step 12: Enter the appropriate details in the fields as applicable.
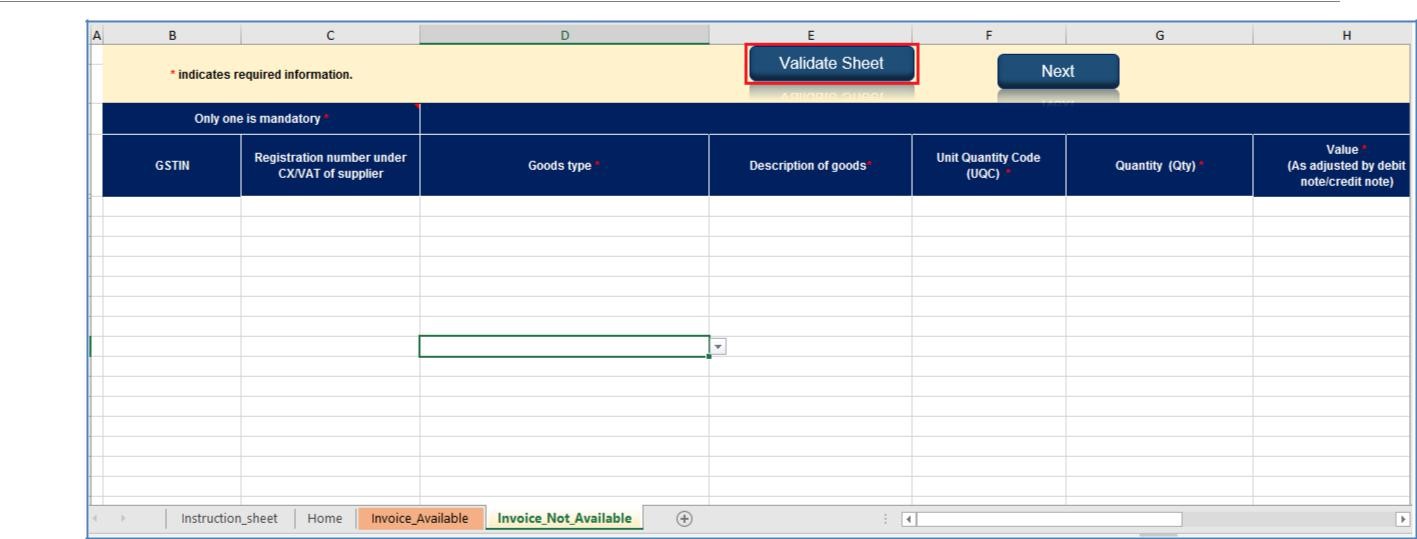
 Step 12- Offline Filing of Form GST ITC-03
Step 13: Once all the information is entered, click on the Validate Sheet icon and validate the Invoice_Not_Available worksheet just like the Invoice_Avalable worksheet. All the validation and error clearing procedures for both the spreadsheets are the same.
Step 12- Offline Filing of Form GST ITC-03
Step 13: Once all the information is entered, click on the Validate Sheet icon and validate the Invoice_Not_Available worksheet just like the Invoice_Avalable worksheet. All the validation and error clearing procedures for both the spreadsheets are the same.
 Step 13- Offline Filing of Form GST ITC-03
Generate the JSON file
Step 1: After successful validation, go over to the Home worksheet. The Next icon may be clicked as well to navigate to the said worksheet.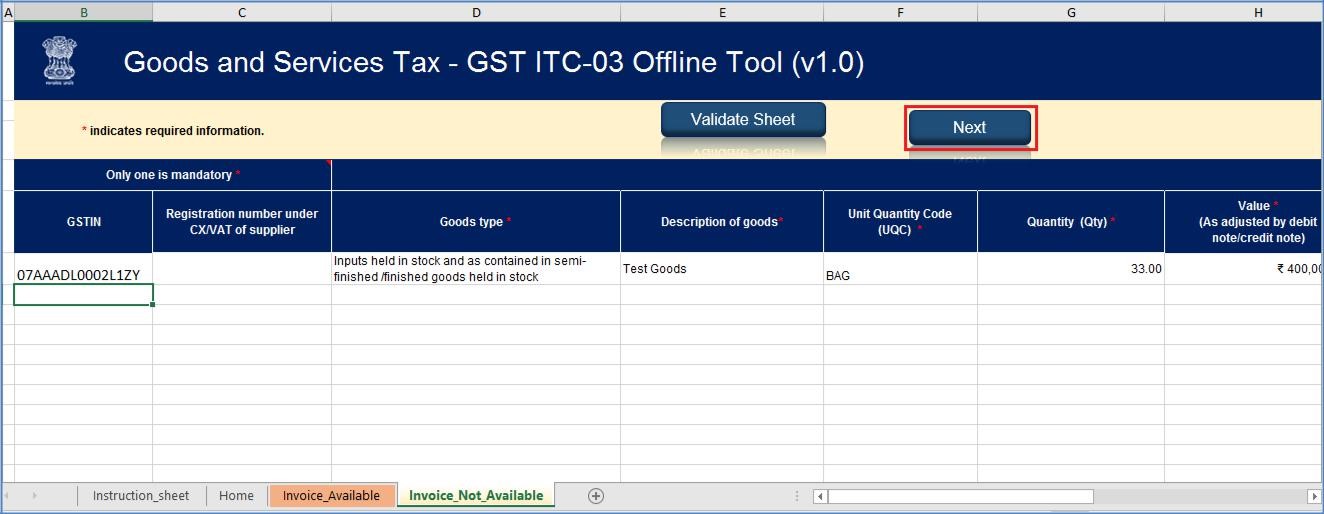 Step 1- Offline Filing of Form GST ITC-03
Step 2: Click on the Get Summary icon to generate a summary of the details updated in the worksheets termed as Invoice_Available and Invoice_Not_Available.
Step 1- Offline Filing of Form GST ITC-03
Step 2: Click on the Get Summary icon to generate a summary of the details updated in the worksheets termed as Invoice_Available and Invoice_Not_Available.
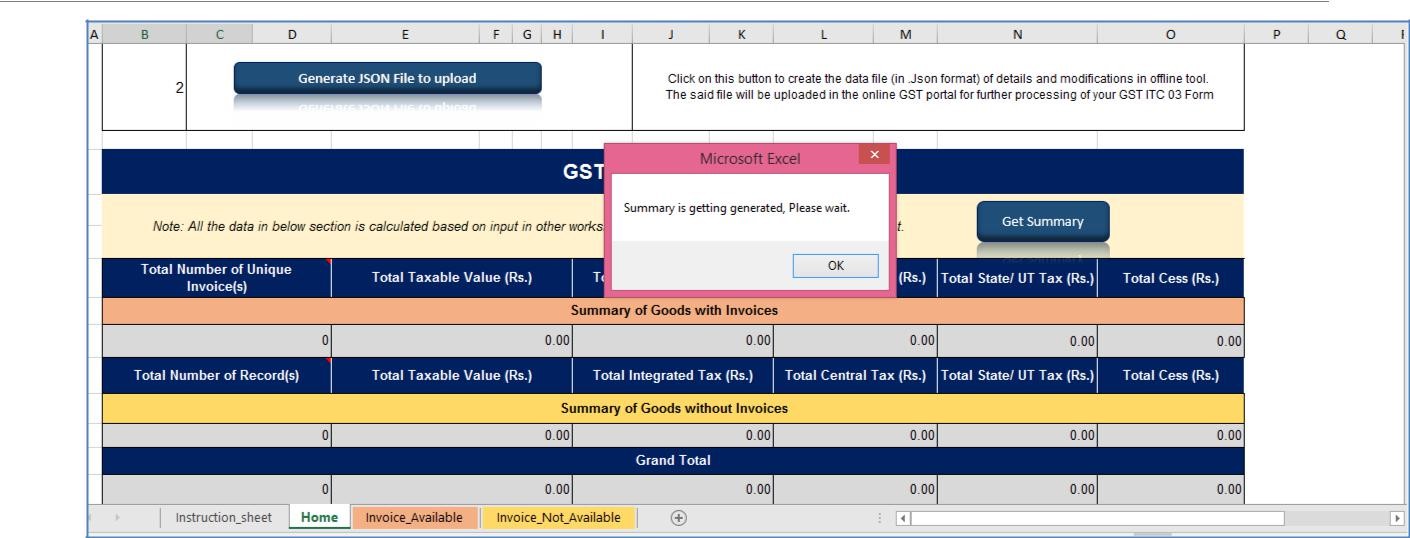
 Step 2- Offline Filing of Form GST ITC-03
Step 3: Click on the OK icon to proceed.
Step 2- Offline Filing of Form GST ITC-03
Step 3: Click on the OK icon to proceed.
 Step 3- Offline Filing of Form GST ITC-03
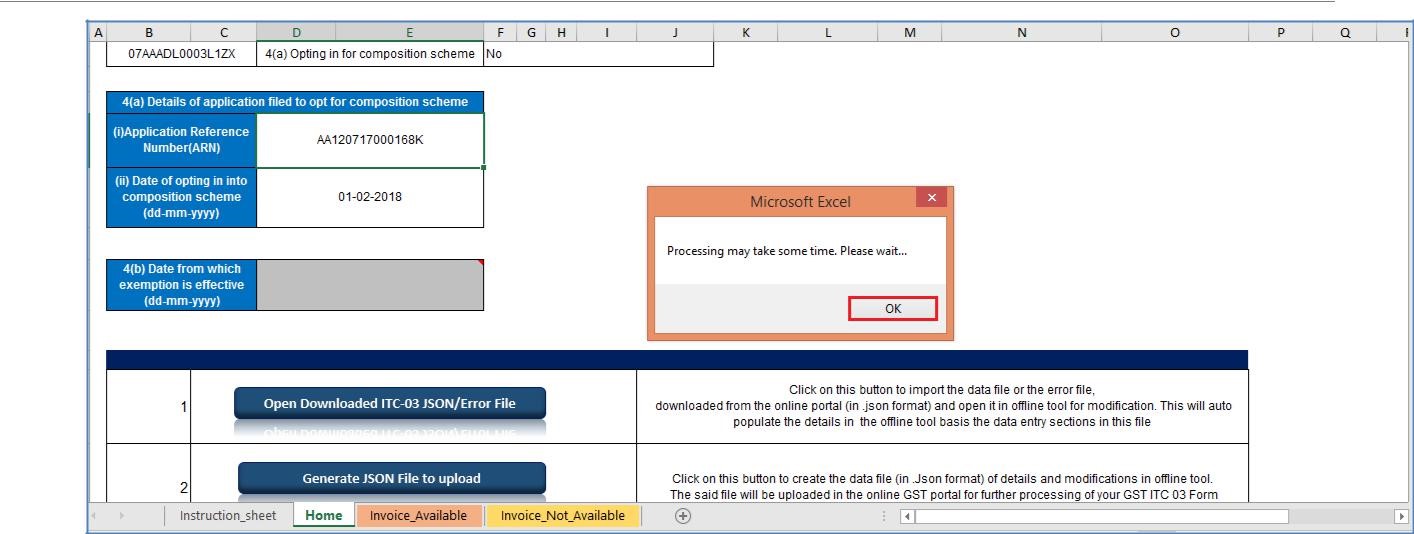
Step 4: Once the summary is generated and verified, select the option to Generate JSON file to Upload icon to create a JSON file to upload on the GST Portal.
Step 3- Offline Filing of Form GST ITC-03
Step 4: Once the summary is generated and verified, select the option to Generate JSON file to Upload icon to create a JSON file to upload on the GST Portal.
 Step 4- Offline Filing of Form GST ITC-03
Step 5: A message indicating that the process may take a while is displayed. Click on the OK icon to continue.
Step 4- Offline Filing of Form GST ITC-03
Step 5: A message indicating that the process may take a while is displayed. Click on the OK icon to continue.
 Step 5- Offline Filing of Form GST ITC-03
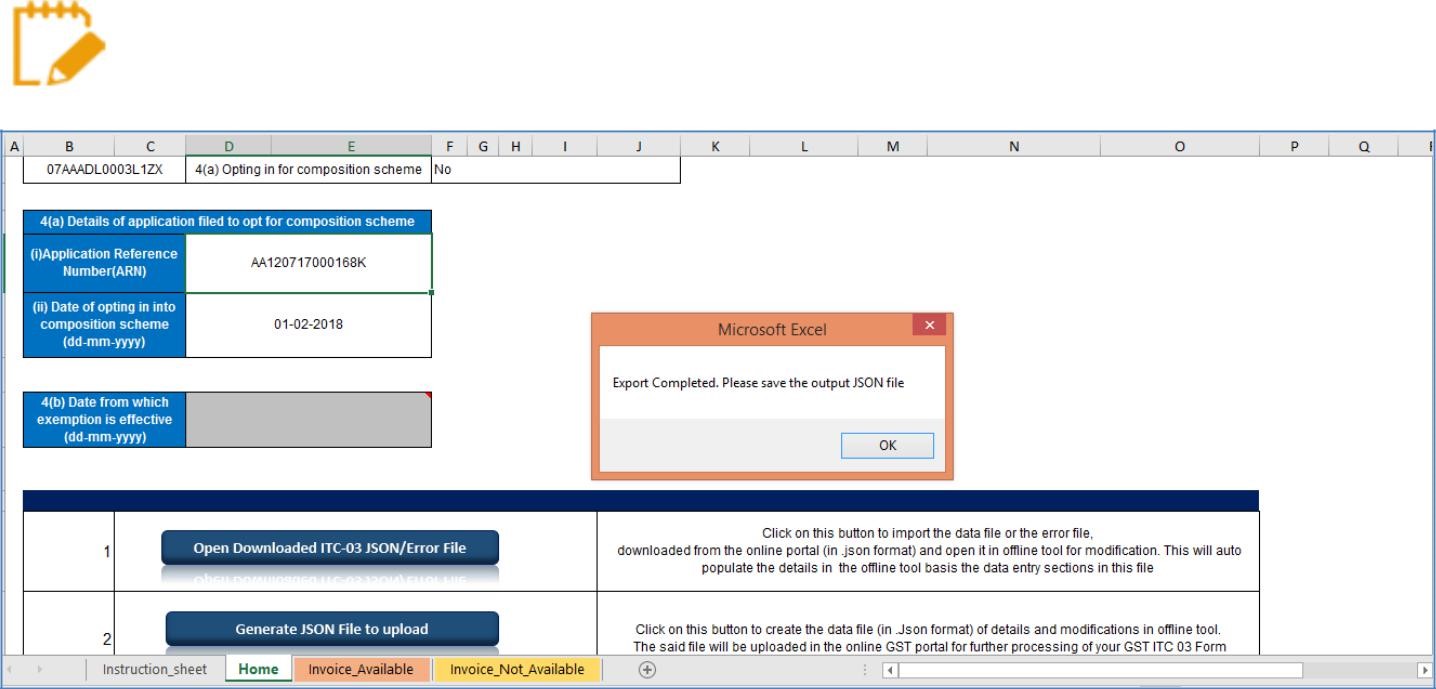
Step 6: A confirmation message showing that the export of the JSON file has been completed would be displayed. Click on the OK icon.
Step 5- Offline Filing of Form GST ITC-03
Step 6: A confirmation message showing that the export of the JSON file has been completed would be displayed. Click on the OK icon.
 Step 6- Offline Filing of Form GST ITC-03
Note: The JSON would be generated only if the worksheet has been validated successfully.
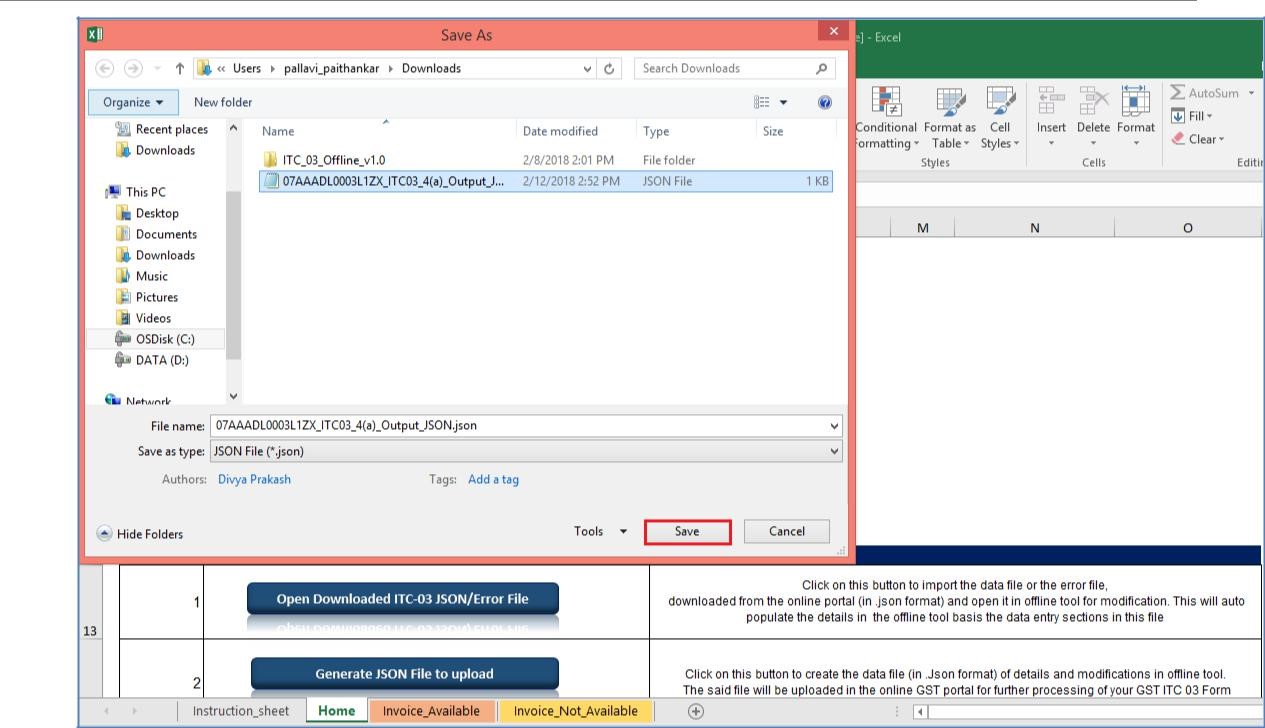
Step 7: Save the JSON file in the required location on the system by entering the file name and clicking on the Save icon.
Step 6- Offline Filing of Form GST ITC-03
Note: The JSON would be generated only if the worksheet has been validated successfully.
Step 7: Save the JSON file in the required location on the system by entering the file name and clicking on the Save icon.
 Step 7- Offline Filing of Form GST ITC-03
 Step 7a- Offline Filing of Form GST ITC-03
Upload the JSON on the GST Portal
Step 1: Log on to the official GST Portal. Step 2: After the home page is displayed, select the Services option. Under the same, pick the Returns option and then the ITC Forms command.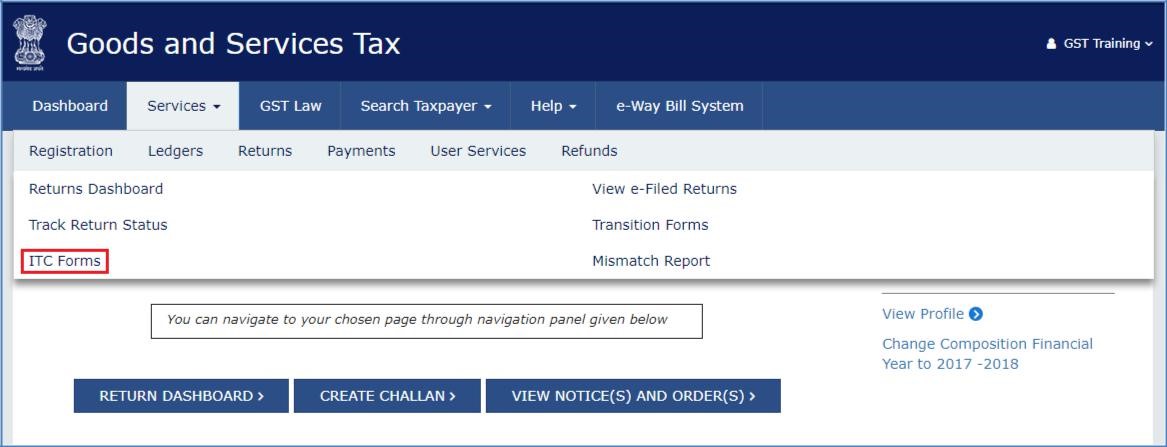 Step 2- Offline Filing of Form GST ITC-03
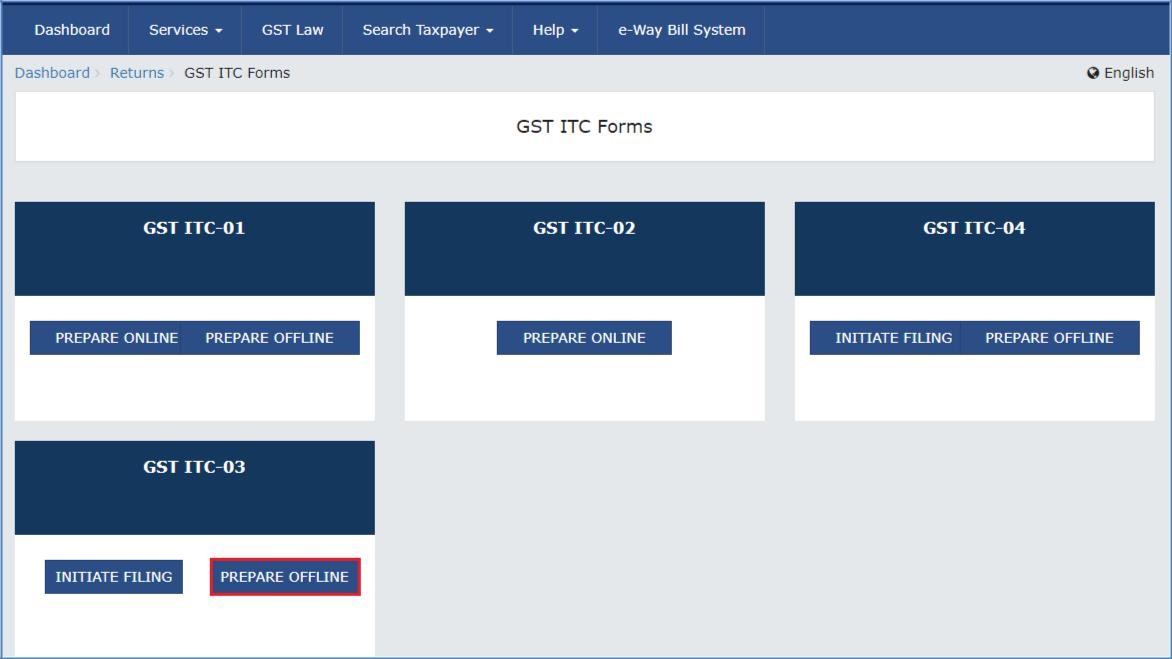
Step 3: After the GST ITC Forms page is displayed, click on the GST ITC-03 option and select the Prepare Offline option.
Step 2- Offline Filing of Form GST ITC-03
Step 3: After the GST ITC Forms page is displayed, click on the GST ITC-03 option and select the Prepare Offline option.
 Step 3- Offline Filing of Form GST ITC-03
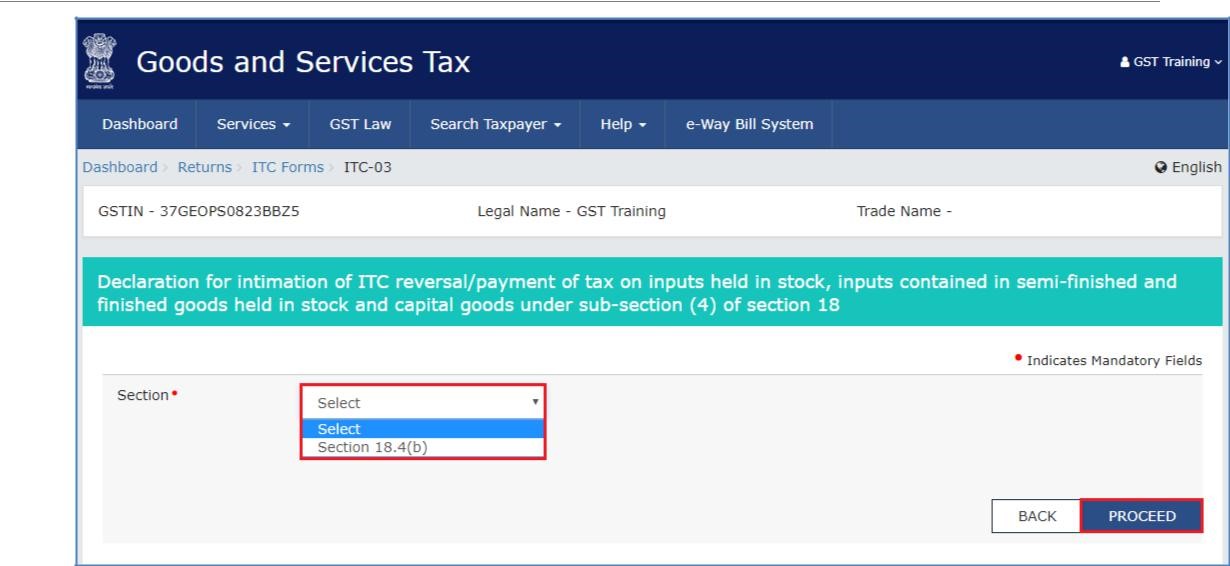
Step 4: Select the Section from the drop-down menu.
Step 3- Offline Filing of Form GST ITC-03
Step 4: Select the Section from the drop-down menu.
 Step 4- Offline Filing of Form GST ITC-03
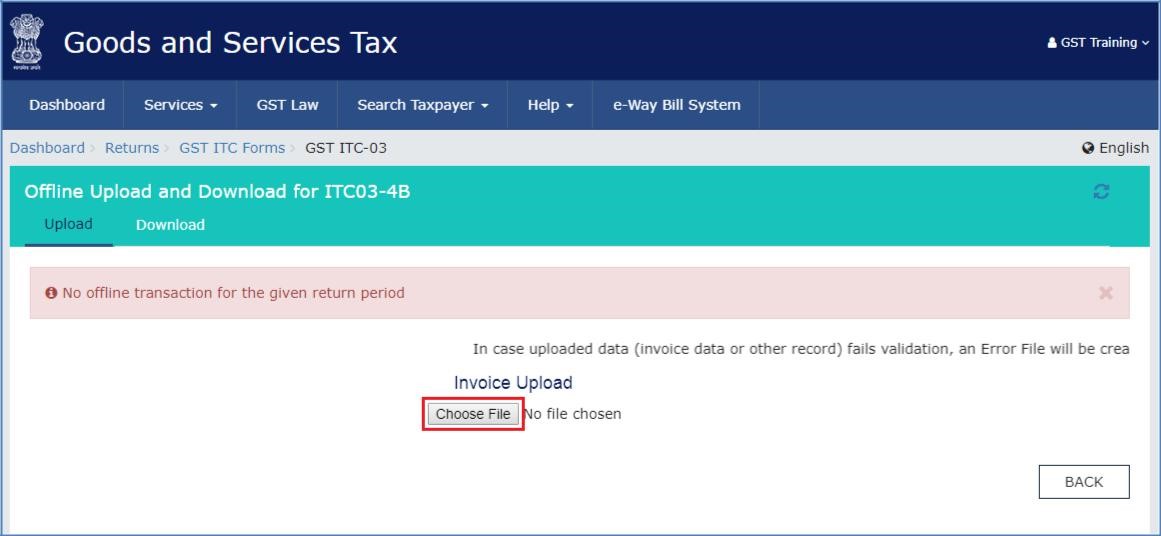
Step 5: The Offline Upload page for the Form GST ITC-03 would be displayed. After which, the Choose File icon should be selected.
Step 4- Offline Filing of Form GST ITC-03
Step 5: The Offline Upload page for the Form GST ITC-03 would be displayed. After which, the Choose File icon should be selected.
 Step 5- Offline Filing of Form GST ITC-03
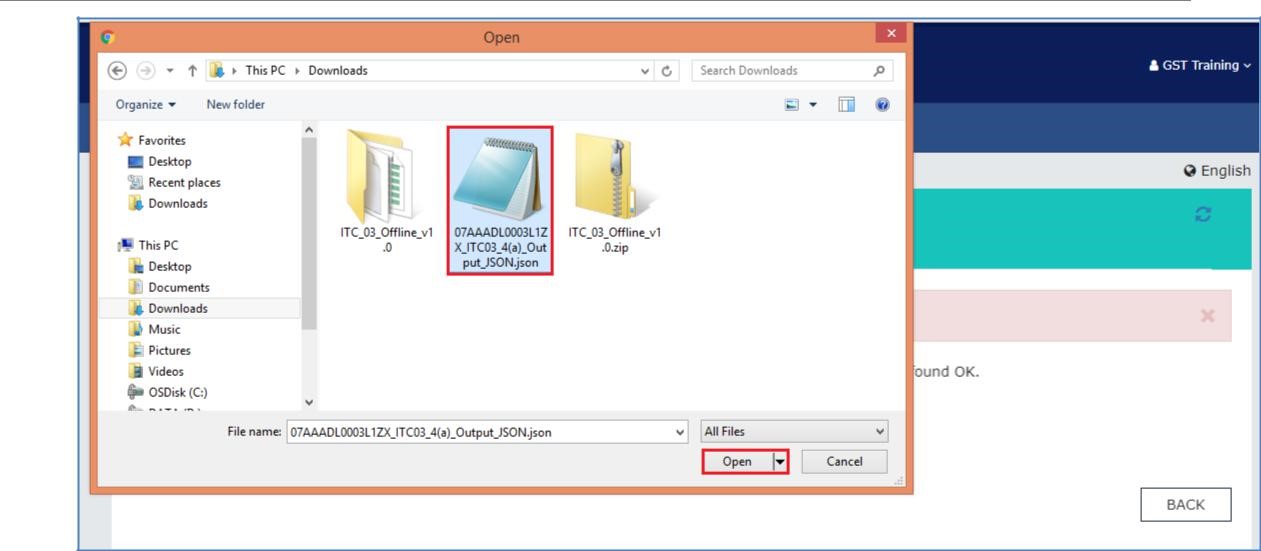
Step 6: Browse and select the JSON file that was generated and click on the Open icon.
Step 5- Offline Filing of Form GST ITC-03
Step 6: Browse and select the JSON file that was generated and click on the Open icon.
 Step 6- Offline Filing of Form GST ITC-03
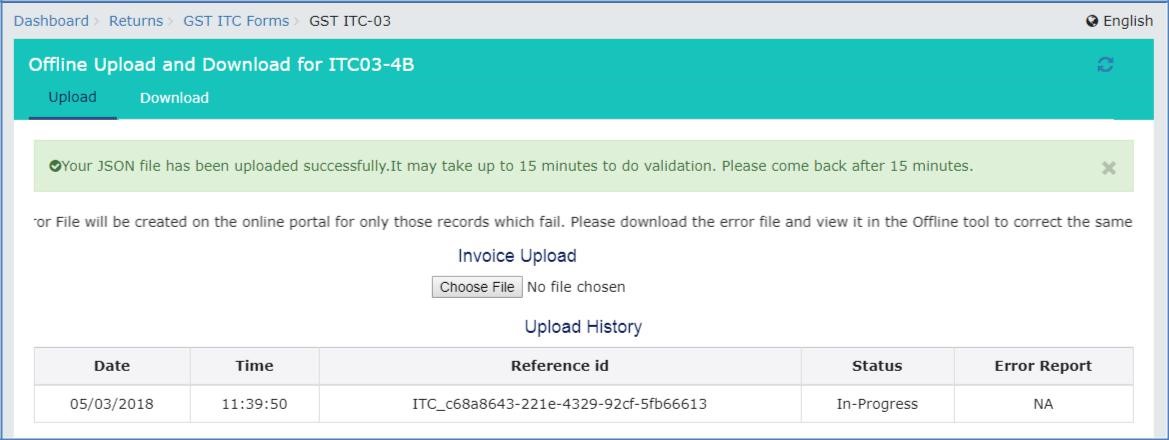
Step 7: The JSON file that was uploaded would be validated and processed. After a successful validation and processing, the information entered would be gathered and displayed as a summary. In case the validation fails due to errors, the same would be shown on the GST Portal.
Step 6- Offline Filing of Form GST ITC-03
Step 7: The JSON file that was uploaded would be validated and processed. After a successful validation and processing, the information entered would be gathered and displayed as a summary. In case the validation fails due to errors, the same would be shown on the GST Portal.
 Step 7- Offline Filing of Form GST ITC-03
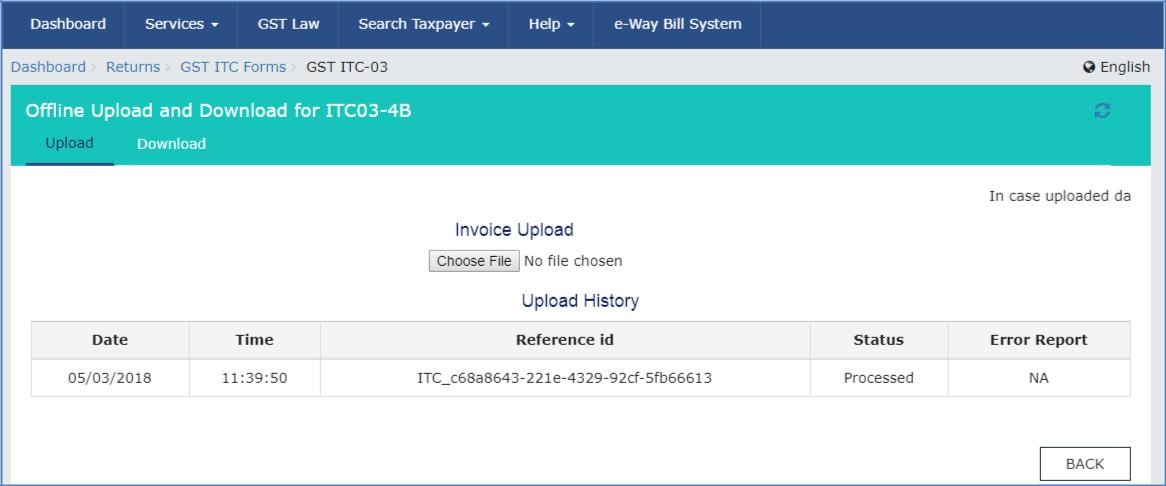
Step 8: Post successful upload of the data on the GST Portal, the form may be reviewed and filed accordingly.
Step 7- Offline Filing of Form GST ITC-03
Step 8: Post successful upload of the data on the GST Portal, the form may be reviewed and filed accordingly.
 Step 8- Offline Filing of Form GST ITC-03
Open the downloaded return file for ITC-03
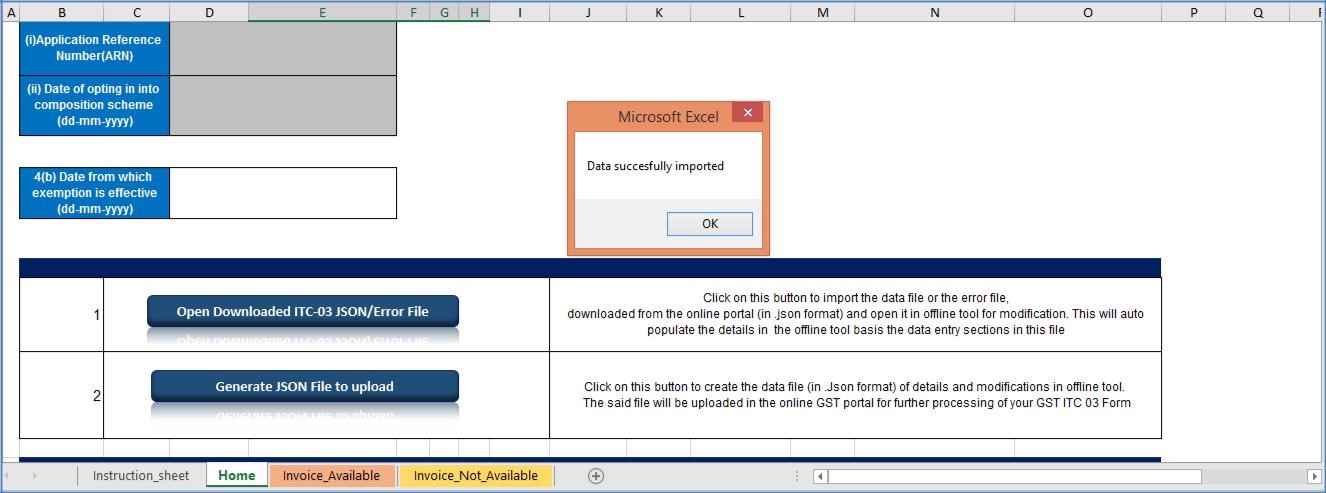
Step 1: Click on the Open Downloaded ITC-03 JSON/ Error File in the Home tab to open the downloaded return file.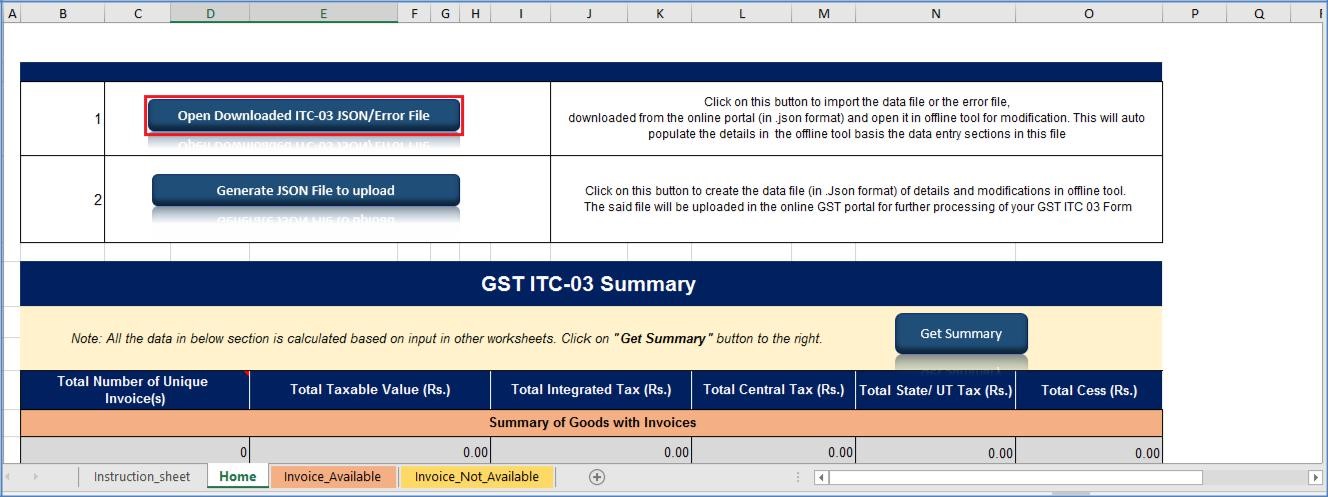 Step 1- Offline Filing of Form GST ITC-03
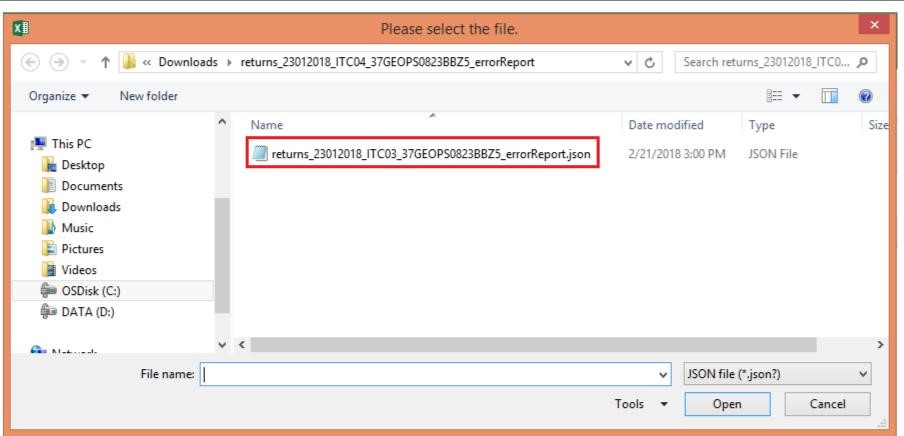
Step 2: Navigate to the JSON file saved in the system and click on the Open icon.
Step 1- Offline Filing of Form GST ITC-03
Step 2: Navigate to the JSON file saved in the system and click on the Open icon.
 Step 2- Offline Filing of Form GST ITC-03
Step 3: Select the downloaded JSON file and click on the OK icon to proceed further. Once imported successfully, a message indicating that the Data Successfully Imported would be displayed.
Step 2- Offline Filing of Form GST ITC-03
Step 3: Select the downloaded JSON file and click on the OK icon to proceed further. Once imported successfully, a message indicating that the Data Successfully Imported would be displayed.
 Step 3- Offline Filing of Form GST ITC-03
Step 4: The information entered in the sections for details on invoices/ taxes to upload on the GST Portal will be populated automatically.
Step 5: Modify the details of the invoice as required.
Step 6: After the necessary edits are made, click on the Validate Sheet icon to validate the worksheets.
Step 3- Offline Filing of Form GST ITC-03
Step 4: The information entered in the sections for details on invoices/ taxes to upload on the GST Portal will be populated automatically.
Step 5: Modify the details of the invoice as required.
Step 6: After the necessary edits are made, click on the Validate Sheet icon to validate the worksheets.
 Step 6- Offline Filing of Form GST ITC-03
Step 7: A pop-up message indicating the Sheet has been successfully validated would appear.
Step 6- Offline Filing of Form GST ITC-03
Step 7: A pop-up message indicating the Sheet has been successfully validated would appear.
 Step 7- Offline Filing of Form GST ITC-03
Step 8: Click on the Generate JSON File icon to generate the JSON file to upload the ITC-03 return details prepared using the offline tool on the GST Portal.
Step 9: The JSON file must be uploaded on the GST Portal to file ITC-03 as mentioned above.
Step 7- Offline Filing of Form GST ITC-03
Step 8: Click on the Generate JSON File icon to generate the JSON file to upload the ITC-03 return details prepared using the offline tool on the GST Portal.
Step 9: The JSON file must be uploaded on the GST Portal to file ITC-03 as mentioned above.
-
Submission and Filing of ITC-03
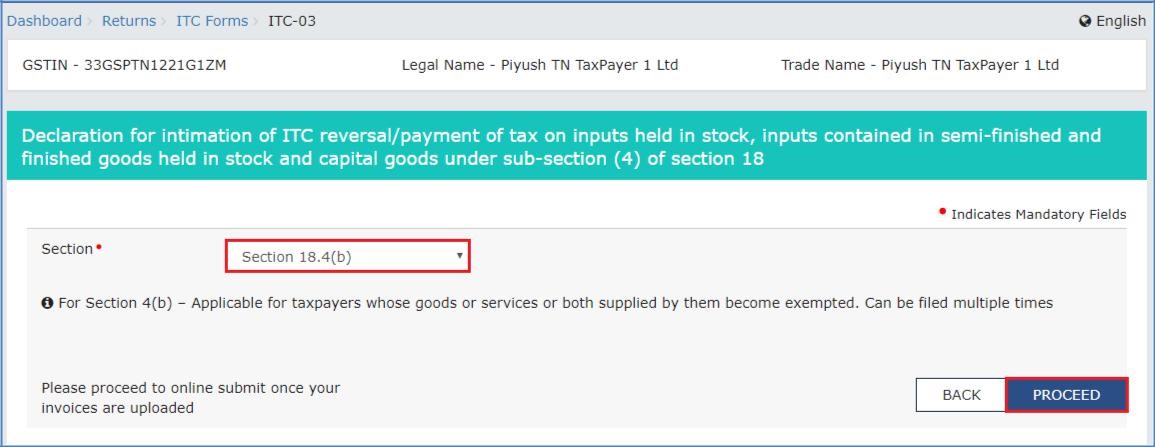
 Step 3- Offline Filing of Form GST ITC-03
Step 4: Select the Section from the dowp down menu.
Step 5: Click on the Proceed icon.
Step 3- Offline Filing of Form GST ITC-03
Step 4: Select the Section from the dowp down menu.
Step 5: Click on the Proceed icon.
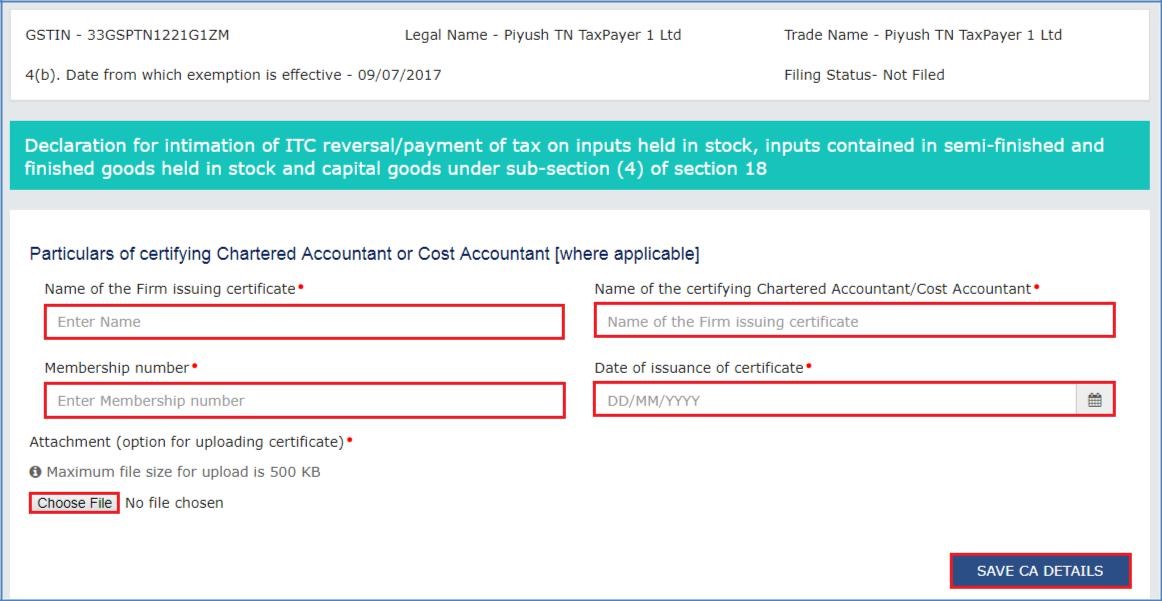
 Step 5- Offline Filing of Form GST ITC-03
Step 6: On the Particulars of certifying Chartered Accountant or Cost Accountant form update the necessary details such as the Name of the Firm Issuing certificate, Name of the Certifying Chartered Accountant/Cost Accountant, Membership Number, Date of Issuance of Certificate.
Step 7: Upload the certificate on the page and click on the Save CA Details icon.
Step 5- Offline Filing of Form GST ITC-03
Step 6: On the Particulars of certifying Chartered Accountant or Cost Accountant form update the necessary details such as the Name of the Firm Issuing certificate, Name of the Certifying Chartered Accountant/Cost Accountant, Membership Number, Date of Issuance of Certificate.
Step 7: Upload the certificate on the page and click on the Save CA Details icon.
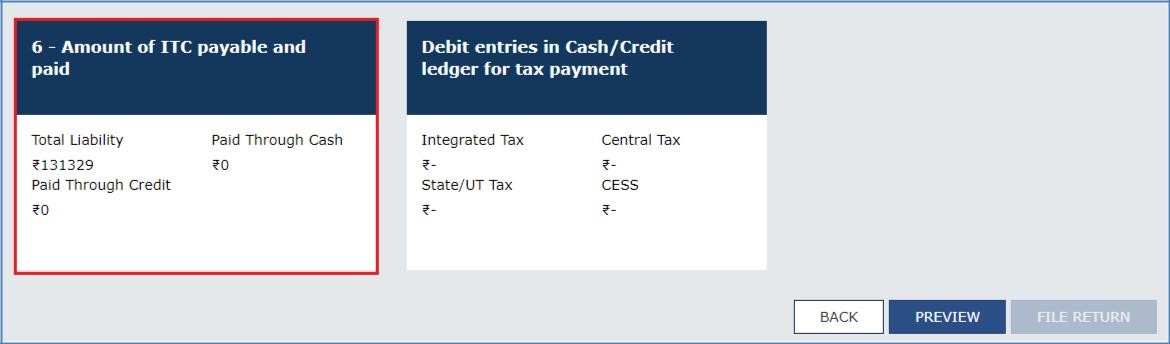
 Step 7- Offline Filing of Form GST ITC-03
Step 8: Select the Amount of ITC payable and paid tile.
Step 7- Offline Filing of Form GST ITC-03
Step 8: Select the Amount of ITC payable and paid tile.
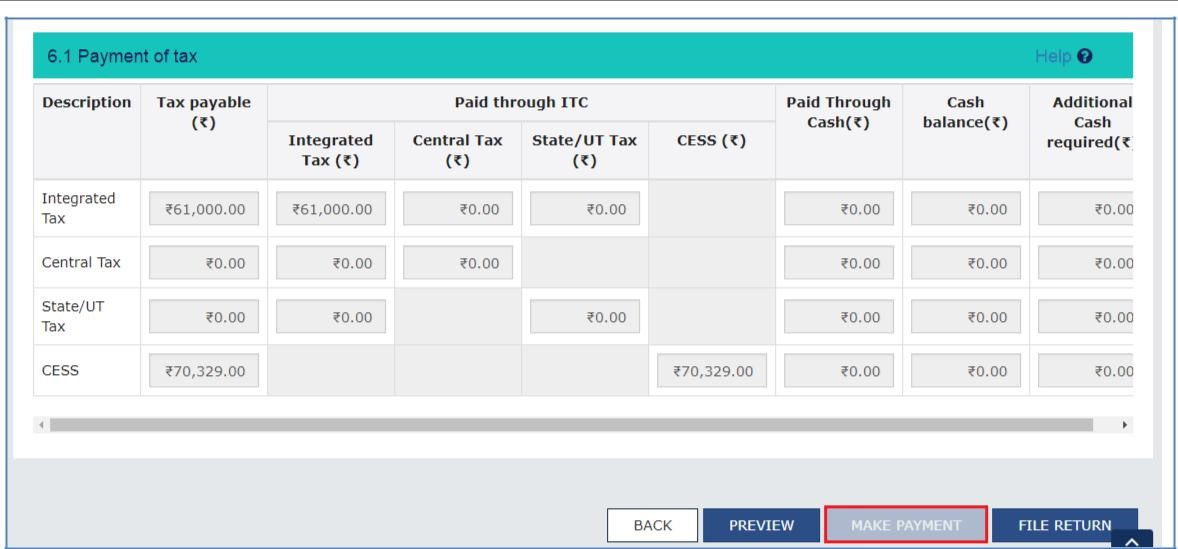
 Step 8- Offline Filing of Form GST ITC-03
Step 9: Enter the payment details and click on the Make Payment icon.
Step 8- Offline Filing of Form GST ITC-03
Step 9: Enter the payment details and click on the Make Payment icon.
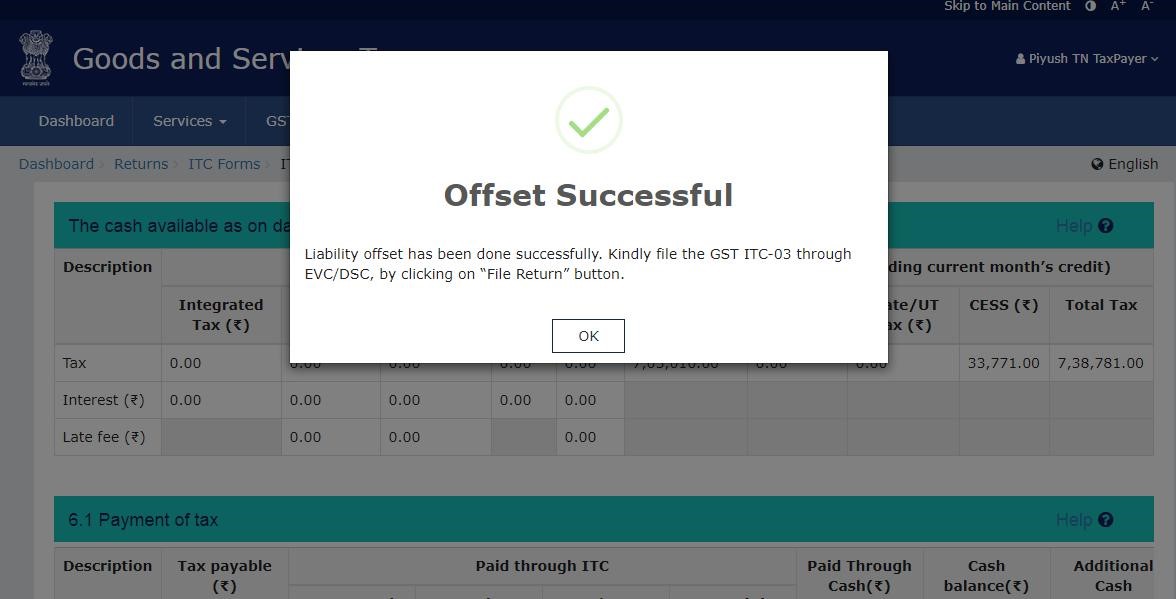
 Step 9- Offline Filing of Form GST ITC-03
Step 10: Once the payment is successful, select the OK option and proceed to the filing.
Step 9- Offline Filing of Form GST ITC-03
Step 10: Once the payment is successful, select the OK option and proceed to the filing.
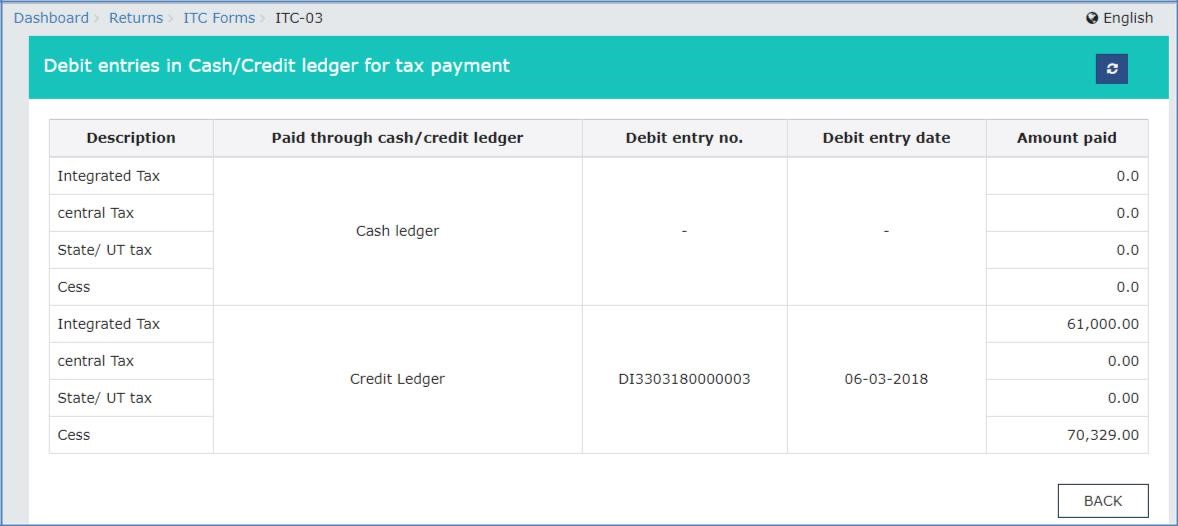
 Step 10- Offline Filing of Form GST ITC-03
Step 11: Once the payment is completed successfully, the details will reflect under the Debit entries in Cash/ Credit Ledger for tax payment section.
Step 10- Offline Filing of Form GST ITC-03
Step 11: Once the payment is completed successfully, the details will reflect under the Debit entries in Cash/ Credit Ledger for tax payment section.
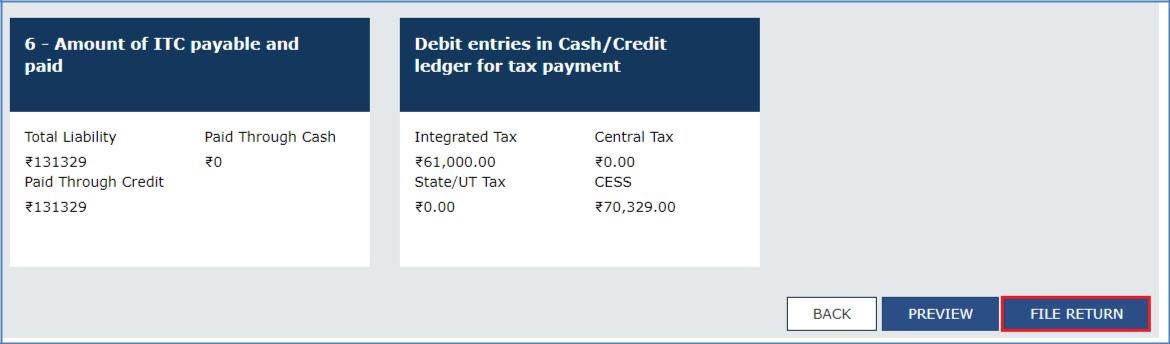
 Step 11- Offline Filing of Form GST ITC-03
Step 12: Select the File Return icon.
Step 11- Offline Filing of Form GST ITC-03
Step 12: Select the File Return icon.
 Step 12- Offline Filing of Form GST ITC-03
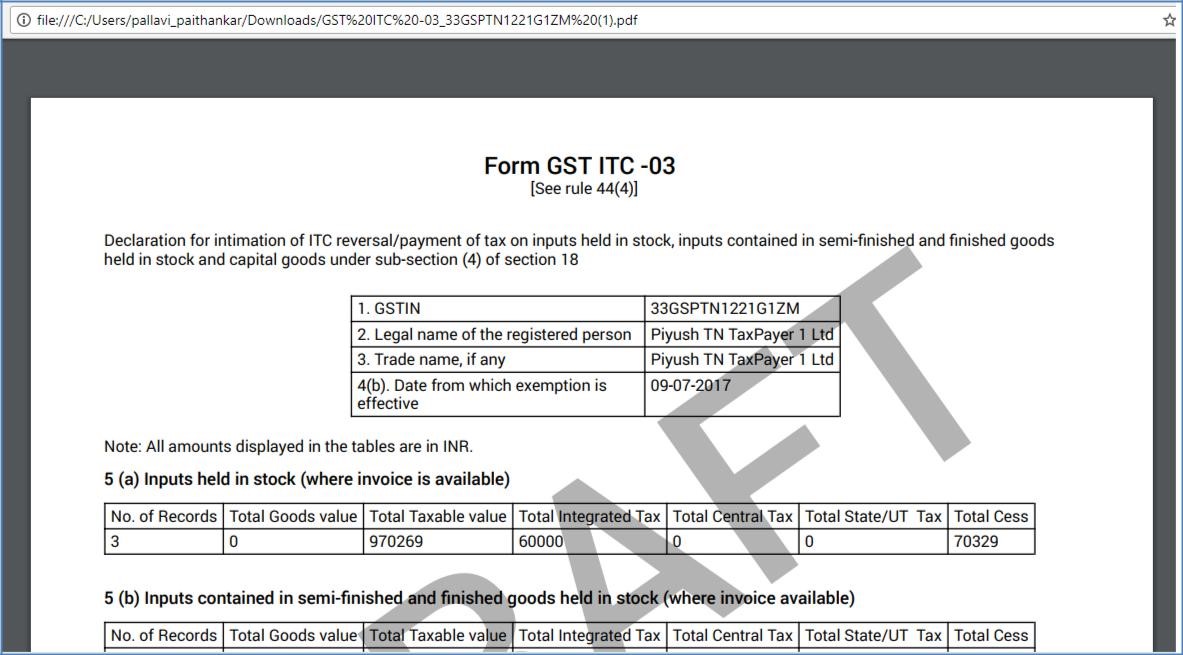
Step 13: Preview the ITC-03 draft may be seen by clicking on the Preview Draft ITC-03 icon.
Step 12- Offline Filing of Form GST ITC-03
Step 13: Preview the ITC-03 draft may be seen by clicking on the Preview Draft ITC-03 icon.
 Step 13- Offline Filing of Form GST ITC-03
Step 14: Draft of the form opens as a PDF format.
Step 13- Offline Filing of Form GST ITC-03
Step 14: Draft of the form opens as a PDF format.
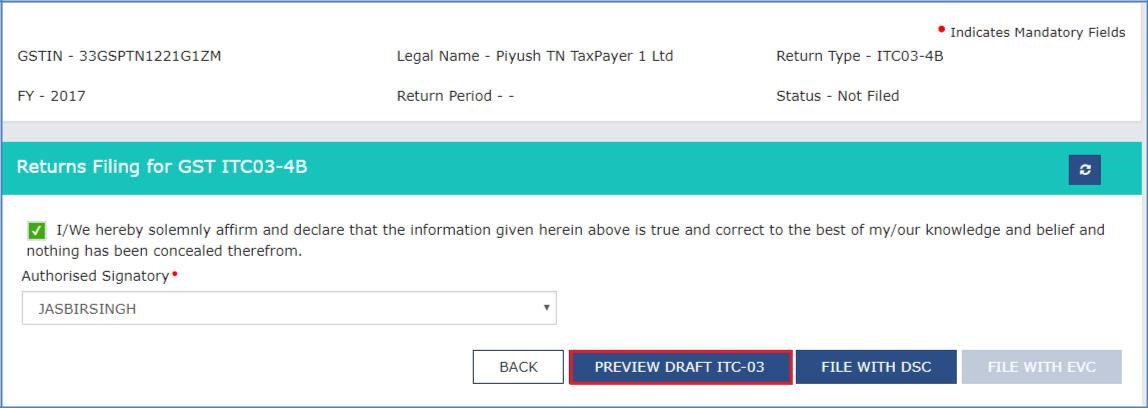
 Step 14- Offline Filing of Form GST ITC-03
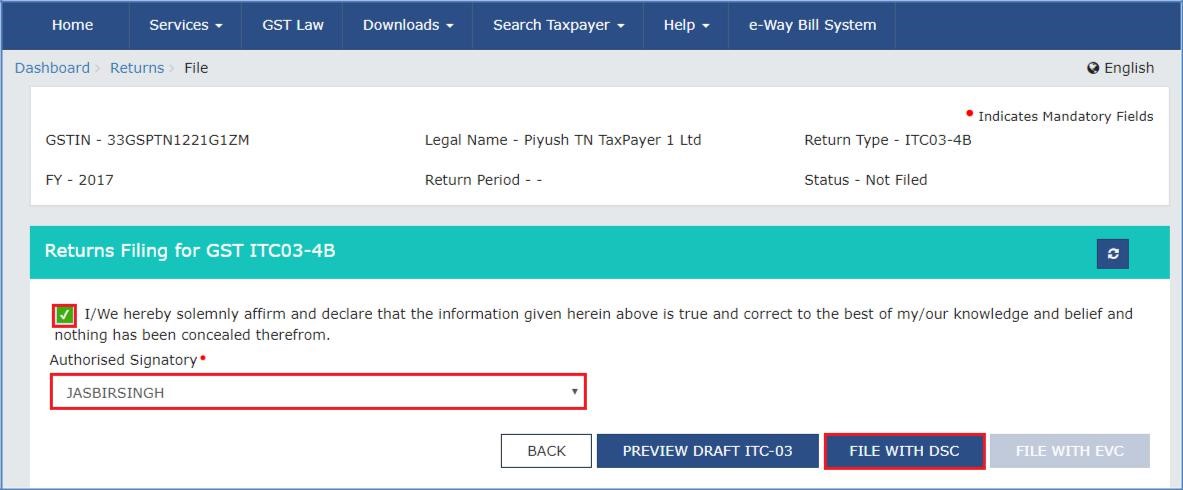
Step 15: After the same is reviewed, click on File Return to proceed with the filing.
Step 16: Select the checkbox.
Step 17: Select the Authorized Signatory from the drop-down menu and click on the File Return with EVC or DSC icon.
Step 14- Offline Filing of Form GST ITC-03
Step 15: After the same is reviewed, click on File Return to proceed with the filing.
Step 16: Select the checkbox.
Step 17: Select the Authorized Signatory from the drop-down menu and click on the File Return with EVC or DSC icon.
 Step 17- Offline Filing of Form GST ITC-03
Step 18: Once the Verification process is completed, ARN will be generated, and the status would be changed to Filed.
Step 17- Offline Filing of Form GST ITC-03
Step 18: Once the Verification process is completed, ARN will be generated, and the status would be changed to Filed.