Bennisha
Expert
Published on: Jun 24, 2026
Voluntary Payment Of Gst
Payment of GST on a voluntary basis is a facility that is provided to the taxpayers to make payment under Section 73 or 74 of the CGST Act, 2017. This payment has to be made within 30 days of issuance of
Show Cause Notice (SCN). Voluntary Payment Of Gst can also be made by taxpayers before issuing an SCN.Time Line of Voluntary Payment
Voluntary payment can be made before issuing the notice under Section 73 or 74 of the CGST Act 2017, or it can be made within 30 days of issue of show cause notice. A taxpayer cannot make voluntary payment after 30 days of issue of SCN.
Prerequisites to Make Voluntary Payment
The following are the prerequisites required to make a Voluntary Payment Of Gst.
- The Show Cause Notice under the determination of tax should not have been issued.
- Payment cannot be made after 30 days after issuing the SCN.
Voluntary Payment - Before Issuance of Show Cause Notice
Here are the steps to make payment against the liability of tax based on the self-assessment before issuance of SCN or within 30 days of SCN under the determination of tax.
Step 1: Login to the official portal The taxpayer has to log in to the official website of the GST portal. Step 2: Enter the Details Once the GST portal is displayed, the taxpayer has to enter the details. Step 3: Click on My Applications After entering all the details, the taxpayer has to click on the 'Services' tab, select 'User Services' and then click on 'My Applications' command. Step 3-Voluntary Payment Of Gst
Step 4: Select Intimation of Voluntary Payment
The taxpayer has to select the 'Intimation of Voluntary Payment - DRC - 03' from the Application type drop-down list.
Step 5: Click on New Application
The taxpayer has to click on the 'New Application' button. The 'Intimation of Payment made Voluntarily or made against the Show Cause Notice (SCN) page is displayed'.
The application for intimation of voluntary payment can be saved at any stage of completion for 15 days. If the application is not filed before 15 days, the saved draft gets purged from the GST database. The saved application can be viewed by clicking on the 'Services' tab, then selecting 'User Services' and then click on 'My Saved Applications' option.
Step 6: Select Cause of Payment
The taxpayer has to click on the 'Cause of Payment' option from the drop-down list.
Step 3-Voluntary Payment Of Gst
Step 4: Select Intimation of Voluntary Payment
The taxpayer has to select the 'Intimation of Voluntary Payment - DRC - 03' from the Application type drop-down list.
Step 5: Click on New Application
The taxpayer has to click on the 'New Application' button. The 'Intimation of Payment made Voluntarily or made against the Show Cause Notice (SCN) page is displayed'.
The application for intimation of voluntary payment can be saved at any stage of completion for 15 days. If the application is not filed before 15 days, the saved draft gets purged from the GST database. The saved application can be viewed by clicking on the 'Services' tab, then selecting 'User Services' and then click on 'My Saved Applications' option.
Step 6: Select Cause of Payment
The taxpayer has to click on the 'Cause of Payment' option from the drop-down list.
 Step 6-Voluntary Payment Of Gst
- For Voluntary Payment, the payment date is auto-populated and cannot be edited.
- For SCN, select the Manual Entry from the SCN Reference Number drop-down list. Then select SCN Issue Date using the calendar.
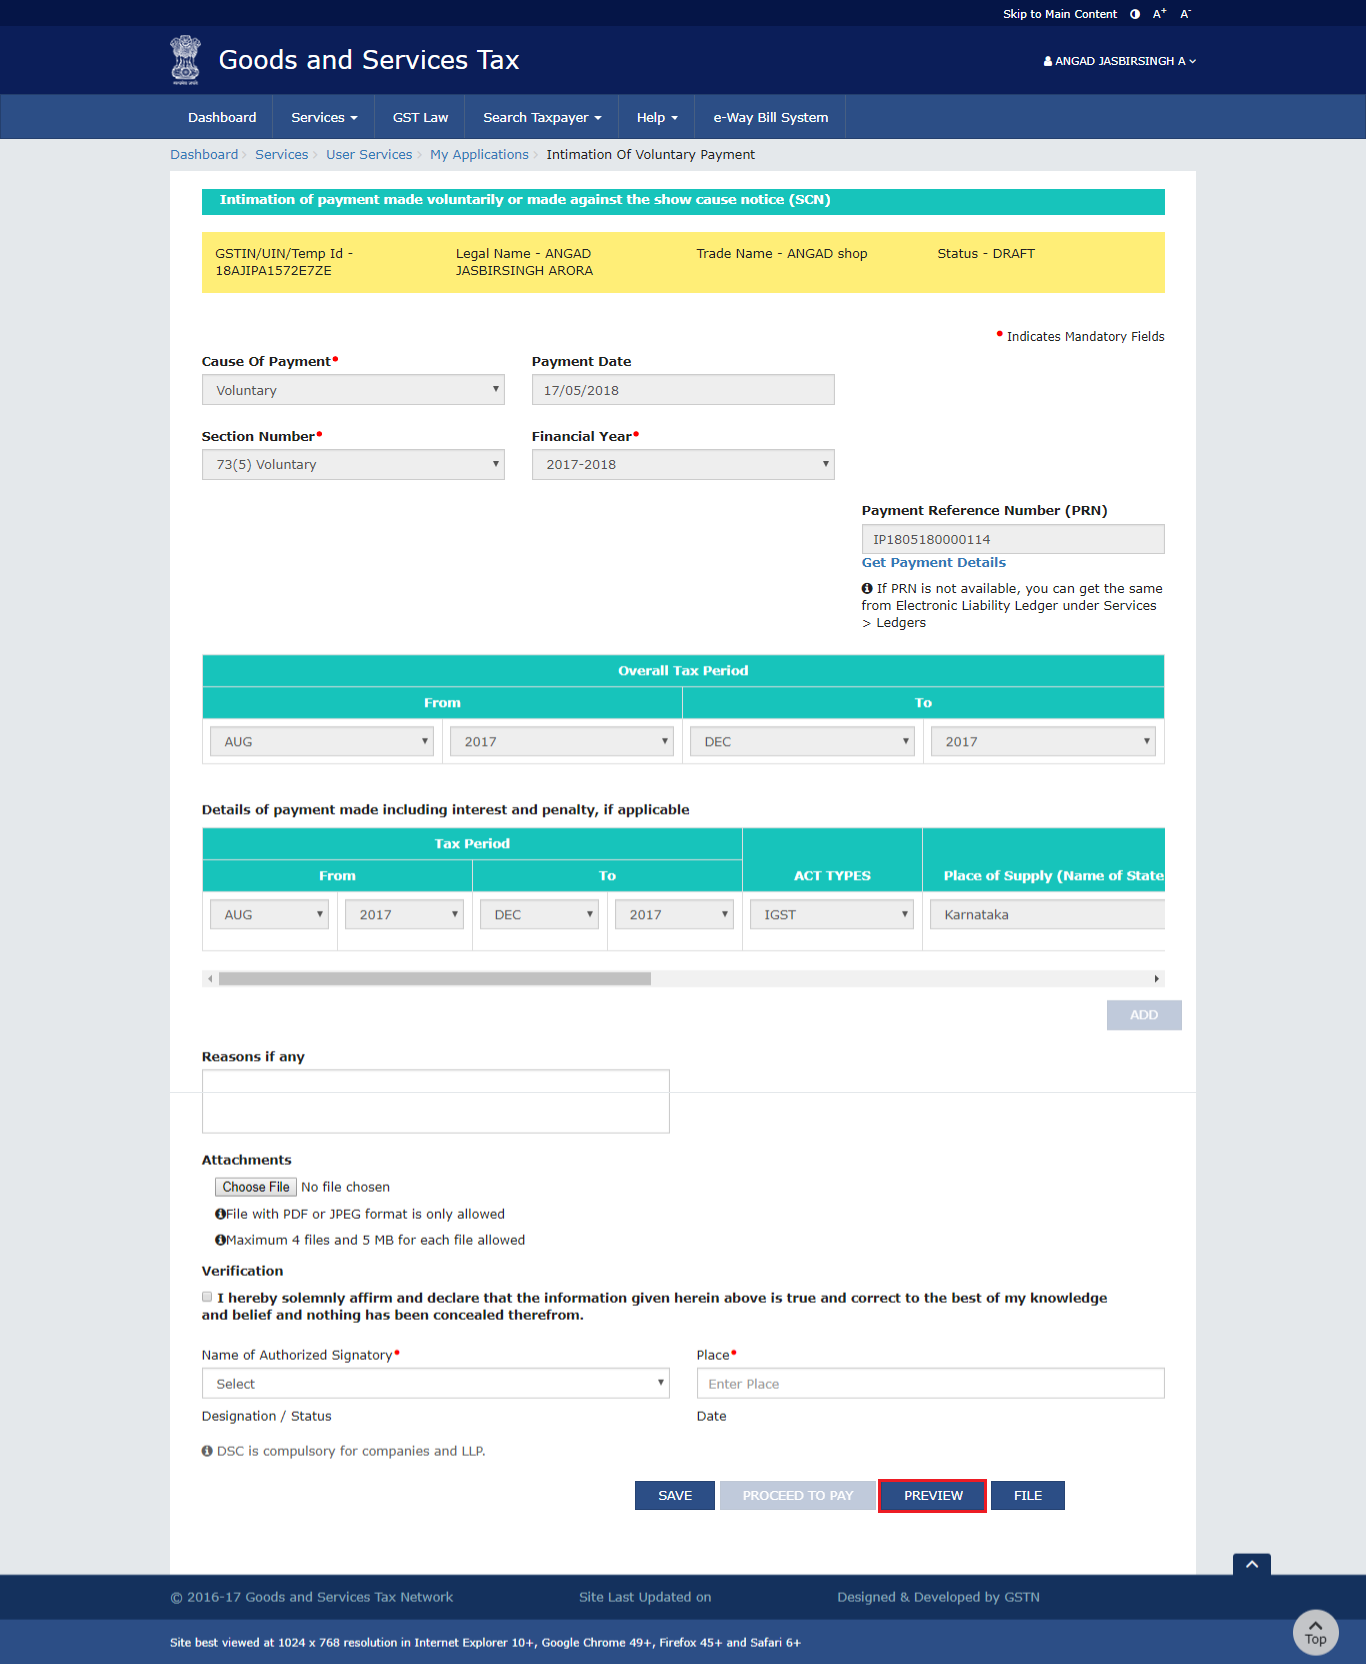
 Step 7-Voluntary Payment Of Gst
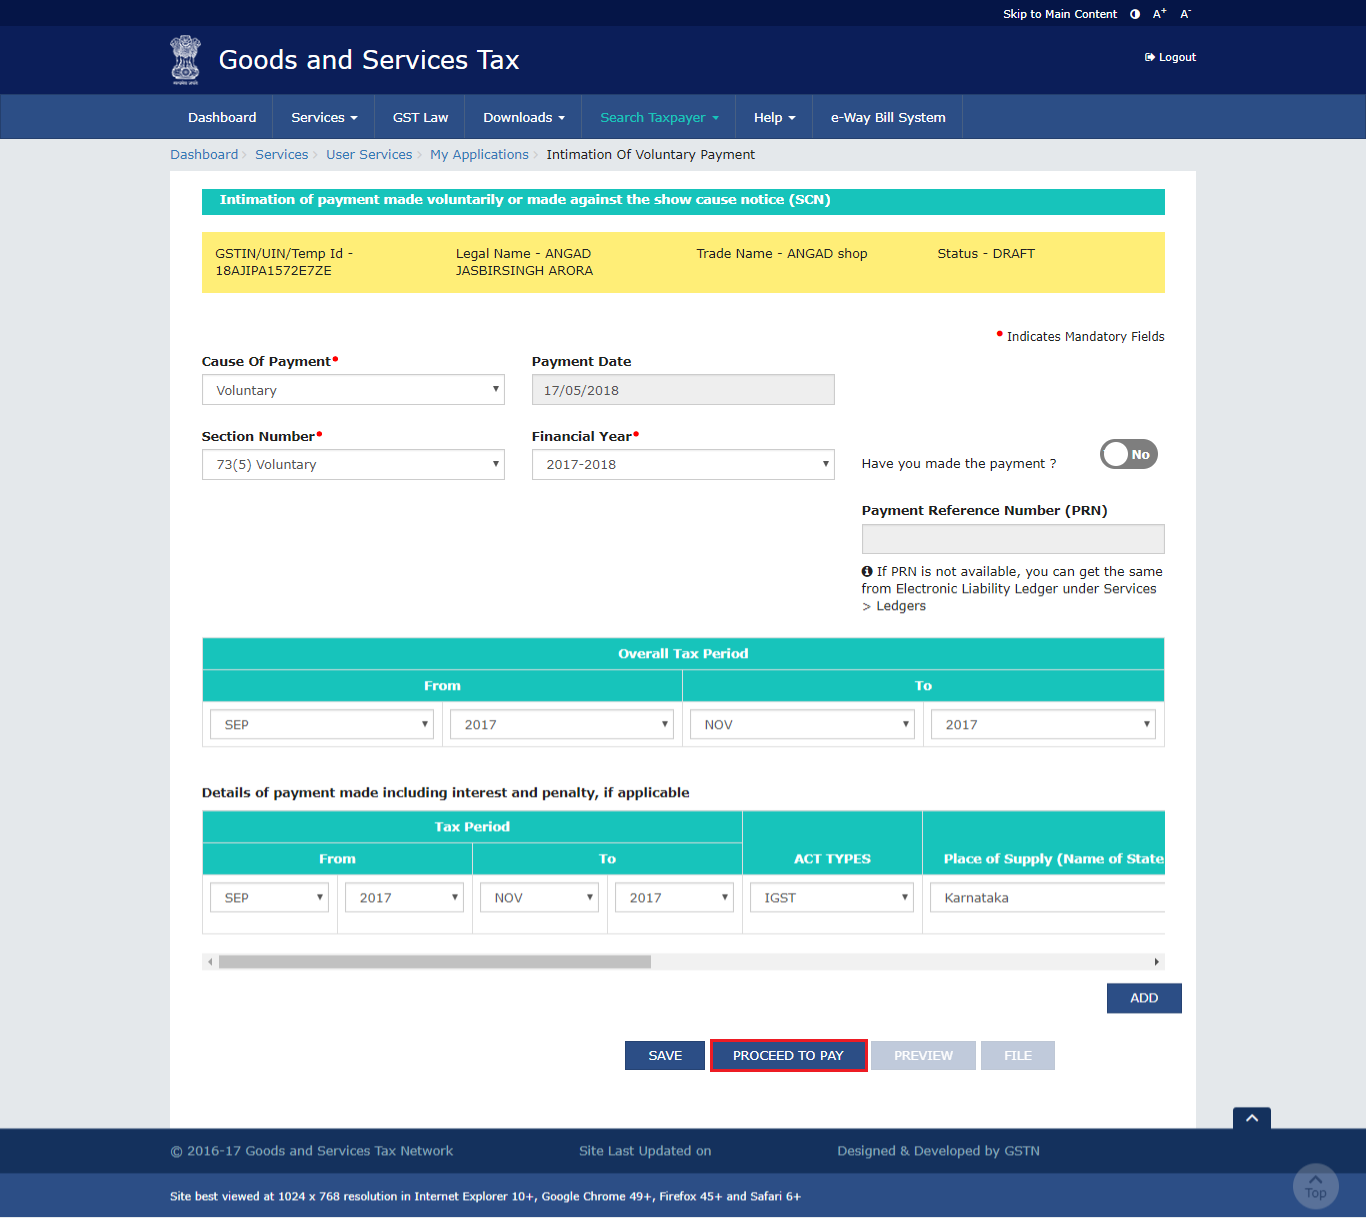
Step 8: Select the Financial Year
The taxpayer has to select the Financial Year from the drop-down list then. The 'From date' and the 'To date' for the overall tax period from the drop-down menu.
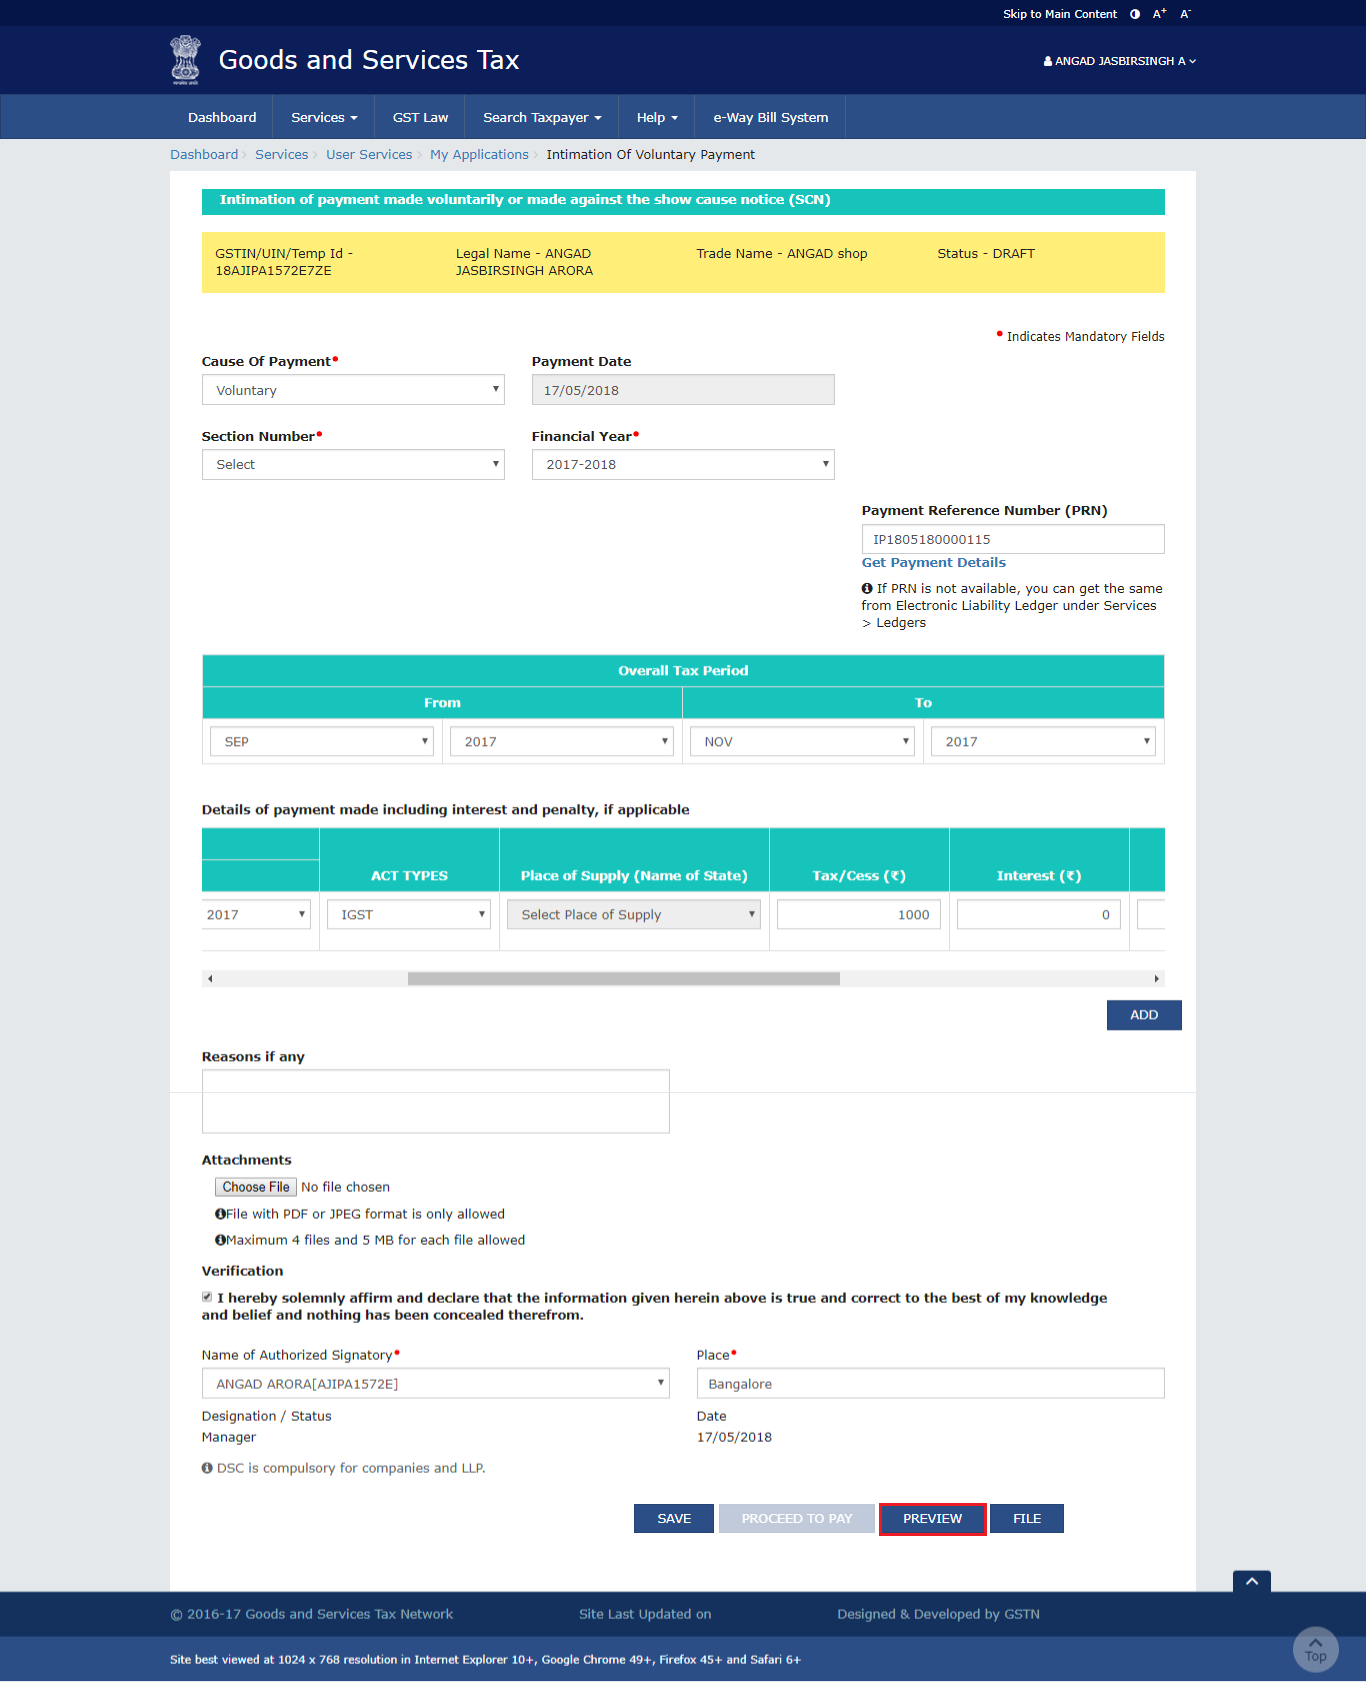
Step 9: Enter the payment details
The taxpayer has to enter payment details including the interest, penalty and others.
Step 10: Click on Proceed to Pay
The taxpayer has to click on the 'Proceed to Pay' button. The voluntary payment page is displayed.
Step 7-Voluntary Payment Of Gst
Step 8: Select the Financial Year
The taxpayer has to select the Financial Year from the drop-down list then. The 'From date' and the 'To date' for the overall tax period from the drop-down menu.
Step 9: Enter the payment details
The taxpayer has to enter payment details including the interest, penalty and others.
Step 10: Click on Proceed to Pay
The taxpayer has to click on the 'Proceed to Pay' button. The voluntary payment page is displayed.
 Step 10-Voluntary Payment Of Gst
Step 11: Click the Set-off button
Once the amount is entered, the Set-off button has to be clicked.
Step 12: Click on OK button
A confirmation message is displayed after which the taxpayer has to click on the OK button.
After that, a success message and the Payment Reference Number (PRN) is displayed on the screen.
Step 13: Generation of PRN
The intimation of payment made voluntarily or made against the show cause notice page is displayed where the PRN is generated. If PRN is not generated, the taxpayer has to click on the 'Services' tab then the 'Ledgers' option and then click on 'Electronic Liability Register'. By clicking on the 'Preview' option, the draft can be previewed in the PDF format.
Step 14: Upload the Documents
Documents can be uploaded by clicking the choose file button. The file format should be in PDF or in JPEG.
Step 15: Select the verification checkbox
The taxpayer has to click on verification checkbox.
Step 16: Select the Authorized Signatory
The taxpayer has to select the 'Name of the Authorized Signatory' from the drop-down list.
Step 17: Enter the Place
In the 'Place' field, the taxpayer has to enter the place from where it is filed.
Step 18: Click the File button
The taxpayer has to click on either the 'File with DSC' or the 'File with EVC' button.
Step 10-Voluntary Payment Of Gst
Step 11: Click the Set-off button
Once the amount is entered, the Set-off button has to be clicked.
Step 12: Click on OK button
A confirmation message is displayed after which the taxpayer has to click on the OK button.
After that, a success message and the Payment Reference Number (PRN) is displayed on the screen.
Step 13: Generation of PRN
The intimation of payment made voluntarily or made against the show cause notice page is displayed where the PRN is generated. If PRN is not generated, the taxpayer has to click on the 'Services' tab then the 'Ledgers' option and then click on 'Electronic Liability Register'. By clicking on the 'Preview' option, the draft can be previewed in the PDF format.
Step 14: Upload the Documents
Documents can be uploaded by clicking the choose file button. The file format should be in PDF or in JPEG.
Step 15: Select the verification checkbox
The taxpayer has to click on verification checkbox.
Step 16: Select the Authorized Signatory
The taxpayer has to select the 'Name of the Authorized Signatory' from the drop-down list.
Step 17: Enter the Place
In the 'Place' field, the taxpayer has to enter the place from where it is filed.
Step 18: Click the File button
The taxpayer has to click on either the 'File with DSC' or the 'File with EVC' button.
- For filing with the DSC, the certificate has to be selected and then click on the 'Sign' button.
- For filing with the EVC, enter the OTP that is sent to the e-mail and mobile number of the Authorized Signatory that is registered at the GST portal and then click the 'Validate OTP' button.
 Step 18-Voluntary Payment Of Gst
Once the Validate OTP button is clicked, the success message and ARN is displayed.
Step 18-Voluntary Payment Of Gst
Once the Validate OTP button is clicked, the success message and ARN is displayed.
After Generation of Payment Reference Number
Step 1: Login to the official portal The taxpayer has to log in to the official website of the GST portal. Step 2: Enter the Details Once the GST portal is displayed, the taxpayer has to enter the details. Step 3: Click on My Applications After entering all the details, the taxpayer has to click on the 'Services' tab, select 'User Services' and then click on 'My Applications' command. Step 4: Select the Intimation of Voluntary Payment The taxpayer has to select the 'Intimation of Voluntary Payment - DRC - 03 from the Application Type drop-down list. Step 5: Click on New Application The taxpayer has to click on the 'New Application' option. The intimation of payment made voluntarily or made against the Show Cause Notice (SCN) page is displayed. Step 6: Enter the PRN If the entered PRN is already utilized, then the system displays an error message to the taxpayer and an unutilized PRN has to be entered. If the entered PRN is unutilized, then the system auto-populates the screens with the payment details where the taxpayer can either file using the form with DSC/ EVC. The taxpayer has to select 'Yes' for 'Have you Made the Payment Option'. Step 7: Enter the PRN In the 'Payment Reference Number' field, enter the PRN that is generated after making the payment. If PRN is not available, the taxpayer has to click on the 'Services' tab, 'Ledgers' option and then click on 'Electronic Liability Register'. Step 7-Voluntary Payment Of Gst
Step 8: Click on Get Payment Details link
The taxpayer has to click the 'Get Payment Details' link.
Step 9: Click on Preview
The details on the page are auto-populated based on the payment done earlier with reference to the PRN mentioned. By clicking on the 'Preview' button, the draft can be viewed in PDF format.
Step 7-Voluntary Payment Of Gst
Step 8: Click on Get Payment Details link
The taxpayer has to click the 'Get Payment Details' link.
Step 9: Click on Preview
The details on the page are auto-populated based on the payment done earlier with reference to the PRN mentioned. By clicking on the 'Preview' button, the draft can be viewed in PDF format.
 Step 7-Voluntary Payment Of Gst
Step 10: Upload the Documents
Documents can be uploaded by clicking the choose file button. The file format should be in PDF or in JPEG.
Step 11: Select the verification checkbox
The taxpayer has to click on verification checkbox.
Step 12: Select the Authorized Signatory
The taxpayer has to select the 'Name of the Authorized Signatory' from the drop-down list.
Step 13: Enter the Place
In the 'Place' field, the taxpayer has to enter the place from where it is filed.
Step 14: Click the File button
The taxpayer has to click on either the 'File with DSC' or the 'File with EVC' button.
Step 7-Voluntary Payment Of Gst
Step 10: Upload the Documents
Documents can be uploaded by clicking the choose file button. The file format should be in PDF or in JPEG.
Step 11: Select the verification checkbox
The taxpayer has to click on verification checkbox.
Step 12: Select the Authorized Signatory
The taxpayer has to select the 'Name of the Authorized Signatory' from the drop-down list.
Step 13: Enter the Place
In the 'Place' field, the taxpayer has to enter the place from where it is filed.
Step 14: Click the File button
The taxpayer has to click on either the 'File with DSC' or the 'File with EVC' button.
- For filing with the DSC, the certificate has to be selected and then click on the 'Sign' button.
- For filing with the EVC, enter the OTP that is sent to the e-mail and mobile number of the Authorized Signatory that is registered at the GST portal and then click the 'Validate OTP' button.
Once the Validate OTP button is clicked, the success message and ARN is displayed.
With Payment Reference Number Generation - After 30 Days
Step 1: Login to the official portal The taxpayer has to log in to the official website of the GST portal. Step 2: Enter the Details Once the GST portal is displayed, the taxpayer has to enter the details. Step 3: Click on My Applications After entering all the details, the taxpayer has to click on the 'Services' tab, select 'User Services' and then click on 'My Applications' command. Step 4: Select the Intimation of Voluntary Payment The taxpayer has to select the 'Intimation of Voluntary Payment - DRC - 03 from the Application Type drop-down list. Step 4-Voluntary Payment Of Gst
Step 5: Click on New Application
The taxpayer has to click on the 'New Application' button. The 'Intimation of Payment made against the show cause notice' page is displayed.
Step 6: Enter the PRN
In the 'Payment Reference Number' field, enter the PRN that is generated after making the payment. If PRN is not available, the taxpayer has to click on the 'Services' tab, 'Ledgers' option and then click on 'Electronic Liability Register'.
Step 7: Click on Get Payment Details link
The taxpayer has to click the 'Get Payment Details' link.
Step 8: Payment Details
The details of the payment are auto-populated based on the payment done earlier with reference to the PRN that is mentioned in the cash payment has been made before 30 minutes. The data have to be manually entered.
Step 9: Select Cause of Payment
The taxpayer has to click on the 'Cause of Payment' option from the drop-down list.
Step 4-Voluntary Payment Of Gst
Step 5: Click on New Application
The taxpayer has to click on the 'New Application' button. The 'Intimation of Payment made against the show cause notice' page is displayed.
Step 6: Enter the PRN
In the 'Payment Reference Number' field, enter the PRN that is generated after making the payment. If PRN is not available, the taxpayer has to click on the 'Services' tab, 'Ledgers' option and then click on 'Electronic Liability Register'.
Step 7: Click on Get Payment Details link
The taxpayer has to click the 'Get Payment Details' link.
Step 8: Payment Details
The details of the payment are auto-populated based on the payment done earlier with reference to the PRN that is mentioned in the cash payment has been made before 30 minutes. The data have to be manually entered.
Step 9: Select Cause of Payment
The taxpayer has to click on the 'Cause of Payment' option from the drop-down list.
- For Voluntary Payment, the payment date is auto-populated and cannot be edited.
- For SCN, select the Manual Entry from the SCN Reference Number drop-down list. Then select SCN Issue Date using the calendar.
 Step 13-Voluntary Payment Of Gst
Step 14: Upload the Documents
Documents can be uploaded by clicking the choose file button. The file format should be in PDF or in JPEG.
Step 15: Select the verification checkbox
The taxpayer has to click on verification checkbox.
Step 16: Select the Authorized Signatory
The taxpayer has to select the 'Name of the Authorized Signatory' from the drop-down list.
Step 17: Enter the Place
In the 'Place' field, the taxpayer has to enter the place from where it is filed.
Step 18: Click the File button
The taxpayer has to click on either the 'File with DSC' or the 'File with EVC' button.
Step 13-Voluntary Payment Of Gst
Step 14: Upload the Documents
Documents can be uploaded by clicking the choose file button. The file format should be in PDF or in JPEG.
Step 15: Select the verification checkbox
The taxpayer has to click on verification checkbox.
Step 16: Select the Authorized Signatory
The taxpayer has to select the 'Name of the Authorized Signatory' from the drop-down list.
Step 17: Enter the Place
In the 'Place' field, the taxpayer has to enter the place from where it is filed.
Step 18: Click the File button
The taxpayer has to click on either the 'File with DSC' or the 'File with EVC' button.
- For filing with the DSC, the certificate has to be selected and then click on the 'Sign' button.
- For filing with the EVC, enter the OTP that is sent to the e-mail and mobile number of the Authorized Signatory that is registered at the GST portal and then click the 'Validate OTP' button.