Order of Rectification

Order of Rectification
Order of rectification is filed by a taxpayer or any other to rectify a mistake in tax filing. For this purpose, a request should be raised under section 154(1). The likes of arithmetical mistakes, small clerical errors, and errors due to overwriting defined under the GST Act can only be corrected through Order of Rectification.
To know more click on to Order Of Rectification
Procedure to File Order of Rectification
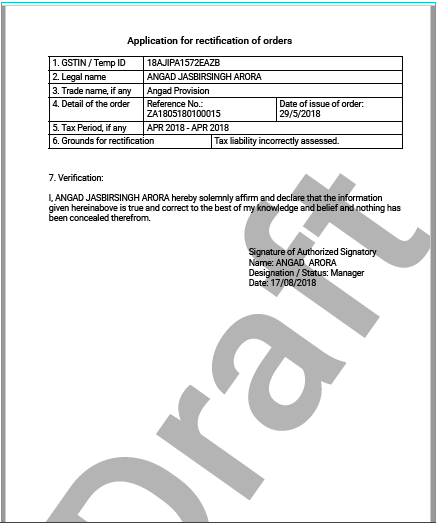
Application for Order of Rectification
The following steps mentioned below will help the user to apply for an order of rectification :
Step: 1 Click the link www.gst.gov.in.
Step: 2 Login into the portal with the valid information.
Step: 3 Click on Dashboard—>Services—>User Service—>My Applications.
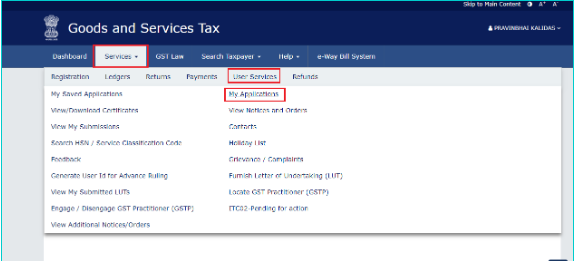
Step: 4 Go to my Application page click on Application Type -> Application for Rectification Of Order) ->(NEW APPLICATION).

Step: 5 In the New Application page, fill in the marked box and keep the status in Draft.

Note: The current application status will be displayed as the draft as shown above, till the application gets completed.
Step: 6 Select the Original Order Number among the options in the drop-down menu.

Step: 7 Once the option is selected, the Original Order Issue Date and Tax period will get auto-populated.

Step: 8 Enter the reason in Grounds for Rectification field for filling this application.
Step: 9 Upload the documents by clicking the Choose File, along with this application.
Step: 10 In the verification page, confirm the accuracy of the details specified. Enter the name and place of the authorized signatory. Select the declaration check-box and fill up the Designation/Status and Date(current date).

Step: 11 Click PREVIEW, download the application and review it.
Step:12 In the Submit Application page, click SUBMIT WITH DSC or SUBMIT WITH EVC.

Step: 13 In the Acknowledgement Page, an ARN gets generated. Download the filed application by the hyperlink Click Here

Note: The following action takes place after filing an application in the GST portal.
- The application status gets updated to “Pending for action by Tax Officer.”
- After filing an application successfully, an ARN gets generated. An intimation of the same will be sent to the registered mail id and mobile.
- The ARN can be viewed and tracked by navigating to Dashboard—> Services—>User Services—>My Applications—>Case Details—>Applications.
Notice and View the Issue Order and open the related Case Details screen.
The following steps are performed to view the issue order and notice the related rectification of order.
Step: 1 Click on the link www.gdt.gov.in —> GST home page.
Step: 2 Login to the portal with the valid credentials.
Step: 3 Click on Dashboard—>Services—>User Service—>View Additional Notices/Orders.

Step: 4 In the Additional Notices and Orders page, search the orders to be viewed. If there is a mistake, apply for the Order of Rectification by clicking on the View button. The hyperlink redirects the user to Case Details page.

Step: 5 In the Case Details page, one can initiate proceedings of action which is related to rectification of order u/s 161. by using the tab APPLICATION, NOTICES, REPLIES, ORDERS.

Note: The APPLICATION tab gets selected by default.
Open the Case Detail Screen and Search Application for Order Of Rectification .
The step-by-step procedure for this provision is described below:
Step: 1 Click on the link www.gst.gov.in.
Step: 2 Login to the portal with the valid credentials.
Step: 3 Click on Dashboard—>Services—>User Services—>My Applications.

Step: 4 In My Application page, click on the Application Type drop-down menu—> Select Application for rectification of order)—>fill up From date and To Date click–>SEARCH.

Step: 5 After searching for the desired application, Click into the ARN hyperlink to open and view the same.

Step: 6 In the Case Details using the tab, one can initiate proceedings of action which is related to the Order of Rectification X u/s 161 by using the tabs APPLICATION, NOTICES, REPLIES, ORDERS.
Select APPLICATION tab to take Action on Case Details and Viewing of Filed Application.
To view the created case detail application, perform the following steps:
Step: 1 In the Case Details page, click on APPLICATIONS. This will assist the user to view the application in PDF.

Step: 2 To view the application in PDF, click on to View.

View the Issued NOTICE of the Application in the Case Detail Screen.
Step: 1 Go to the Case Detail option for any particular application. Select NOTICES. The adjudication authorities will then issue and display all the notices as shown below.

Step: 2 In the attachment section(bottom right), look for the document name and click on it to download the application for reference.
Viewing or Adding Replies to the Particular Issue
Step: 1 In the Case Details page, select REPLIES, upon which it displays the file against the notice issued by the authority. Click on ADD REPLY—>Additional Information.

Step: 2 Click the REPLIES option. In the Additional Information Page, enter all the necessary details in the field provided. Click Back to go to the previous page.

- Choose whether or not a personal hearing is required by clicking on Yes or No on the pertinent option
- Enter the details of the issued notice in the field Reply.
- To upload the document, click on the option Choose File
- Enter Verification details and select the check-box for declaration. Select authorised signatory name. Select the field which is necessary like Designation/Status and Date. In the application, enter the name of the authorized signatory and the place of signing it.

- To download and review the application click on “PREVIEW”

Step: 3 Submit the application by clicking on the ISSUE WITH DSC/ISSUE WITH EVC in the Submit Application page.

Step: 4 In Notices and Order page, a reference number gets generated. Download the file by clicking into the hyperlink “Click here” —> click Ok.

Step: 5 Click the REPLIES tab to update the essential fields, which are “Reply Furnished, Pending for Rectification Order”, found under the Status tag. The attachment can be downloaded by clicking on the document.

Note: Once the reply is successful the message will be sent to the concerned person through mail and SMS.
Issued Order of the application can get viewed in the case details by using ORDERS tab.
Step: 1 In the Case Details page, click on to the option ORDERS. All the attached documents along with the issued order will be stored in PDF.

Step: 2 Under the Attachments option, click on the documents to download the same.