Karthiga
Expert
Published on: Apr 20, 2026
Noc - No Objection Certificate
RTO No objection Certificate (NOC) is an official document issued by the local Regional Transport Office (RTO) to allow re-registration of the vehicle with another RTO in a different state. Also, it is a document certifying that there are no pending dues of tax on the concerned vehicle. In this article, we look at the procedure for obtaining No Objection Certificate (NOC) in detail. Also, read about Driving Licence Address ChangePurpose of Obtaining NOC
As per the Motor Vehicle Act, the owner of a vehicle must obtain NOC if he or she desires to remove or sell his/her vehicle to the other state. However, an application for change of address and registration needs a NOC from the local RTO where you got your vehicle registered.Service Charge
The prescribed fee of Rs.50/- for all class of vehicle will be charged in the issuance of NOC.Documents Required
The following are the documents to be furnished along with the application form:- Copy of Police certificate from NCRB
- Copy of Registration certificate
- Copy of Insurance certificate
- Valid tax details
Offline Application Procedure for NOC
The No Objection Certificate (NOC) can be obtained using the form no. 28 that the applicant needs to fill with the required details and submit at the Regional Transport Office (RTO) along with the documents required to issue NOC. Once the application form is submitted will be checked by the concerned authority of the RTO in order to obtain the report of the vehicle from the police authority to verify that the vehicle is involved under any criminal case or stolen. On verification, if there is no DSA cases pending or outstanding dues against the vehicle, then the receipt of clearance can be obtained, and No Objection Certificate (NOC) is issued. Note: The application form for the No Objection Certificate (NOC) is given below in the pdf format.Online Application Procedure for NOC
To obtain NOC from the RTO, follow the procedure which is mentioned below: Step 1: The applicant needs to access the official portal of Ministry of Road Transport & Highways. Step 2: Select the state from the list of states as given below.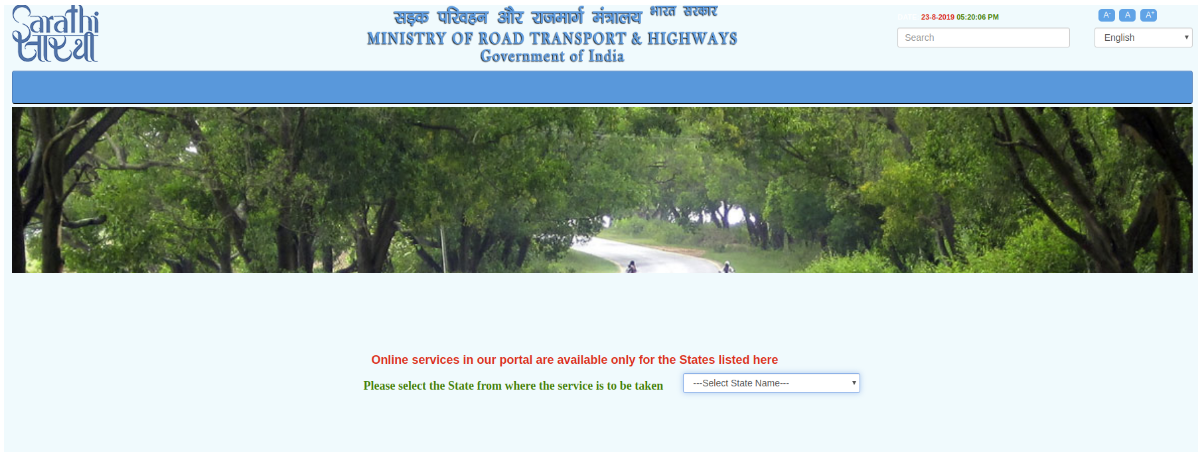 No Objection Certificate (NOC) - Image 1
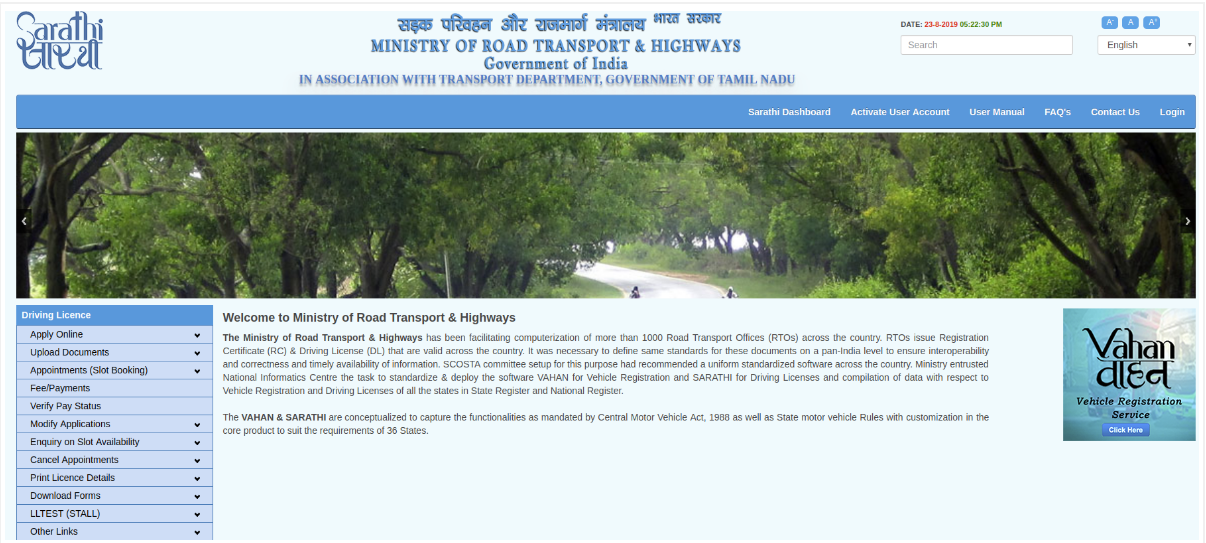
Step 3: Click on "Apply Online" and select "Services on Driving Licence" to apply for NOC.
No Objection Certificate (NOC) - Image 1
Step 3: Click on "Apply Online" and select "Services on Driving Licence" to apply for NOC.
 No Objection Certificate (NOC) - Image 2
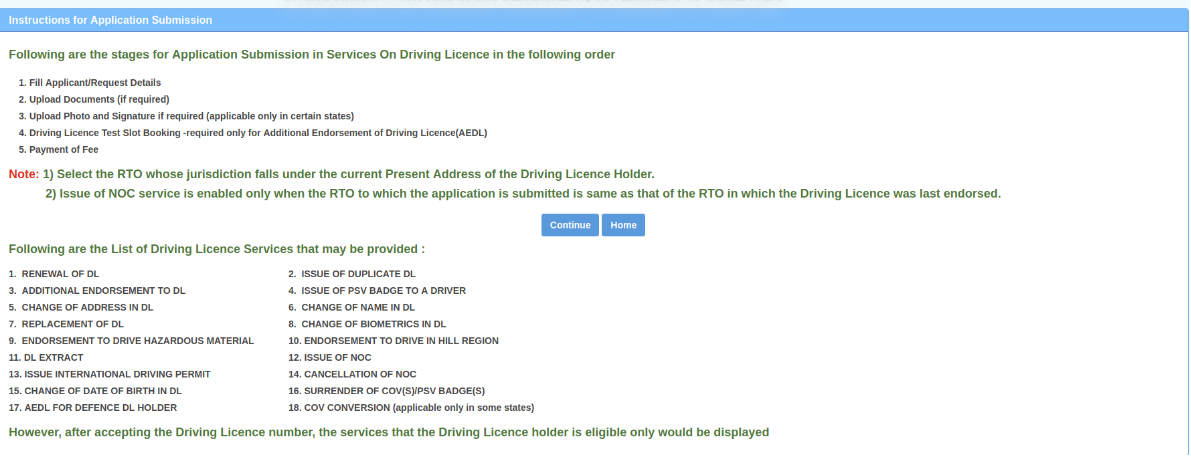
Step 4: Now, read the following instructions carefully and click on the "Continue" button to move further.
No Objection Certificate (NOC) - Image 2
Step 4: Now, read the following instructions carefully and click on the "Continue" button to move further.
 No Objection Certificate (NOC) - Image 3
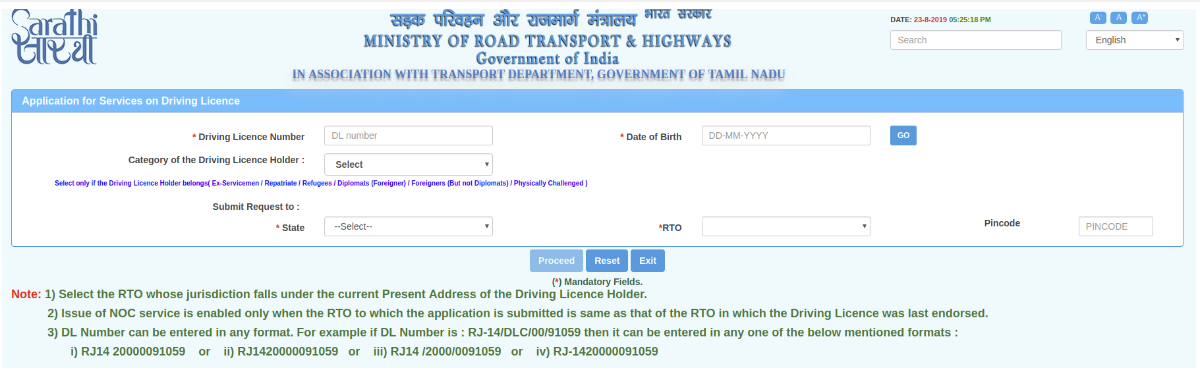
Step 5: Enter the details of the driving license, date of birth and click on the "Go" button.
No Objection Certificate (NOC) - Image 3
Step 5: Enter the details of the driving license, date of birth and click on the "Go" button.
 No Objection Certificate (NOC) - Image 4
Step 6: The applicant name with other details are displayed and then select the respective state and RTO and click on the "Proceed" button.
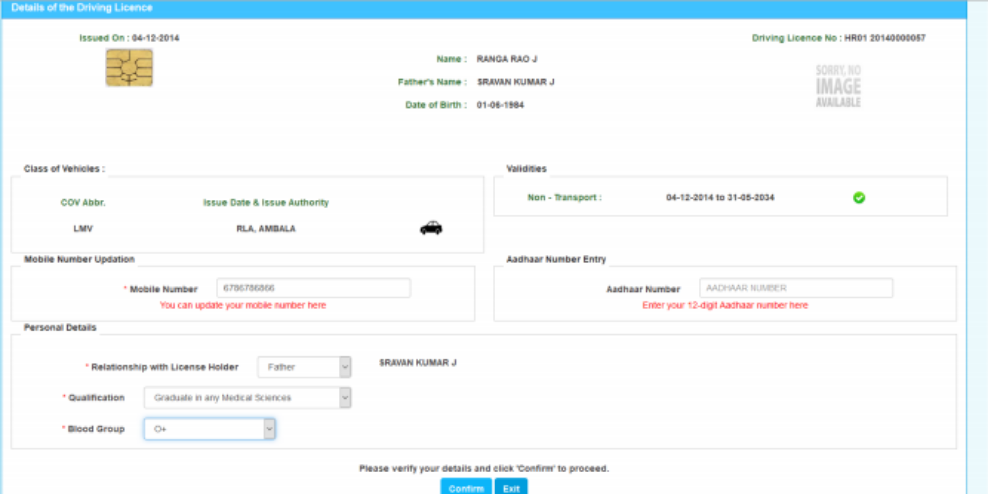
Step 7: On the next page, details of the driving license is displayed to verify the details shown and click on the "Confirm" button to proceed.
No Objection Certificate (NOC) - Image 4
Step 6: The applicant name with other details are displayed and then select the respective state and RTO and click on the "Proceed" button.
Step 7: On the next page, details of the driving license is displayed to verify the details shown and click on the "Confirm" button to proceed.
 No Objection Certificate (NOC) - Image 5
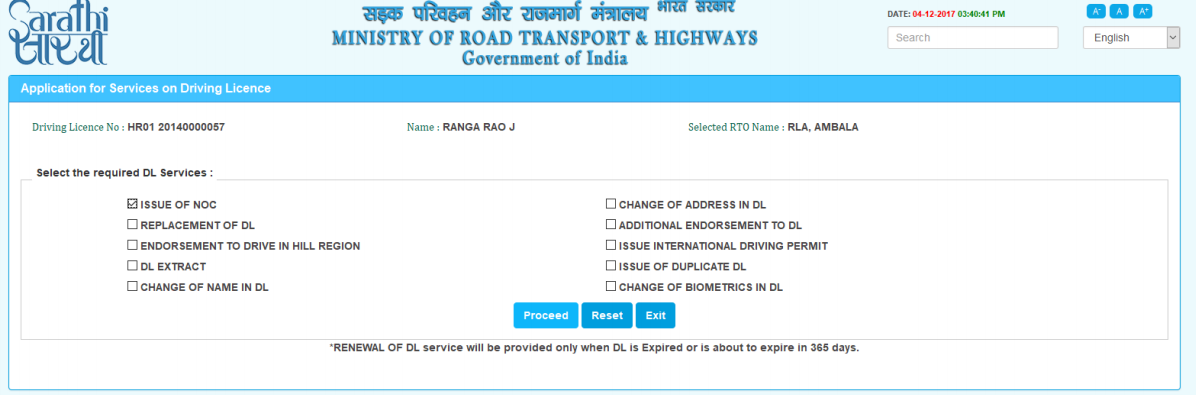
Step 8: Issue of NOC page is displayed, select the required service and click on the "Proceed" button, then data accepted successfully message will be shown.
No Objection Certificate (NOC) - Image 5
Step 8: Issue of NOC page is displayed, select the required service and click on the "Proceed" button, then data accepted successfully message will be shown.
 No Objection Certificate (NOC) - Image 6
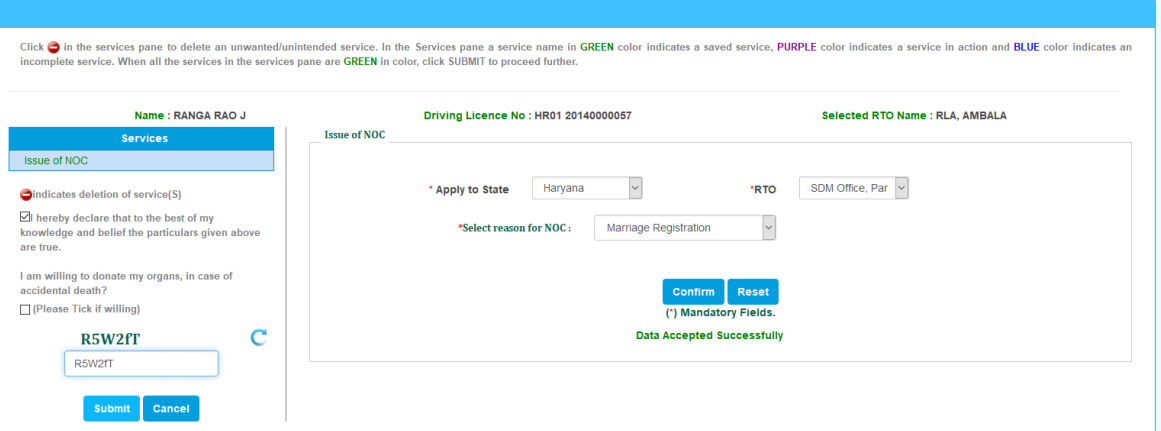
Step 9: Enter the captcha as same and click on the "Submit" button.
No Objection Certificate (NOC) - Image 6
Step 9: Enter the captcha as same and click on the "Submit" button.
 No Objection Certificate (NOC) - Image 7
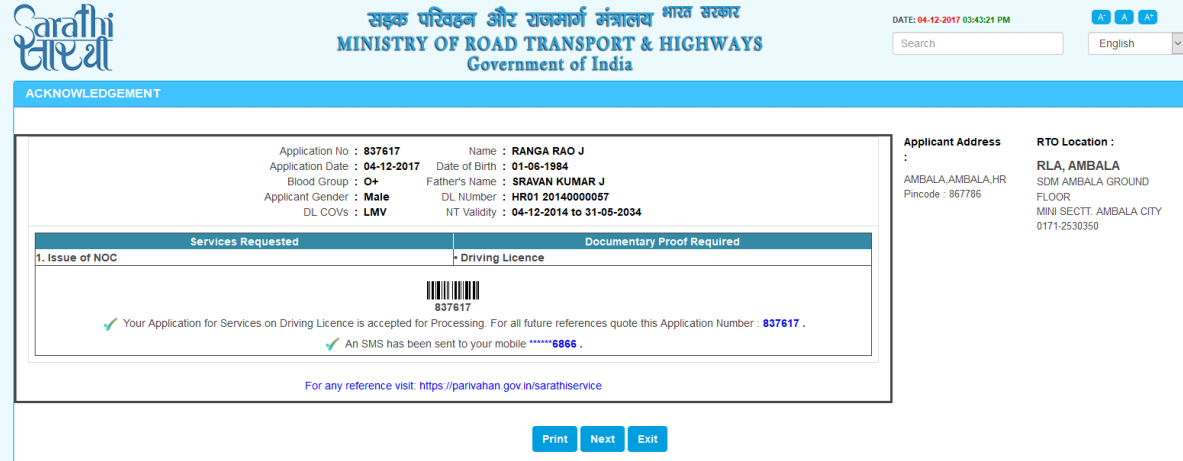
Step 10: The acknowledgement form will be created with the applicant details and the service requested and clicked on the "Proceed" button.
No Objection Certificate (NOC) - Image 7
Step 10: The acknowledgement form will be created with the applicant details and the service requested and clicked on the "Proceed" button.
 No Objection Certificate (NOC) - Image 8
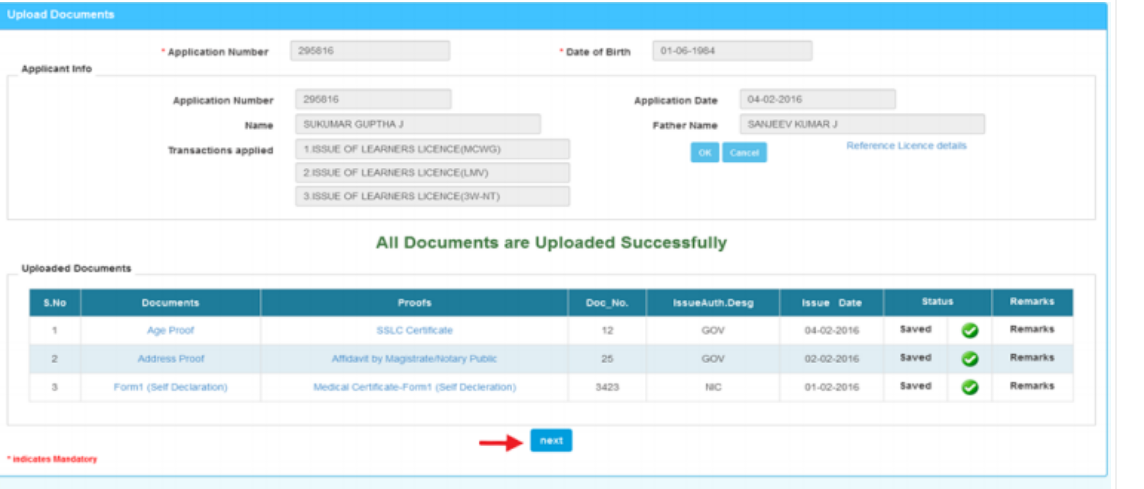
Upload Documents
Step 11: To upload the documents required, click on the "Upload Documents" button and press "Next" button.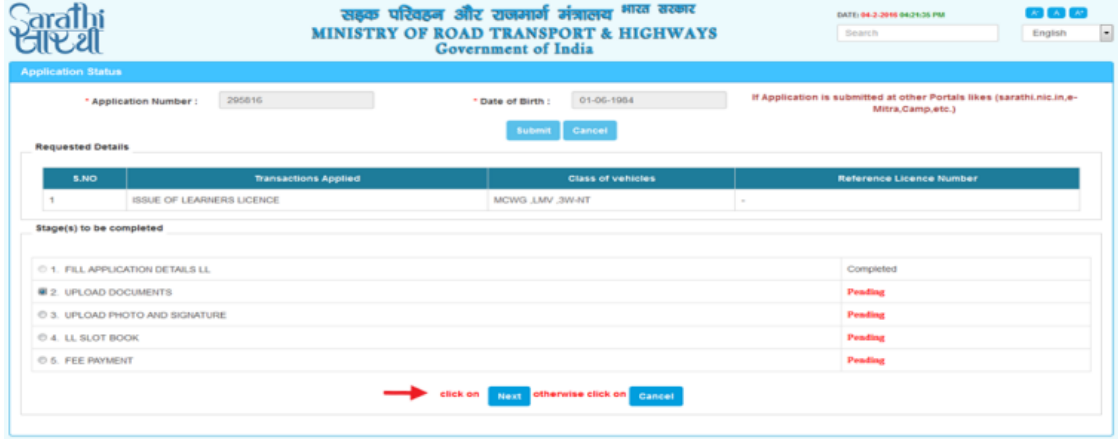 No Objection Certificate (NOC) - Image 9
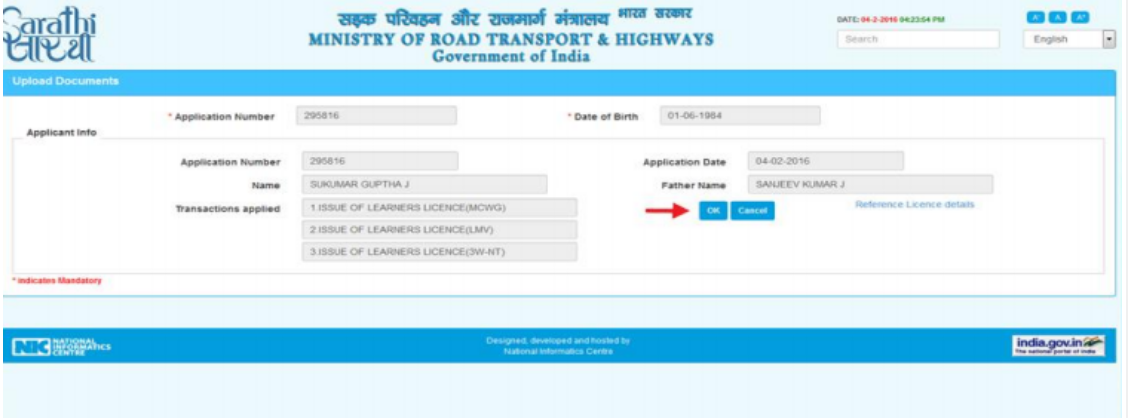
Step 12: To continue with uploading the documents click on the "Ok" button.
No Objection Certificate (NOC) - Image 9
Step 12: To continue with uploading the documents click on the "Ok" button.
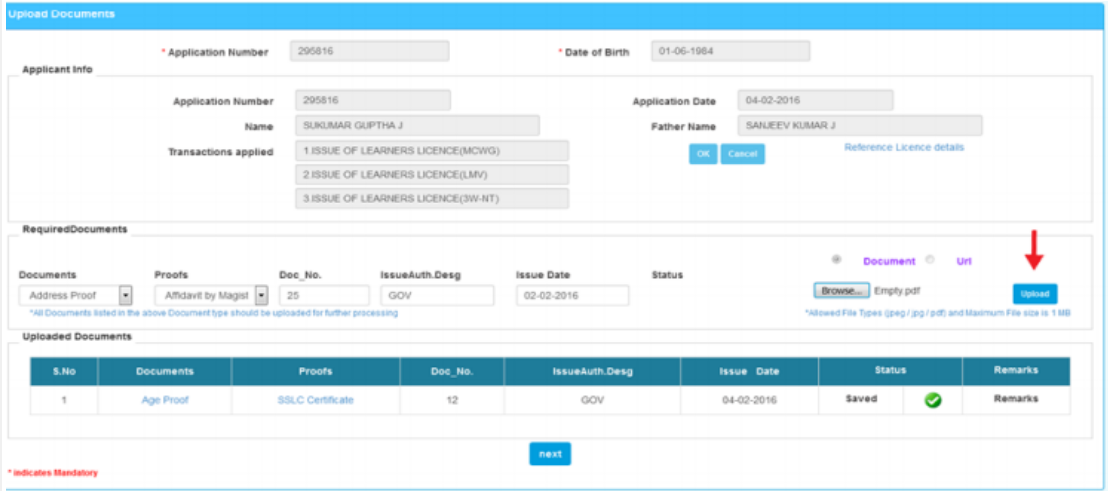
 No Objection Certificate (NOC) - Image 10
Step 13: Select the respective address proof from the documents list, upload the same and click on the "Submit" button.
No Objection Certificate (NOC) - Image 10
Step 13: Select the respective address proof from the documents list, upload the same and click on the "Submit" button.
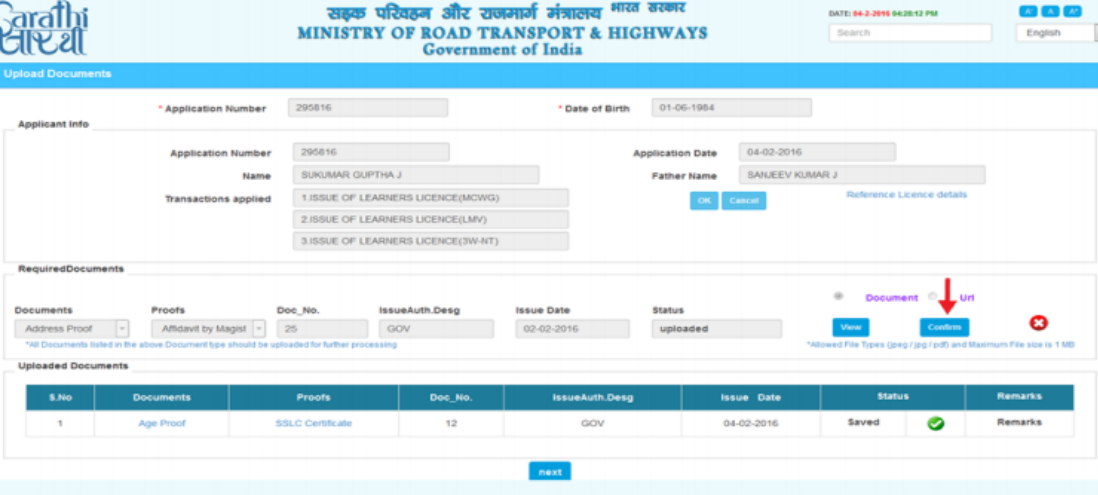
 No Objection Certificate (NOC) - Image 11
Step 14: On the next level, select the age proof from the documents listed, upload the same and click on the "Confirm" button.
No Objection Certificate (NOC) - Image 11
Step 14: On the next level, select the age proof from the documents listed, upload the same and click on the "Confirm" button.
 No Objection Certificate (NOC) - Image 12
Step 15: Select the "Form-1" for uploading and click on the "Upload" button to confirm. Click on the "Next" button to proceed.
No Objection Certificate (NOC) - Image 12
Step 15: Select the "Form-1" for uploading and click on the "Upload" button to confirm. Click on the "Next" button to proceed.
 No Objection Certificate (NOC) - Image 13
Upload Photo and Signature
Step 16: Under this step, click on "Upload Photo and Signature" button to upload the photo and signature and click on the "Next" button.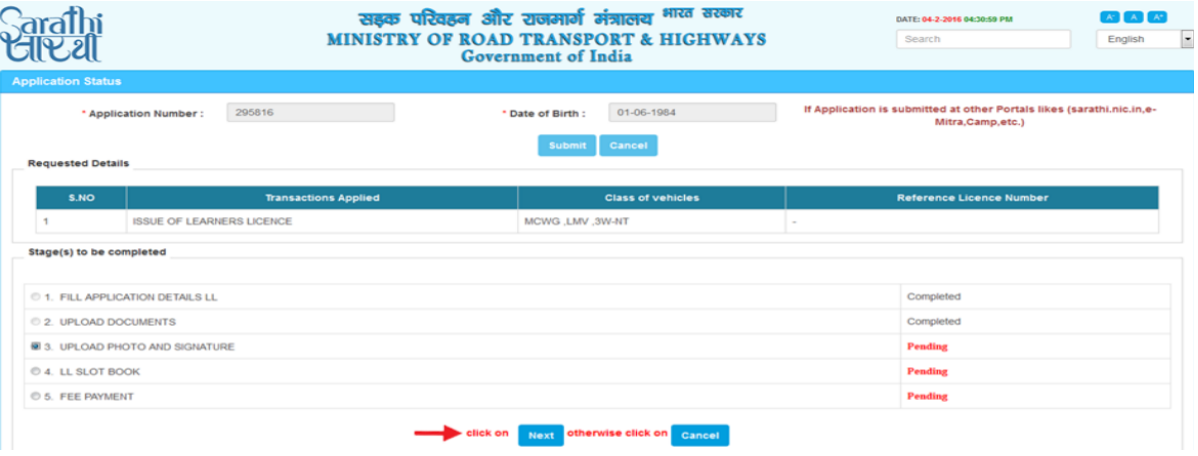 No Objection Certificate (NOC) - Image 14
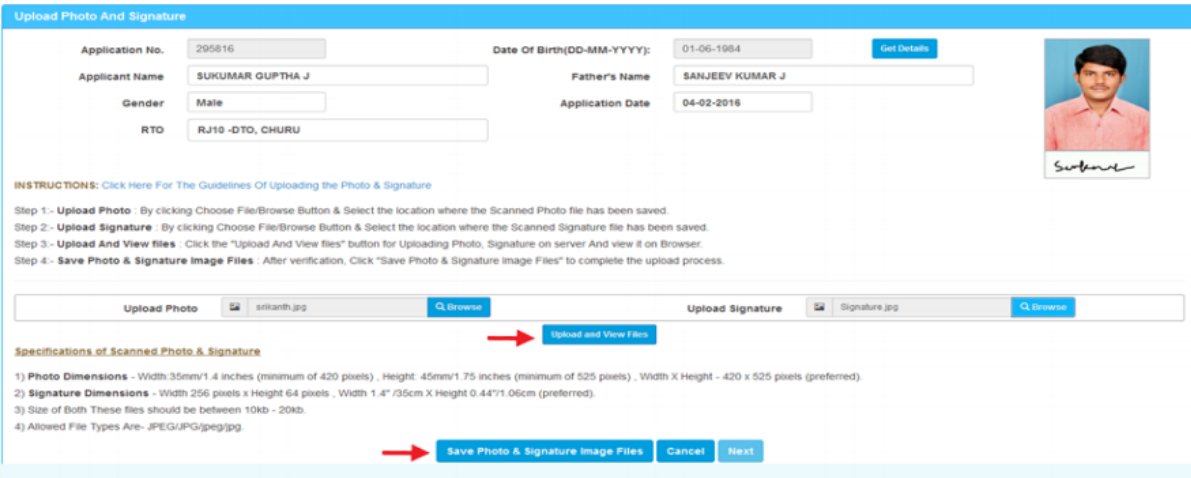
Step 17: Read the below-listed instructions carefully for the size of the photo and signature and click on "Upload and View files" button.
No Objection Certificate (NOC) - Image 14
Step 17: Read the below-listed instructions carefully for the size of the photo and signature and click on "Upload and View files" button.
 No Objection Certificate (NOC) - Image 15
Step 18: On uploading the "Photo and signature" successfully, the message will be displayed and then click on the "Next" button.
No Objection Certificate (NOC) - Image 15
Step 18: On uploading the "Photo and signature" successfully, the message will be displayed and then click on the "Next" button.
 No Objection Certificate (NOC) - Image 16
Payment of Fee
Step 19: Select the "Fee Payment" and click on "Next" button to pay the prescribed fee.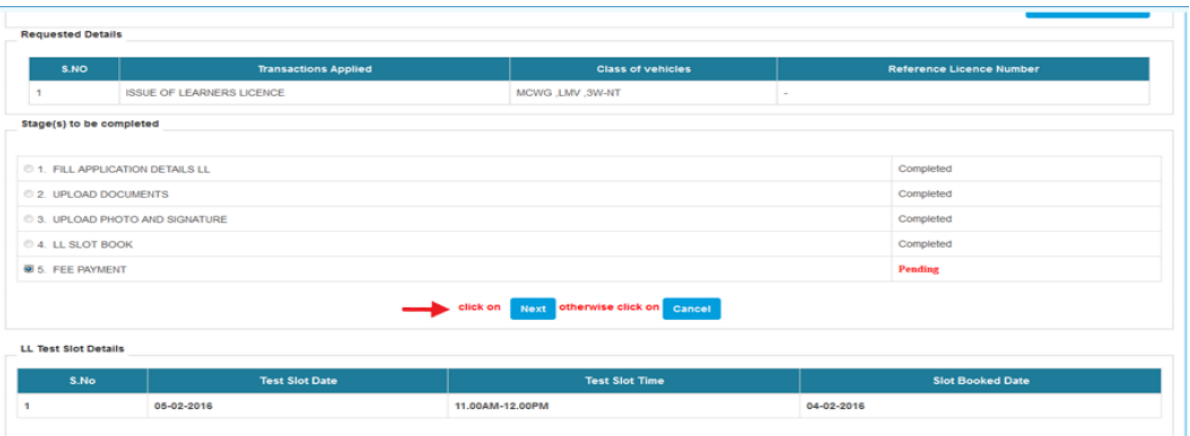 No Objection Certificate (NOC) - Image 17
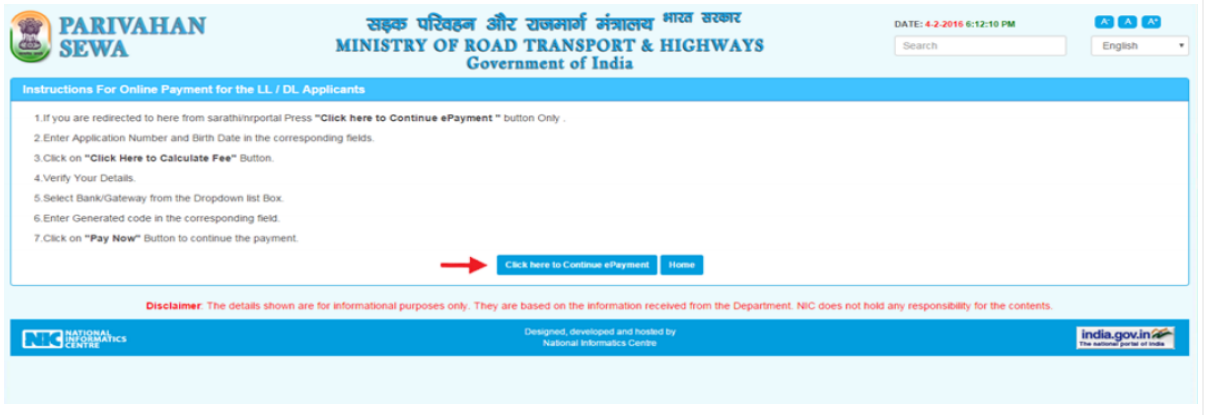
Step 20: Now, read the below-listed instructed carefully and "click here to continue e-payment" for the continuation of the payment process.
No Objection Certificate (NOC) - Image 17
Step 20: Now, read the below-listed instructed carefully and "click here to continue e-payment" for the continuation of the payment process.
 No Objection Certificate (NOC) - Image 18
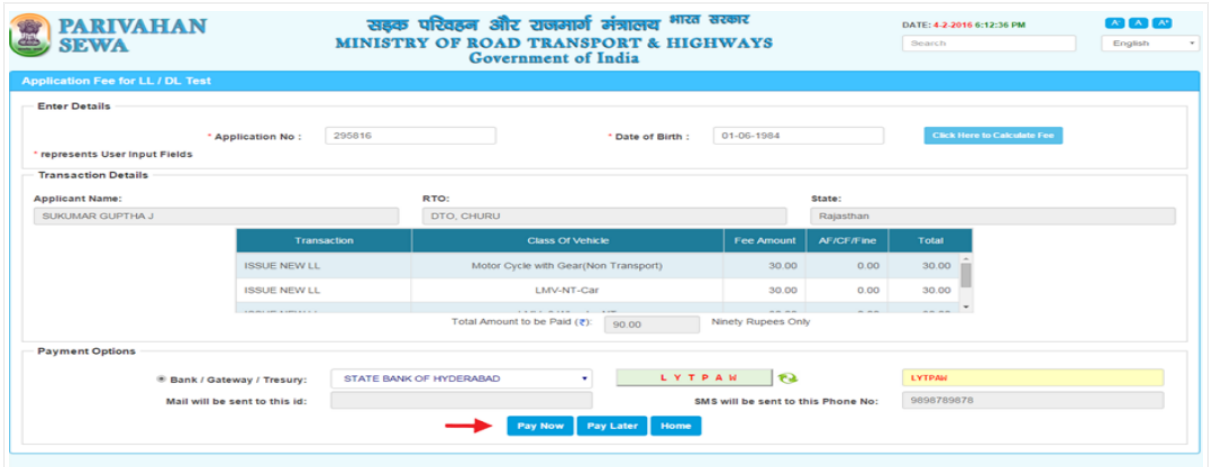
Step 21: Calculate the fee in the application fee window and select the bank or gateway by providing captcha.
No Objection Certificate (NOC) - Image 18
Step 21: Calculate the fee in the application fee window and select the bank or gateway by providing captcha.
 No Objection Certificate (NOC) - Image 19
Step 22: Click on "Pay Now" for continuing the payment process.
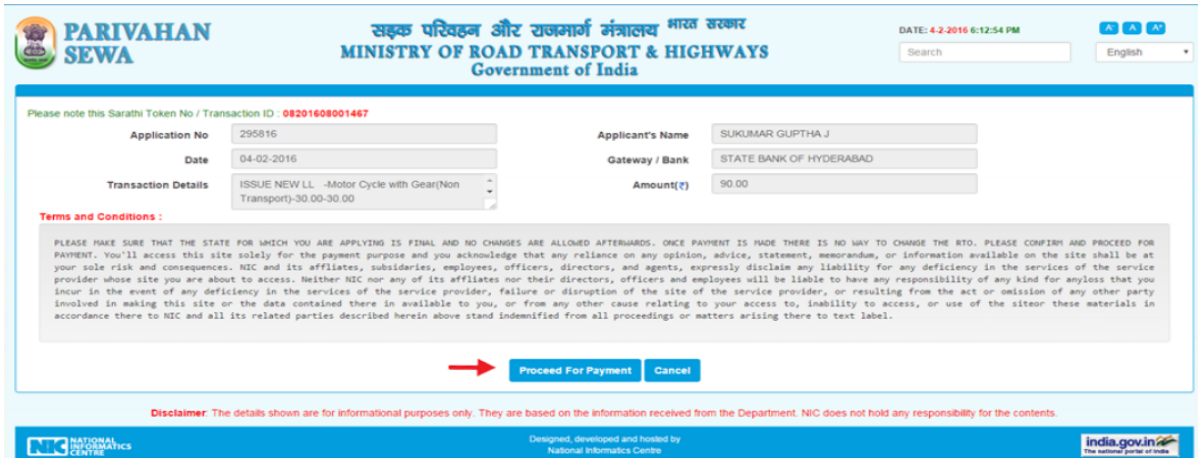
Step 23: On the next screen/page, verify all the details and click on "Proceed for payment" for the continuation of the payment process.
No Objection Certificate (NOC) - Image 19
Step 22: Click on "Pay Now" for continuing the payment process.
Step 23: On the next screen/page, verify all the details and click on "Proceed for payment" for the continuation of the payment process.
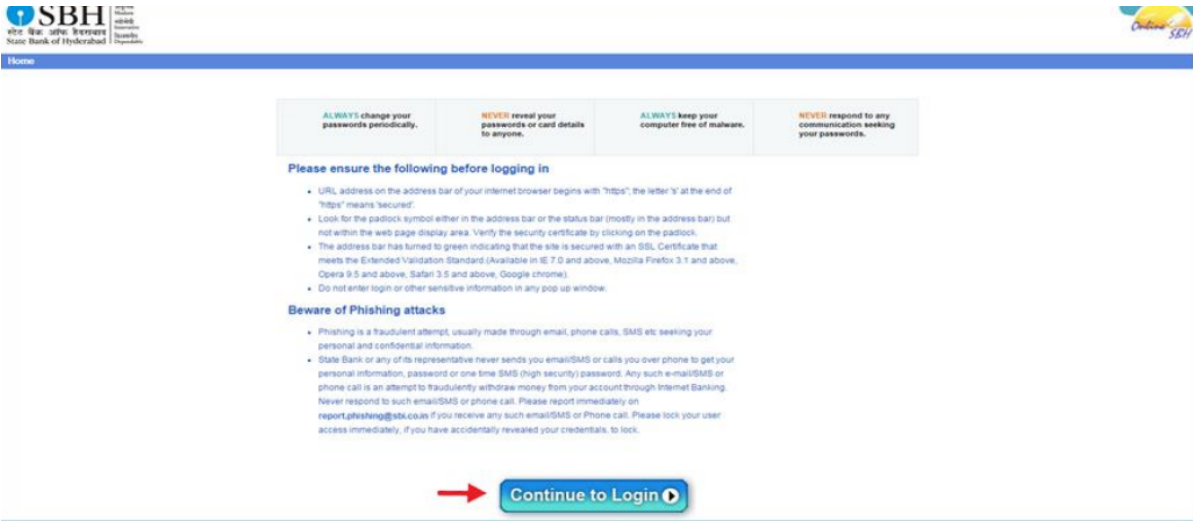
 No Objection Certificate (NOC) - Image 20
Step 24: Click on the "Continue" button to log in to the bank gateway for the continuation of the payment process.
No Objection Certificate (NOC) - Image 20
Step 24: Click on the "Continue" button to log in to the bank gateway for the continuation of the payment process.
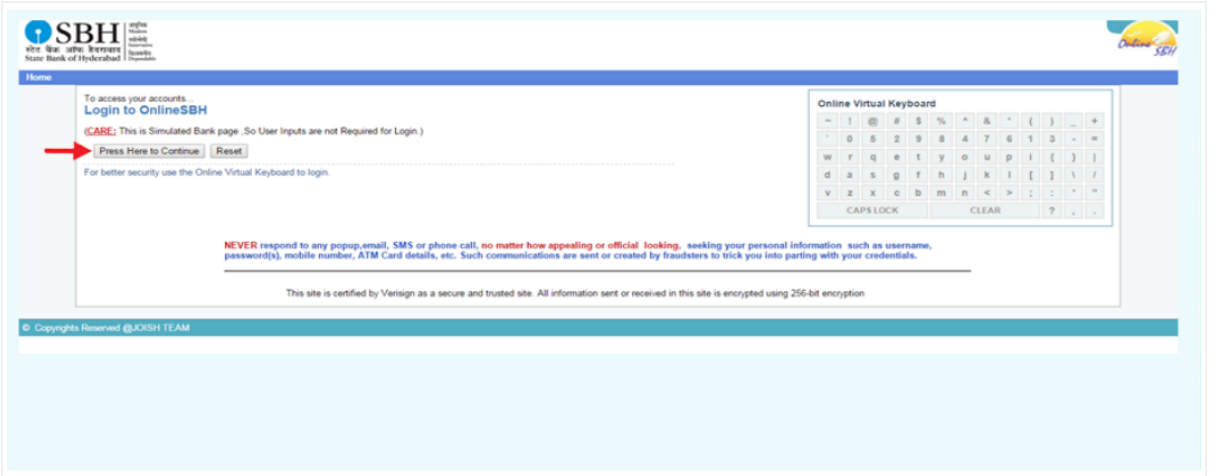
 No Objection Certificate (NOC) - Image 21
Step 25: On successful payment, the acknowledgement message for payment successful will be displayed.
No Objection Certificate (NOC) - Image 21
Step 25: On successful payment, the acknowledgement message for payment successful will be displayed.
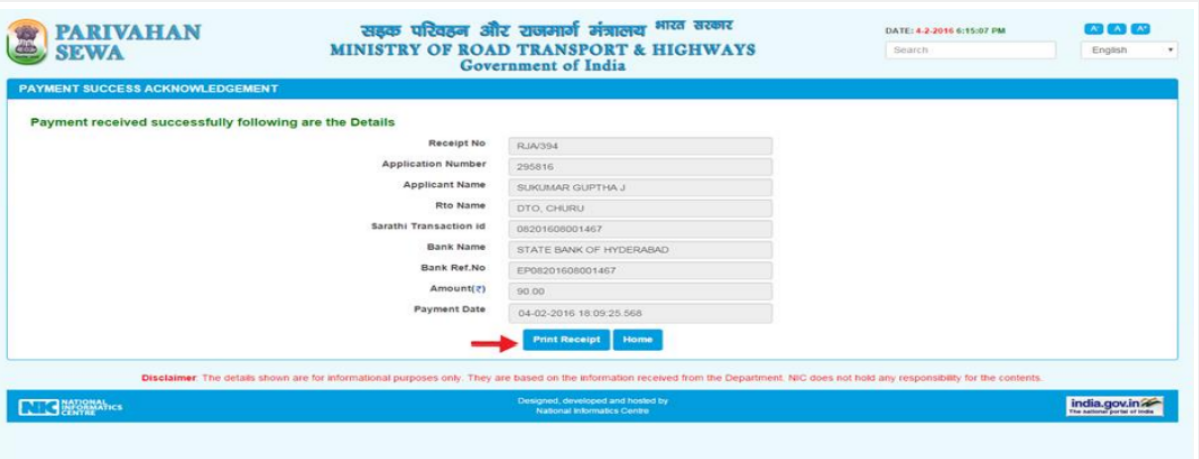
 No Objection Certificate (NOC) - Image 22
Step 26: Click on the "Print Receipt" button to generate payment receipt, and then the payment receipt will be generated and verify the details given in the payment receipt.
No Objection Certificate (NOC) - Image 22
Step 26: Click on the "Print Receipt" button to generate payment receipt, and then the payment receipt will be generated and verify the details given in the payment receipt.
 No Objection Certificate (NOC) - Image 23
Step 27: On approval of your application, the No Objection Certificate (NOC) will be provided in thirty days from the day of receipt application.
No Objection Certificate (NOC) - Image 23
Step 27: On approval of your application, the No Objection Certificate (NOC) will be provided in thirty days from the day of receipt application.